In this article, I’m going to show you how to graphically login as root in Ubuntu. This is a generally considered a terrible idea and you should not do this. In fact, if you have a good reason for doing this, please leave a comment letting us know what that reason is. Thanks!
A couple of days ago, I told you how to enable root in Ubuntu. In that article, I explained why enabling login as root was a bad idea and unnecessary for most people. I still told you how to do it, just as I’ll tell you how to graphically login as root in Ubuntu and maybe some of the official Ubuntu flavors.
I should remind folks that this is a terrible idea from a security perspective – especially if you don’t have good physical security. However, if you don’t have good physical security then your computer is already easily compromised by anyone with a live USB in their pocket.
NOTE: This is only sure to work for Ubuntu. It looks like it should work from 18.04 to at least 20.10, and will probably continue to work until Ubuntu moves on from GDM3. (GDM3 is Gnome Display Manager 3, a drop-in replacement for GDM.) This may work for other Ubuntu flavors, I haven’t tested. If you do test or know, please leave a comment below. Thanks!
Anyhow, on with the explaining how to graphically login as root. This shouldn’t take too long!
The first step is to set up the system so that you can login as root. To do that, you should read this article and learn how to enable root login for Ubuntu. Be sure to read the warnings on that page and think carefully before doing this to your own computer.
After enabling root login, the next step is to open your default terminal. You can do that by pressing CTRL + ALT + T.
Now, let’s temporarily make you a superuser. You can do that with:
sudo su
Our next step is to tell the aforementioned GDM3 to let us use the root login.
nano /etc/gdm3/custom.conf
You’re going to arrow down to just below the automatic login configuration text and enter this line:
AllowRoot=true
Then, you’ll save the changes by pressing CTRL + X, then Y, and then ENTER. See? Now you’ve edited and saved a file in the terminal with nano. It gets easier the more often you do it!
Your next step is going to be telling PAM (Pluggable Authentication Modules) that logging in as root is okay. That’s pretty easy, and we’ll do it with nano just like above.
nano /etc/pam.d/gdm-password
Scroll down and look for this line:
auth required pam_succeed_if.so user != root quiet_success
What you’re going to do is ‘comment it out’, by adding the # symbol which means, in this case, ‘ignore this line’. Change that line so that it looks like this:
#auth required pam_succeed_if.so user != root quiet_success
Now, save it just like you did above. (Press CTRL + X, then Y, and then ENTER.) As you’re still using ‘sudo su’, you can get out of that mode by simply typing:
exit
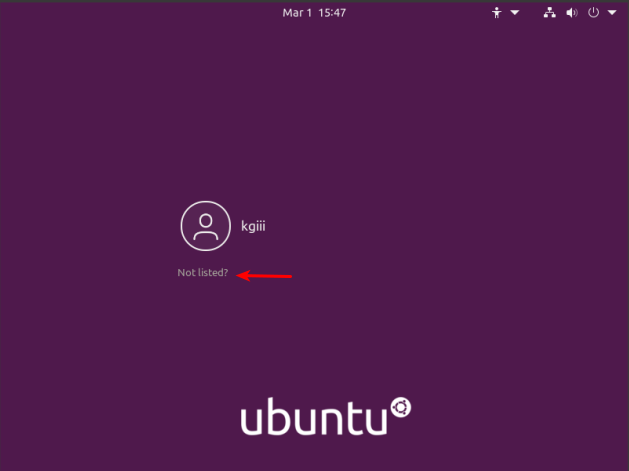
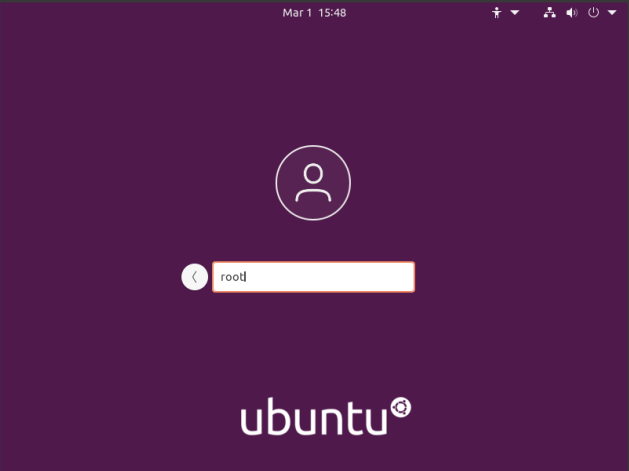
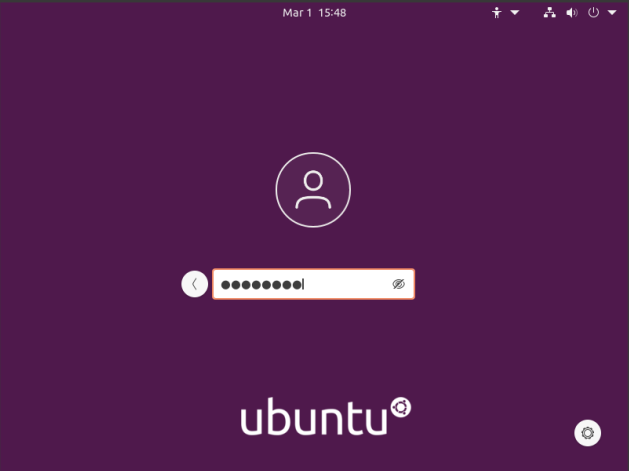
That’s it, actually! When you next reboot or logout, you can login as root. To do so, you need to click on ‘Not Listed’, type in ‘root’, and then enter your password. It should look pretty much like the following images:
Tada! You’ll be logged in as root for no good reason and with almost no benefits! Congratulations! Now, undo it and go back to being a bit more secure. Or not… I don’t mind. It’s your computer. You do what you want!
Please just don’t let your box get owned and turned into something malicious like a spam bot or a node in bot network used to do things like DDoS sites for money. Don’t let your computer make you a bad netizen.
Closure:
And there you have it! You can now login as root in the GUI and use Ubuntu as root. This is, of course, a terrible idea – but you can do it. If you’re ever in a position where this seems like the best solution, be sure to ask around to see if there are better ways to accomplish your goals. If you can login as root, so can’t someone else! Either way, it’s another article in the books!
Thanks for reading! If you want to help, or if the site has helped you, you can donate, register to help, write an article, or buy inexpensive hosting to start your own site. If you scroll down, you can sign up for the newsletter, vote for the article, and comment.
There are many tools for showing your hardware information and today we'll get to view…
Today's article isn't going to be complicated or long as we are going to cover…
We've had a run of Python packages recently and you can tell that I'm a…
The title is the best I can come up with to describe this exercise as…
It was suggested that I write an article about journalctl, which seemed like a large…
Today we will have a fairly simple exercise as we're going to just use a…
View Comments
You said "In fact, if you have a good reason for doing this, please leave a comment letting us know what that reason is."
The reason is simple. I'm normally a Windows user, I can just do stuff. Whenever I want, on my own computer. If I want to edit a configuration file for some program, I can do it if I'm root, in a GUI text editor like mousepad. No typing bloody sudo commands all the time. And I get to see all the files. Nothing hidden from myself, the only owner of the computer.
Thanks for commenting and yup, you can do that. It's great that you can.
I just use sudo, personally. Though I do cheat. I have a complex password and I don't like typing it all the time. So, once logged in, you can use sudo in the terminal without a password.
https://linux-tips.us/how-to-use-sudo-without-a-password/
I'm a big fan of 'whatever works for you'. If that works for you, then you should do it.
Thanks for stopping by.