Today’s article is about the ‘tail’ command, seeing as the last article was about the ‘head‘ command. The tail command is the head companion’s counterpart. It only makes sense to cover one after covering the other, so today’s article will do just that.
Like the head command, the tail command has been with us for a long time, since pretty much the earliest days of Unix. Where head shows you the first lines in a file, the tail command shows you the lines from the end of the file. The man page describes tail as:
tail – output the last part of files
The tail command is pretty handy, often used by sysadmins to monitor log files. It can also be used like the head command to quickly check the contents of a text file, but it shows the material at the end of the file and not at the start of the file. That’s useful for remembering where you left off, for example. Anyhow, there are all sorts of ways to use it and this article will explain some of them.
Getting Started With The ‘tail’ Command:
I don’t think it’s all that important for this article (I’m not sure, I haven’t written it yet!), but we can start on the same page like we did with the head command.
We’ll need to get started with the terminal open. You can do open your terminal with your keyboard – just press
Once you get the terminal open, you can run the following two commands. Be sure to press the enter button after each of them and it will download a handy text file (just some random numbers) so that we’re all working on the same file.
1 2 | cd Downloads wget https://linux-tips.us/files/rnd-num.txt |
With that complete, we can head on into the main article! It shouldn’t be all that long or difficult.
The ‘tail’ command:
Seeing as you’ve already got the rnd-num.txt file downloaded and your terminal is already open, I think we can just jump into using the tail command. If you just want to view last 10 lines of a file, you can use this command:
1 | tail rnd-num.txt |
On the other hand, you can use the -n flag to show a specific number of lines. If you only wanted to see the bottom 5 lines, you’d use this command:
1 | tail -n 5 rnd-num.txt |
Assuming you’re all playing the home game, and just to show a good example, the output from the final command would look similar to this:

Along the same lines, but not necessarily as useful, is the -c command. It works the same way it does in the head command, namely showing the specified number of bytes. If you wanted to see the final 5 bytes, the command would look like:
1 | tail -c 5 rnd-num.txt |
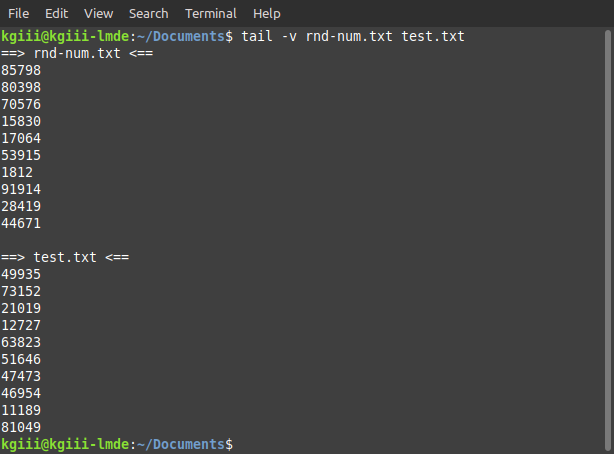
You can also use tail on more than one file at a time. If you do so, you can also use the -v flag and it will helpfully show the names of the files. The command would look a little like this:
1 | tail -v rnd-num.txt test.txt |
The output would look similar to this:

One of the command options available with tail isn’t available with head. That flag is the -f mostly used for logs. What happens is you use the -f flag and then tail keeps running, outputting new lines to your terminal as the occur. In that case, it’d be something like:
1 | tail -f <log> |
That should show the last 10 lines of the log file and then update when new lines are added to the log file you’ve opened. Use man tail for more usage information.
Closure:
And that’s it! There’s another article for the site and another article closer to reaching the project’s goals. This article covers the tail command, seeing as the head command was covered in the last article. Feel free to leave a comment sharing how you use the tail command, or maybe even just a comment or question to motivate me.
Thanks for reading! If you want to help, or if the site has helped you, you can donate, register to help, write an article, or buy inexpensive hosting to start your own site. If you scroll down, you can sign up for the newsletter, vote for the article, and comment.