How To: Crack A PDF Password

I don’t know how handy today’s article is going to be in reality but it’s sort of possible to crack a PDF password. Once you read the article, you’ll see why I said “sort of possible”. The odds of success will vary greatly.

Everybody knows what a PDF file is. It’s a Portable Document Format. This is actually a standard (ISO 32000). You don’t need Adobe products to create, edit, or read PDF-formatted documents. Odds are good that your distro comes with tools for manipulating PDF documents.

It’s possible to password-protect a PDF document. You can have an owner’s password (allowing editing) or you can have a user’s password (allowing you to read the document). This may be something you’ve encountered in the past.

Well, like all things password-protected, it’s possible to crack the password.

What do I mean by crack? I mean it will reveal the password to you in plain text. This will allow you to access the document in one form or another, depending on which password you crack.

This is gonna take some time…

Also, I’ll assume you’re using something based on Debian because I’ve not tested this with other distros. I’ve only tested this on my systems.

The tool we’ll be using is a ‘brute-force’ password cracker. That means it starts from the letter a and works its way up, adding new letters after the rest of the letters have been tried. So, you’ll see aa, ab, ac, ad, and progression along those lines. You can immediately see why this is going to take a while.

The tool we’ll be using is helpfully called ‘pdfcrack’.

pdfcrack:

This pdfcrack is a terminal-based PDF password-cracking tool. You can use brute force or lists of words such as common passwords. You can also specify the character list, though the default is to just use the regular alphabet in both uppercase and lowercase formats.

The pdfcrack application is helpfully described as such:

pdfcrack – Password recovery tool for PDF-files

I’ll assume that you’re only trying to recover passwords on documents you should legally have access to. I assume that you won’t use this to access content that does not belong to you. That seems like a safe assumption!

As you can see, this is the correct tool if you want to crack a PDF password.

Crack A PDF Password:

As mentioned above, you’ll crack passwords in the terminal. That requires an open terminal, so we might as well install pdfcrack in the terminal. Just press CTRL + ALT + T and that will usually open up a terminal for you.

With your terminal now open, install pdfcrack:

With that installed, check the man page:

Download:

Example PDF File

Now, crack it…

As it’s a download, it’s probably in your ~/Downloads directory, but mine is stored in my ~/Documents directory because it’s a document. So, my example:

That uses a very simple password that should be cracked in a few seconds. On my older and slower computer, I was able to do more than 20,000 words per second. This short password should crack almost instantly.

Leave a comment telling me what the password is!

By default, pdfcrack will crack the user password. You can specify which password you wish to crack. Though the syntax is a little wonky. In this case, the syntax is as follows:

Which translates into the following…

For the owner:

For the user:

If you want to pause this, you can! 

To pause a running pdfcrack instance just press CTRL + C. This will save the progress as savedstate.sav. The program will automatically resume when you run the command again. Pretty neat!

There’s a lot you can do with this command. Let’s say you recall the password was between 8 and 12 characters and want to just search in that area.

You can also specify the character set. If you want to use uppercase, lowercase, and numbers you can do that. You just add them to the command with the -c flag, making sure to put them in quotes. That’d look like this:

You can specify a wordlist like so:

The format for that file appears to require one word per line and there are collections of common passwords you can download to help you crack a PDF password.

As you can imagine, and as you were warned near the start, this process can take a while. Assuming you have the right characters loaded and enough time, it’s certain to work eventually.

Go ahead and crack my example file above. That one won’t take you very long, even on a slow computer. It won’t be instantaneous, but it’ll be pretty quick.

If you want, you can also run a benchmark to see how fast your computer is. The command to do that is quite simply this:

I ran this on the slowest computer I use. I didn’t run it on anything faster because I don’t care that much. I’m sure you’ll do better on your computers, though you can share the results as a way to compare your rig with others.

Anyhow, my output was this:

Be sure to check out the man page. It’s a simple application but there are many options available for pdfcrack and you might as well learn about them now. You never know when you’ll find an old PDF document with a forgotten password. It can (and does) happen!

Also, be sure to check the pdfcrack project page.

Closure:

So, you might wonder why I’d include an article like this. After all, isn’t cracking passwords a potential legal mess? Isn’t it immoral to crack passwords? Is it even legal to crack passwords?

The answer is simple enough. It’s a tool you can use to recover your lost passwords. You can use this tool to access things that you shouldn’t be accessing, just like you can use a screwdriver to poke things you shouldn’t be poking. I’m just giving information.

I am also not a lawyer. I permit you to crack the password of the included file. For other files, don’t do anything illegal in your jurisdiction. If it’s a crime, don’t do it. I’m decidedly not your lawyer. If you think this requires asking a lawyer, go ahead and do so.

That and it’s not a great secret. If you’re relying on a password to protect PDF files from anyone serious, you’re probably doing your security wrong. It’s well known that this is possible and that the tools are easily installed. PDF passwords aren’t very good for security, though you can make complicated passwords.

The distro you’re using may very well have pdfcrack available, even if it isn’t one of the Debian-based distros. Just search and you can find it. With some work, you can even mostly install it with PIP. Just click the link above to the project page for more information about that.

As always…

Thanks for reading! If you want to help, or if the site has helped you, you can donate, register to help, write an article, or buy inexpensive hosting to start your site. If you scroll down, you can sign up for the newsletter, vote for the article, and comment.
Set Individual Flatpaks Permissions With Flatseal

This will be an article about Flatpaks permissions and how you can set said Flatpaks permissions with Flatseal. There’s a good chance that this will be a relatively short article, which is nice.

BEFORE YOU BEGIN:

I covered what a Flatpak is and some other bits of information. Read this:

Install Flatpaks In Lubuntu

That will give you an overview and enough information to get started. The only thing that will change is how you enable Flatpak and the Flathub repository. The method you use to do that will be different unless you’re using a distro that relies on the apt package manager.

What Is Flatpak:

I wrote this information out already, but some of you will not bother clicking immediately so I’ll mention that a Flatpak is an application that runs with its own dependencies and is sandboxed from the rest of the system.

The important part of this is that the developers who packaged the Flatpak set the permissions for that application. For example, their application may need access to the network. Their application may need access to storage media. The Flatpak may need to be able to access the sound manager so that you can hear things output by the application.

Well, you can adjust those permissions. If you want to grant additional access, you can do that. If you don’t need certain features, you can deny access to those resources. It’s up to you.

The developer shipped the Flatpak with a set of permissions. There are also default permissions that you can edit. If you want to do something like disallow all Flatpak access to the network,  you could do that. You can also adjust these permissions on a per-application basis.

Which leads us to this…

Set Flatpaks permissions with Flatseal:

If you want to manage Flatpaks permissions with Flatseal, you can start (and pretty much close this page) with the following link:

Flatseal on Flathub

The installation instructions will be available on that page. Alternatively, if you’ve already enabled Flatpaks (see the earlier link in this article) you can just press CTRL + ALT + T to open your terminal and enter the following command:

After you enter that into your terminal, you’ll press the Y button on your keyboard a couple of times to confirm that you wish to install.

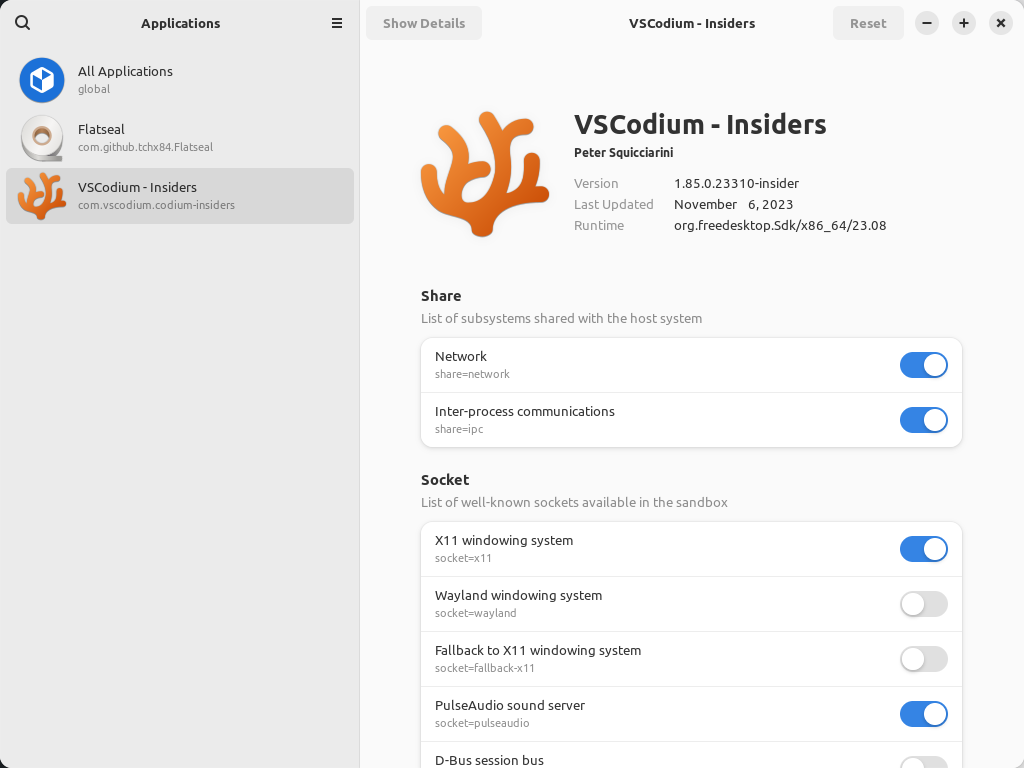
With that said and done, you can then open your application menu, find Flatseal, and open the application. I’ll give you a screenshot, but there’s just so much more to this application that I can’t cover it. It’s fairly self-explanatory and you should be able to figure it out – but there are many options. 

Flatseal is used to adjust the permissions of a Flatpak.
That’s just the tip of the iceberg. Scroll down and there are maybe 50 options. Good luck!

There are just too many options for me to cover. The best way for you to learn how to use Flatseal is to simply install Flatseal and examine the options. If you have any questions about those options, reach out and I may be able to help. Otherwise, you can figure this out on your own.

I have faith in you. You can figure this one out!

Closure:

Well, you can now adjust Flatpaks permissions with Flatseal. I’m never quite sure how to pluralize or make it possessive, but I did my best. We’ll have to see how the final article does.

Anyhow, I told you this should be a fairly short article. It’s not designated as a short article because it’s a bit long for that and you have to read a bunch of other stuff if you want to use this as your starting point. If I could assume you had Flatpaks already enabled, this could have been a short article. I’ll make no such assumptions.

Thanks for reading! If you want to help, or if the site has helped you, you can donate, register to help, write an article, or buy inexpensive hosting to start your site. If you scroll down, you can sign up for the newsletter, vote for the article, and comment.

Automate Updates In Linux Mint

Today’s article will be a fairly simple one and is limited to Linux Mint users as we learn how to automate updates in Linux Mint. That seems like a good idea to me. Ideally, this will continue working without any intervention, but we’ll see…

So, I’m not sure how long this has been an option. I only noticed it fairly recently. If you’re not already aware, you can automate updates in Linux Mint. It’s a pretty simple task and won’t require much more than a mouse – or maybe a terminal and then a mouse.

This can be a touchy subject. I’m firmly in the camp of immediately installing all updates. I want my system to be as secure as possible, which means applying the updates as soon as they are available. So far, this mostly appears to work.

Updates often come right before public disclosure and proof-of-concept samples. While it’s true that an update can bork your system, that’s easily fixed and such a rare thing that I don’t even consider it as a reasonable reason not to apply updates.

I also consider it my duty, my obligation, to keep my systems secure. An insecure system doesn’t just impact you. An unsecured computer can be used as a proxy, a command center, a spam relay, or a node in a DDoS attack, among other things. As a good netizen, I keep my systems updated.

So, why not automate that stuff when I can? 

Automate Updates In Linux Mint:

In your system tray, down on the right, look to see if you have an icon that looks like a shield. If you do not see the icon, press CTRL + ALT + T and type in mintupdate. Both of those things will open the Update Manager in Linux Mint.

At some point along this path, you’ll be asked to enter your password. Do so.

That will open this window:

to automate updates in Linux Mint, start with opening up the update manager
Your theme may mean this has different colors or whatnot, but it should look like this.

Next, you’ll click on ‘Edit’.

You need to click on the Edit button to move to the next step of automating updates in Linus Mint
This is a pretty easy step. Heck, they’re all easy steps! You’ve got this! I’m sure of it!

You next want to open Preferences and click on Automation.

You'll need to edit the preferences to automate Linux Mint Updates.
Just in case you’re confused, I added an arrow for you! (My CDN is going to hate me.)

When you’ve done all of this, you’ll face a new screen.

This new screen is where you edit your automation settings. This new screen is where you enable automatic updates in Linux Mint. It looks like this when I’ve configured it to my liking:

Enabling automatic updates in Linux Mint via the Update Manager preferences.
You can configure those however you like, but I enable all of them. You do you, I guess.

Make sure you have a viable backup process.

As you can see, I’ve chosen all the things. I’ve chosen to automate all the updating that I can do. If anything, I wish I could increase the frequency. I suppose I could set up a cron job for this, but a handy GUI is fine for this task. This way will also update Spices and Flatpaks. So, there’s that.

I’ve had this setting enabled for a little while now and I’ve verified that it has been working as expected. If you want to automate updates in Linux Mint, you can do that – and it’s not even difficult.

Update:

No, it doesn’t appear to update Flatpaks. I’ve given it a few tries and it does not.

flatpaks are not automatically updated
I’ve waited and waited a few times. You have to update Flatpaks manually. So, there’s that…

Closure:

I like automatic updates. I use that sort of feature online with my various websites. Scheduled updates performing themselves is a good thing to me. You may be more cautious, but I throw caution to the wind. I haven’t had an update nuke my system beyond a 2-minute repair job in forever. I haven’t even had a 2-minute repair job in years. That’s good enough for me. You can make your own choices. Regardless of your choices, be sure to backup your system regularly.

Thanks for reading! If you want to help, or if the site has helped you, you can donate, register to help, write an article, or buy inexpensive hosting to start your site. If you scroll down, you can sign up for the newsletter, vote for the article, and comment.

Block A Specific Port In Linux Mint

If you’re using Linux Mint, you’ll find you have ufw already installed which means it’s easy to block a specific port in Linux Mint! I’ll explain how to do that in this article and do what I can to make it easy enough for a new Linux user to follow. If this interests you, read on!

You might want to block a port for all sorts of reasons. If you’re open to the public web via your router, you might find bots hammering at the default ports (such as 22 for SSH) trying to find the login credentials, even if none exist. This is unnecessary traffic and can cause the system to slow down if it’s overwhelmed with connection requests.

Also, Linux uses a lot of ports. There are a bunch that are reserved, for example. You can also designate your ports for many things. I’ve written articles about ports before, so here’s some light reading material:

How To: Check If A Specific Port Is Open
How To: Scan A Remote Host For Open Ports
Find Out What Process Is Listening On A Specific Port
Prevent Brute-Force SSH Attacks With fail2ban

About Ports:

Now, I think I’ll let an AI tell you what a port is in Linux.

A Linux port is a virtual concept that helps access different services within a network. A port is a 16-bit integer ranging from 0 to 65535 with no physical existence.

A port acts as a communication endpoint for identifying a given process or application on the Linux operating system. A port is a 16-bit (o to 65535) number that differentiates a single application from others on various end systems.

As the blurb says, these are virtual ports. They’re not like the physical ports on your router, or anything like that. They’re used for communication and sending traffic to a specific port is asking for traffic on that port. 

If you have nmap installed, you could run nmap localhost to find out which ports are open on your computer. You probably should run that command (you’ll need to install nmap with sudo apt install nmap before you can run this command in Linux Mint). If the port isn’t open, then you don’t need to block that specific port.

UFW:

Linux Mint comes with ‘ufw’ already installed. It is not enabled by default, however. It’s good that it comes installed, which means it’s almost ready for use and you only need to enable ufw for it to be of use. If you don’t know what ufw is, you can check the man page with man ufw to learn more. For simplicity’s sake, you’ll find that ufw is described as:

ufw – program for managing a netfilter firewall

We will be using ufw to block a specific port in Linux Mint. You’ll learn that ufw stands for “Uncomplicated Firewall” and is a frontend for iptables. You can do anything with iptables that you can with ufw, but ufw is much easier for a new Linux Mint user. It doesn’t need to be complicated, as you’ll see in this article.

Use UFW To Block A Specific Port In Linux Mint:

While there is a GUI front-end for ufw, we won’t be using that. Instead, we’ll just use the installed terminal and ufw. As you’re using Linux Mint, you can open your default terminal by pressing CTRL + ALT + T.

With your terminal now open, we first need to enable ufw because ufw is not enabled by default. To enable ufw, run the following command:

That will enable ufw on system startup. That command should output something that looks like this:

You can later disable ufw if you find you no longer wish to use it. That command would look like this:

Now, to block a specific port in Linux Mint with ufw, the syntax would be easy enough to figure out. It just looks like this:

If you want to block the default SSH port (port 22) then you can do that like so:

If you change your mind at a later date, the command to undo this would be:

All you need to do is remember ‘deny’ and ‘allow’ and that ufw commands require elevated permissions which means you need to use sudo. If you can remember that, you can block and unblock specific ports in Linux Mint!

Closure:

Yes, this article is about blocking a specific port in Linux Mint with the ufw command, but it applies to many other distros. I just happened to be using Linux Mint when I wrote the article and didn’t want to test on other systems before smashing the schedule button. So, I wrote it specifically for Linux Mint. This will likely be an accurate tutorial for Ubuntu, the official Ubuntu flavors, other Ubuntu derivatives, and maybe Debian. I’m not sure about Debian.

And now you know…

Thanks for reading! If you want to help, or if the site has helped you, you can donate, register to help, write an article, or buy inexpensive hosting to start your site. If you scroll down, you can sign up for the newsletter, vote for the article, and comment.

Subscribe To Our Newsletter
Get notified when new articles are published! It's free and I won't send you any spam.
Linux Tips
Creative Commons License
This work is licensed under a Creative Commons Attribution 4.0 International License.