How To: Create a New User Without a /home Directory

There are legit reasons to create a new user without a /home directory. Maybe you want a new user to have limited access to just a few things, or a dedicated user that runs a single application. This article will show you how.

See, I was reading a forum post on Linux.org about a member that had set up a bunch of Linux computers for some learning children. One of the things that came up was that the kids were already trying to guess the password so that they could install games. 

That got me thinking about some security implications. What if they guessed the password and wanted to hide it? What if they used that password to create a new user, but one without a /home directory so that it wouldn’t be easily spotted by just using a file manager? It wouldn’t be impossible to find, but it’d not stand out immediately with a quick inspection. Besides, the new account’s password would remain the same even if the admin changed the password to the root account.

Well, if they get that advanced and guess that password, I kinda hope they read this article! Why? Because the world needs a little chaos and creativity! So, my fellow Linux.org forum user, this article is for you! Well, no… It’s for when the kids use a search engine to learn how to make a user account a little less obvious! 

Create a New User Without /home:

This one will be short and easy, perfect for budding Linux users! There are two easy ways to create a user without automatically making a /home folder. 

Both ways are done in the terminal, so you need to open it. To open the default terminal, use your keyboard and press CTRL + ALT + T.

Now, the first method is:

The second method is:

Those commands will both make a new user without a /home directory of their own. (Be sure to check ‘man useradd’ for more awesome things you can do.)

There are a couple more steps you can take, if you want. First, there’s no password assigned to the user you just created. So, let’s assign a password to them.

Follow the prompts to type in the password twice and you’re done with that step.

Next, the newly created user isn’t a member of sudoers – meaning it has no administrative rights. That’s easily fixed with the following command:

That command will make the new user a member of the sudoers group. Meaning they have administrative rights over the system. They can install software, remove software, delete files, create files, or even update the entire system.

The admin can still discover the new user by listing the users or poking around in the logs. However, the user won’t stand out immediately. There won’t be any new user folder in /home, so one may not have any reason to look. Additionally, changing the root password won’t matter. You’ll have to do something about the user they created.

And that, kids, is how you get started hiding stuff after you’ve discovered the root password! Use that account for your nefarious activities! You’re welcome!

Closure:

Nah, there are legit reasons why you’d want a user without a home folder. You may want that user to only access a limited set of applications or whatever. A keen admin would likely notice this fairly rapidly, so it’s not a great long-term strategy for hiding your game installing.

Thanks for reading! If you want to help, or if the site has helped you, you can donate, register to help, write an article, or buy inexpensive hosting to start your own site. If you scroll down, you can sign up for the newsletter, vote for the article, and comment.
How To: Sanitize Exif Data From Your Digital Images For Privacy Sake

When you take a digital picture, the resulting file contains potentially personal information. It is known as ‘Exif‘ and it contains sensitive information. This article will explain how to sanitize Exif data to avoid leaking your personal information.

If this article looks familiar, I’ve previously authored an article on this subject. It’s at the old site, which will be redirected here. I might as well write it anew, using the current style.


UPDATE: I received an email one Morgan Kinney, inviting me to review and include a link to a study they (authored by one Paul Bishoff) had done regarding Exif data and the privacy implications. If this article wasn’t clear enough about the privacy aspect of sanitizing Exif data, then please consider reading the following link:

EXIF metadata privacy: A picture is worth a thousand data points

I’d not normally do this, but their work is well done and is a worthy addition to your understanding of Exif data and the privacy risks associated with Exif data. See the “Closure:” section for more updated information.


Moving on…

Exif is the additional information included in the file your digital camera makes, among other things. It can be as benign as color correction data to orientation settings. In some cases, it can also contain such privacy-wrecking gems as when and where (the GPS coordinates) and when  the picture was taken. It is defined as thus:

Exchangeable image file format (officially Exif, according to JEIDA/JEITA/CIPA specifications) is a standard that specifies the formats for images, sound, and ancillary tags used by digital cameras (including smartphones), scanners and other systems handling image and sound files recorded by digital cameras.

The Exif data can even contain information about the camera’s brand and, as you can see, isn’t limited to just a fancy digital camera. Your other devices, from smartphone to scanner, add this extra data to the file. Anyone who is aware of this can easily look for this data. Exif data has even been used as evidence by the judicial system.

Obviously, there are huge privacy implications with this. You can probably minimize some of the data that’s created by changing your phone/camera’s settings. That does nothing for existing files, and nothing for when your device has no such configuration options.

Let’s See This Exif Data

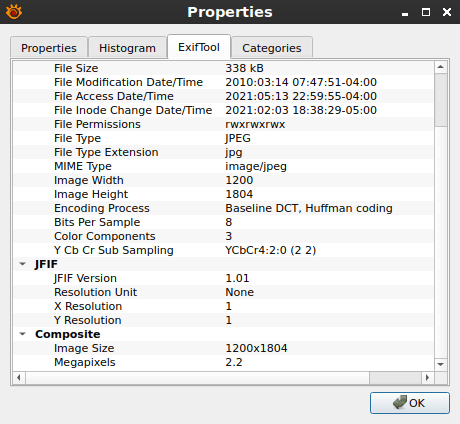
There are any number of ways to examine the Exif data. For example, this is some of that data and it is being drawn from a program called XNViewMP.

Exif data
Exif data sample. There’s not a whole lot of data with this one.

That one tells you how old the picture is, and not a whole lot more. But, it also now contains the information about the last time it was accessed. That could be of interest, perhaps giving away things like the age of the photo’s subject.

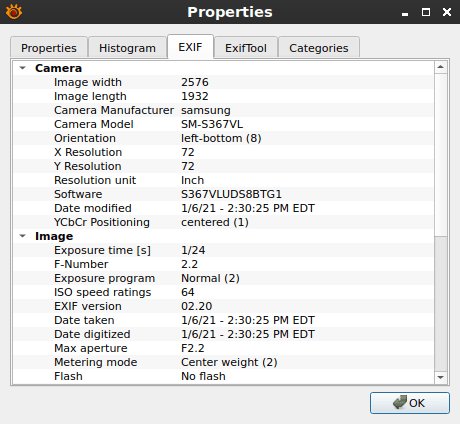
This next picture is the Exif data from one of my cellphone pictures. I have the GPS data turned off, so that wasn’t included. You’ll see a ton of additional information.

More detailed Exif data.
See? Now you can tell I don’t bother updating my phone often.

As you can see, there’s even more data in that file. There may well be even more data in your pictures. It tells you what camera I was using (a cell phone, and an old one at that) and that I took the picture at 14:30, in a well lit room. It even tells you the software version, which may be exploitable to an attacker.

Don’t worry too much about this. It’s a solved problem. You can sanitize Exif data and maintain a bit more privacy. It’s actually remarkably easy.

Many image hosting sites will automatically strip the Exif data when you upload your image.

Let’s Sanitize Exif Data

The tool we’re going to use for this is ‘exiftool‘ and it’s pretty simple. It’s quite likely already in your default repositories, or at least the repositories you can add trivially. In Debian/Ubuntu/Mint/similar, you can install it with:

You’ll need to adjust the command for your distro, of course. Once you have it installed, you can navigate to the directory where you store your images and run something like this to sanitize png files:

Or, if you’re trying to sanitize .jpg images, you’d run this command:

Depending on the number of files in the directory, it could take a little while to run. It’s pretty speedy and it does give you confirmation when it’s done. I’ve used it on large numbers of images at once and it took care of them all in less than a minute. I probably should have paid more attention, that way I’d have some actual numbers for you.

NOTE: The exiftool can actually strip data from other files, including files like PDFs and other such types of documents. A complete list can be found here. Yes, those documents contain data beyond that of the text contained in them. They may contain such data as the computer name, username, and dates and times of file creation and editing.

Personally, I combine both the .png and .jpg commands into one command and I run that command with an alias. We haven’t covered aliasing yet, so I’ll just go ahead and show you what I use.

That, if added to .bash_aliases, would let you use ‘picclean’ to sanitize an entire directory’s worth of png and jpg files. It comes in pretty handy if you’re sharing a bunch of files and want to make sure they’re all clean before you send ’em.

Closure:

Well, there you have it. Hopefully you’ll now know a little bit more about how to sanitize your image files, removing the private data from them as much as you can. If you don’t generate the data in the first place, you don’t have to delete it. So, disable embedding GPS coordinates in your phone (or some fancy cameras) and don’t take pictures of yourself while doing illegal activities.

UPDATE: As mentioned, I’d not normally do this – but there are exceptions. I don’t mind linking to other sites if the content is worth the attention of my readers. If you have your own content and would like to have it referenced here, don’t be afraid to contact me. Just be aware that I decline about 60% of these sort of requests. While I do love guest additions and guest articles, no I won’t be including articles about mortgage rates and the benefits of CBD oil. My readers aren’t interested in articles like that. So, your content needs to be both good and topical.

Thanks, as always, for reading. I always look forward to the feedback, here and on other sites. Don’t forget that you can unblock ads, sign up for the newsletter, donate, or contribute by writing an article or two. Don’t forget to share this site with your friends. Share the love!

UPDATED: (Updated on 01/23/2022)

How Long is my Ubuntu Support Going to Last?

Ubuntu versions, and official flavors, have different lengths of time that they’re supported. Today, we’ll learn how to tell how much longer you have Ubuntu support and what you can do about it.

Every two years, Ubuntu releases a LTS version. That means “Long Term Support” and the support length for that is usually 3 years, and then it enters ESM, which means Extended Security Maintenance. Except when they don’t, and you get 5 years of support and 10 years of ESM.

Ubuntu’s official flavors have LTS versions that also come out every two years. Those are supported for three years and then you have no access to the flavor-specific updates unless you update to the newest LTS version of said official flavor.

Every six months, Ubuntu releases an ‘interim’ release. These releases are supported for nine months, which means you have a three month window to upgrade to the next version before the upgrade window closes. These releases also explore new versions of software that will make it into the LTS releases.

LTS releases are always YY.04 releases, but not all YY.04 releases are in fact LTS releases. They’re only LTS releases if the year of release was an even year. So, 18.04 and 20.04 are all LTS releases and there won’t be another LTS release until 22.04 –  which, according to Ubuntu’s versioning format will be in April of 2022.

Confused yet?

I can’t blame you if you are! After all, unless you spend all your time learning about this sort of stuff then you’re not going to remember that. At best, you have the “proper” configuration and you upgrade when your OS tells you to upgrade. If you’re using an interim release and miss that upgrade notice then it can be quite an ordeal to upgrade to a new version.

Let’s figure this out.

How To: Check Ubuntu Support Status

Fortunately, you can check your support status pretty easily. The results may be confusing, but you’ll figure it out.

Like so many articles, let’s crack open the terminal. Just use your keyboard and press CTRL + ALT + T to open your default terminal emulator.

If you’re using 18.04 or older, then you use the following command:

If you’re using 18.10 or newer, then you’d use this:

Your output will look something like this:

Which, as you can see, says I have support until 2025. If I had ESM enabled, that’s software from the Ubuntu Advantage program, then I’d have security updates even longer. As you may recall, that requires Snap apps, and I’ve chosen to disable Snap Applications. So, obviously I won’t be doing that whole ESM thing. 

Not that it matters with the ESM, because I’m using Lubuntu. Where it says 2025, I have to assume “official support” to only last until 2023 – three years of support. Now, you can keep using an official flavor beyond those three years, it’s just that the official flavor parts won’t be getting any additional updates. That’s generally considered a Bad Idea®. But, you can do so, and that’s why the date for ending Ubuntu support is later than it really is.

Anyhow, that should make it more clear. You should find the end date of your OS’s support and keep that in mind. You should make plans to upgrade in a timely manner, because security updates are important to you and the rest of the ‘net.

NOTE: When your computer isn’t upgraded you’re a threat not just to yourself. You risk becoming compromised and becoming part of a botnet, spamming relay node, or worse. So, keep things upgraded. Thanks!

Like always, thanks for reading. You can participate by contributing articles, donating, or sharing the links with others. You can also sign up for the newsletter. I promise, I won’t send you any spam!

How To: Generate Sufficiently Complex Passwords In The Terminal

In this article, I will tell you how I use pwgen to generate random passwords. It is a simple command, but comes in surprisingly handy. This being Linux, there are surely other ways to accomplish this task, but this is the method that I use.

I’ve been working on a router for the past few weeks. I’ve been working on getting this site up and running. I’ve also been working on a new computer that’s just meant for testing.

I don’t do a whole lot of password sharing and remembering. That means when I need to login to an account I’ll often just hit the button to recover my password and then use a new password entirely. This means I’ve had to generate quite a few passwords. The tool I use to do this is known as pwgen.

GENERATE COMPLEX PASSWORDS

The tool ‘pwgen’ may well be installed by default. If not, it’s very likely to be in your default repositories. I checked everything from Fedora to Mandriva, and it looks like you shouldn’t have any issues installing it. If you’re using a Debian/Ubuntu/derivative and have access to apt, then you can just install with:

Once installed, you can just run the ‘pwgen’ command from the terminal and you’ll get a bunch of random passwords. They may, or may not, be sufficiently complex and able to satisfy the various password requirements. It tosses out a lot of passwords, so it’s not like you won’t have choices.

Me? I use it a bit differently. In fact, you might even say that I use it ‘wrong’. After all, the man page describes the pwgen application as:

pwgen – generate pronounceable passwords

I don’t actually want pronounceable passwords. I want suitably complex passwords! Fortunately, pwgen can be bashed into shape and can provide all the complex passwords you desire. Here’s the command I use:

So, what’s going on with that? What do those switches do?

     s – random and hard
     n – adds numbers
     y – adds symbols
     c – at least one capital letter
     B – removes ambiguity
     1 – one password per line

The 12 is how many characters each password will have and the 6 is how many passwords it will spit out for you. So, for example, you’ll get an output like this:

In my case, this is already aliased to ‘newpass’ and that means I don’t need to type the entire command when I want a new password. Alas, I’ve not yet covered aliases. It’s on my list of articles to cover, but it’s not done yet.

Anyhow, thanks for reading. As you can see, this is the very first article at our new home. I’ll slowly move the other articles over here, editing them to match the new format and maybe making some of them a bit more thorough. This site should be faster, have the features that were used at the previous site, and a bit easier to maintain. There’s even a published privacy policy.

Don’t forget to sign up for the newsletter. It’ll only send out emails when an article has been published and won’t include any spam. I won’t give your email address out, nor will I sell or trade it. 

Subscribe To Our Newsletter
Get notified when new articles are published! It's free and I won't send you any spam.
Linux Tips
Creative Commons License
This work is licensed under a Creative Commons Attribution 4.0 International License.