Today’s article isn’t like a regular article, it’s just some news about Purism. There’s not going to be much written about this company by me, as I’m not wanting to get sued by angry people. I’m mostly going to give you some information and then share a video. With that information, you’ll be free to make your own choices.
Let’s start with the basics…
I have been paying a little bit of attention to Purism for quite some time. I have considered giving them money, but there were already enough complaints that I never felt comfortable doing that.
Purism SPC, the company, is located in San Francisco, California. They have been around since 2014 and they sell products that are based on ‘opensource’, hardware such as laptops and phones.
Their site can be found at https://puri.sm/
Purism claim to be interested in protecting your privacy and liberties, by using open-source software. There are lots of thoughts about this.
I have seen a few people mention this company lately, as though they were interested in their products. I feel an obligation to inform, thus this news article about Purism.
I will not be offering my opinions on the matter. As much as free speech exists in my country, I don’t really feel like spending money on legal fees and I don’t want to deal with a cease-and-desist notice that tells me to take the site down.
What I am going to do is share a video with you.
Warning, this video uses adult language – but provides sources for their claims. I would suggest watching this video if you’re interested in Purism products.
Now, you take that information and do with it what you will. You can view a bunch of old/current complaints at the Purism Subreddit. There are also a number of topics over on HackerNews but I don’t have links to those. I’m not trying to do an expose, I’m trying to help people make wise choices. This means doing your research – and real research.
Closure:
My opinions are my own, though I’m sure it’s okay to say that I do not now own any Purism products and I do not intend to buy any in the near future. This is simply one of many videos, articles, and comment chains that finally made me realize that I should probably share this with others – as we don’t all dive deep into things prior to making a purchase decision.
What you do with this information is up to you.
I will further suggest that any comments on this matter should be left here. It’s well known that I share my articles elsewhere but I don’t know if Purism is lawsuit happy and I don’t think I’d like to put other sites at risk. I’m sure it’s fine, but we’ll see…
Thanks for reading! If you want to help, or if the site has helped you, you can donate, register to help, write an article, or buy inexpensive hosting to start your site. If you scroll down, you can sign up for the newsletter, vote for the article, and comment.
In today’s article, we’re going to show you how to disable your webcam. It’s something I’ve seen folks ask before, and something someone contacted me to ask about. While I don’t normally answer questions via email, it did seem like a good article to write.
I see this question, about how to disable your webcam, quite a lot. There are some ingenious solutions, from sliders you can stick to your laptop to just putting a piece of electrical tape over it. Some vendors have gotten in on it and include a sliding cover that you can use when the webcam is not in use.
If you’re that paranoid, you might want to look for a laptop (generally) that doesn’t have a webcam – but that can be hard to find these days. In some cases, they’ll have a red light that comes on when the webcam is in use. Of course, the truly paranoid don’t trust that. And the really, truly paranoid people know their coffee pot is spying on them!
Well, in today’s article we’re going to share how to disable your webcam. It won’t be all that difficult. It’s something a beginner could do, if they can follow directions, because we’ll be using nano. So, anyone can do this…
NOTE: I only tested this with Lubuntu. That means it should work with any Ubuntu flavor and with any derivatives of Ubuntu. It should also work up-stream and in most distros, but I can’t say that those have been tested.
Disable Your Webcam:
Like many articles, this one requires an open terminal. If you don’t know how to open the terminal, you can do so with your keyboard – just press CTRL + ALT + T and your default terminal should open.
Once you have the terminal open, enter the following command:
1
sudo nano /etc/modprobe.d/blacklist.conf
Now, copy/paste (or type yourself) the following into that file:
1
2
#Disable the webcam
blacklist uvcvideo
The first line, the line starting with a # sign, is a ‘comment’, meaning that it’s there for you, the reader, and won’t be interpreted by the computer as an input or a command of any kind. This is pretty common and traditional. You can change that text to anything you’d like. Something short and descriptive is probably best.
Now, you’ve gotta save it. It’s nano, so it’s actually not that hard but might confuse some folks. After all, it could seem hard if you’ve never done it before, but this is how you save it with nano. You just press CTRL + X, then Y, and then ENTER Bob’s your uncle! It’ll save the file and close nano for you.
Finally, you need to reboot for the changes to take effect. The effect is permanent, more or less. If you want to undo it permanently, then just reverse the process from above. If you want to disable it temporarily, you can try this and it should work for you:
1
sudo modprobe uvcvideo
That should do it! Though you’d still have a non-working webcam the next time you rebooted your computer. If you’re going to take the time to disable your webcam, you probably want that behavior anyhow. Again, if you disable your webcam and want to truly reverse it, just remove the lines like I mentioned.
Closure:
I don’t really want to encourage people, but I won’t be terribly rude if you email me with a question. Just, you know, know that I have other things going on in my life and that I don’t actually have all the answers. I write about the things I know, the things in my notes, or the things that spring to mind when I am late with scheduling another article. Ah well, now you know how to disable your webcam.
On the other hand, you can feel free to email me questions you think I might be able to answer (Keep ’em simple!) that might make good articles. I could use your question as a bit of an intro fluffing device and then do a “Reader’s Questions” kinda thing. There’s a big difference between emailing me for support and emailing me with a question that might make a good article. There’s no pressure in the latter case, as there is no time constraints or expectations. So, feel free to do that – just don’t expect me to respond with a solution, and there might be an article that comes from it.
Thanks for reading! If you want to help, or if the site has helped you, you can donate, register to help, write an article, or buy inexpensive hosting to start your own site. If you scroll down, you can sign up for the newsletter, vote for the article, and comment.
Today’s article isn’t all that Linux specific, but pertains to your personal information and whether or not it has been leaked or hacked. This is good information to know. While there’s not much that you can do after the fact, there are steps you can take when the inevitable happens and those steps will vary depending on the severity of the hack and how much information the bad folks got away with.
Basically, when you visit sites you leave at least some information behind. Depending on the site, you may leave more information behind than other sites. For instance, you may leave behind your email address when you signed up for their newsletter. This is relatively benign (insert plug for the Linux-Tips newsletter), but more concerning when you add more information to it – such as your password, phone number, username, answers to security questions, etc…
Sometimes, those sites aren’t all that well defended and people manage to find exploits that give them access to this data. These are known as data breaches. Your data is then, more often than not, put up somewhere online for sale or even for free. The usual goal is to sell this data, as profit is the ultimate motive these days.
There’s quite a bit that bad actors can do with this hacked and leaked data. This is especially true if you do things like re-use passwords. By the way, that’s something you should never do. Don’t use a password or a ‘password system’. Generate random passwords for every use.
Enter “have i been pwned?”
This have i been pwned? site has been around for a long time. You can visit the site by clicking the following:
Go there and enter your email address or phone number. It will then let you know if your data has been exposed in a data breach. The site’s name is a play on the word ‘pwned’ – which means similar to ‘owned’ or, in this case, your personal information been exposed by way of a data breach.
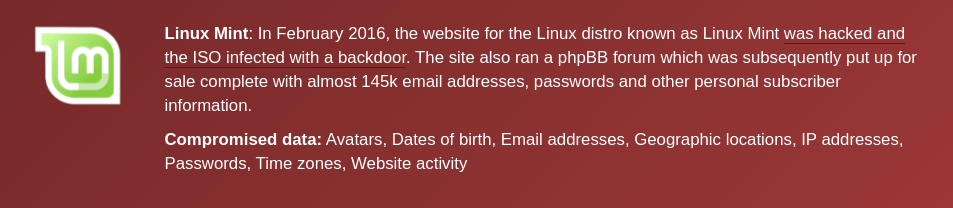
If your personal information has been included in a data breach that was made public, it’ll be listed in the results. For example, I have one email address that was involved in a very dark time for Linux Mint. See this:
My personal information was compromised in this attack. Also, yes that happened. It’s very much real.
You can be reasonably comfortable putting your email into that site. They have a long, long history of good behavior and, at the end of the day, you’d just lose your email address. So, feel free to drop your email addresses into the site.
NOTE: I take your personal information seriously. If I ask for it, I secure it. I only ask for as much information as required for the role. Signing up for the newsletter doesn’t even ask for a username! Passwords are salted and hashed (not saved in plain text). There’s a layered approach to prevent compromise, including things like requiring 2FA for administrative roles.
Again, “have i been pwned?” has no motivation to do anything with your email address and their reputation is pretty solid. You can drop your email address into the search box safely.
They Lost Your Personal Information:
So, what can you do if you found out that your personal information has been compromised? There’s not a whole lot, actually. Once the data is out there, it’s out there. You can’t do anything to take it back.
What you can do is stop doing business with these people. You can change your passwords for the compromised sites. You can also check other accounts for signs of compromise. Depending on the data that was lost, you can lock your credit or use a credit monitoring service.
When (not ‘if’) you find your email and personal information in these lists, it can be a little jarring. It’s not entirely unlike finding out that your house has been broken into. But, you can relax. It’s not the end of the world or anything of that nature.
In many cases, passwords aren’t stored in plain text. They’re hashed and salted before they’re stored. The password you typed in is just checked against the hashed values and, so long as you match, you’re let into your account. That’s a great thing, a great start even, but rainbow table attacks still exist to attack hashed passwords.
If there are extra security steps you can take, take them! If you can enable 2FA (2 Factor Authentication), they by all means do so. A login that requires a second factor, such as a code sent to email or to text message, is much more secure. This is more useful before a hack occurs, of course.
When you give out your personal information, ask yourself if you truly need to give the information and if you trust the company with that information. Different companies may have different trust levels for you. I trust this site with all my information, ’cause I own it. I trust sneakydownload.site enough to have my email address and nothing more. There’s a pretty broad spectrum of trust and a very personal choice to make.
Closure:
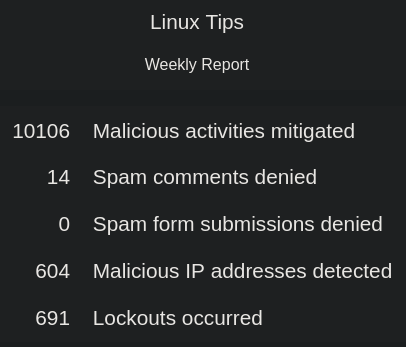
This article could easily run thousands of words, as security, privacy, and personal information are broad subjects. Be careful who you trust and be sure to check in once in a while to see if your personal information has been compromised. On Linux-Tips.us, I just avoid collecting data. I find it easier to protect your data if I don’t actually have it. However, even this small site is under attack constantly:
That’s a week’s worth of attacks. That’s just for a small site.
The two spam comment selections are from people/bots who made it through the first levels of defense. Even the rest of the numbers are people who made it through the basic security checks, now that I think about it in this light. Point being that a site is constantly under attack and your personal information is a commodity, so protect it well.
Thanks for reading! If you want to help, or if the site has helped you, you can donate, register to help, write an article, or buy inexpensive hosting to start your own site. If you scroll down, you can sign up for the newsletter, vote for the article, and comment.
Today, we’re going to learn to clear the terminal screen. This is generally done for privacy’s sake. You don’t want people to be able to scroll up and see what you’ve been reading in the terminal. This probably isn’t as important if you’re the only user and you’re in your house, but you may still like to keep things clean and tidy.
We’ll go ahead and cover two ways to clear the terminal in this article. They’re both rather easy commands and you’ll find this article is definitely not all that complicated, or even very long. This is pretty much one of the first things folks should have learned when they started using the terminal. We might as well cover it here.
Rather than make this long-winded, we’ll just make this into a short and easy article to read. Let’s all learn how to…
Clear The Terminal:
To be clear, this just erases the text in the terminal. It clears the scrollback content so that folks can’t scroll up and see the previous terminal contents. Again, it’s a good idea to do if you’re in a multi-user environment where people may have access to your screen and you don’t want them to know what has been written to the terminal.
Obviously, you need a terminal for this article. Just press CTRL + ALT + T and your default terminal should open.
I suppose we’ll need some content, so let’s try using this command:
1
ls -la
That should fill your terminal up.
Now, to clear it you can use either of the two following commands:
1
clear
Or you can also use:
1
reset
(Though reset may leave a little text at the top, it still removes the terminal’s scrollback history.)
Both of those will do the job, with ‘clear’ being the obvious winner = but it’s nice to have options. They’ll clear the scrollback in the terminal, preventing folks from scrolling up to read what has previously been written there. Of course, they could potentially still press the arrow up button and see what commands you’ve written, so you can try to prevent that as well.
Closure:
See? I told you that it’d be a quick and easy article. It’s not all that taxing to learn how to clear your terminal and that’s all that this article is meant to cover. Both of the two commands have a man page, but they’re not very useful commands for anything else but clearing the terminal. Have an easy day, a day where you can (maybe) say you learned something and not have to read a long article. After all, it was a quick and easy day for me!
Thanks for reading! If you want to help, or if the site has helped you, you can donate, register to help, write an article, or buy inexpensive hosting to start your own site. If you scroll down, you can sign up for the newsletter, vote for the article, and comment.
This article is a bit of a review of some software called ‘uMatrix’. If you’ve never heard of it, it’s an impressive piece of software – especially considering it’s a browser extension.
I was nosing around some old projects in my GitHub when I decided to look upstream. Lo and behold, Ray Hill (gorhill of uBlock Origin fame) has picked up developing uMatrix again. (Install through your browser’s extension manager. Links below.)
Well, do you remember old school firewalls where you could not just block things by application, you could be even more refined – like narrowing it down to which port, ingress or egress, and even which domains that application could connect with?
Imagine something similar to that, except it’s for your browser. For each page, you can elect to block images, CSS, cookies, scripts. Then, you can decide which scripts and which CSS to allow through. You can elect which third party assets load, from cookies to images – and you can do so on a domain name basis.
There’s a learning curve. It’s a pretty big learning curve for a browser extension. Plan on a couple of hours to really get used to it – and to get your favorite sites configured. You need only configure them once and then you can backup the settings so that you can use it on multiple devices or put it aside for safekeeping.
It WILL break sites. You WILL get frustrated.
More About uMatrix:
If I took privacy serious and were more security focused, I would not use the internet without uMatrix. As it stands, I have an older version (now updated) configured in one browser for when I want to visit stuff I absolutely don’t trust. If you take privacy serious (and cross-domain scripting, third party cookies are a huge no-no, but so shouldn’t images and CSS files) then you really, really should take a look at this extension.
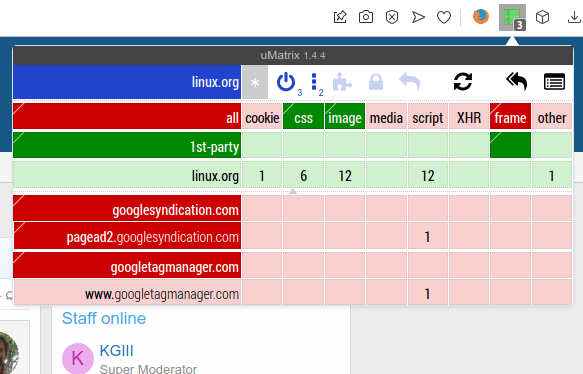
Take a look at this:
Look a little daunting? You can figure it out. I have faith in you!
In each of those columns, you can click to block it everywhere or to allow it on this one specific domain. As you can see, there’s everything from cookies to CSS, from media to scripts. The refinement you can achieve is amazing. It will take some work and time for you to ‘get good’ with uMatrix.
Now, you basically want it to operate in the default configuration you have it in right after installing, only allowing CSS and images from the domain you’re visiting.
When a site refuses to work properly, you can start by allowing scripts on an individual basis – on the per-site basis you see from the domains listed on the left. You can click on two areas in each column to give fine-grained permissions. After a while, you can get pretty quick at deducing why it doesn’t work. It’s usually a script from another site that needs to be enabled.
You’ll also learn how much cruft the web has, browsing much faster and having fewer scripts chew up your CPU and RAM. If you have a low-end computer, this is also a must-have.
At one point, Hill had stopped working on the project and shuttered it. I’m not sure when he started working on it again. I’m glad they did because it’s the best privacy and security browser extension I’ve ever seen in my life. Now that he’s working on it again, I feel comfortable recommending it.
uMatrix Review:
Really, I wrote this to share my joy. If I had to review it, and I guess I have to, I’d give it a solid 9.5 out of 10. I’ve deducted a half point because there’s no effort to make it all that intuitive to new people and this makes the learning curve harder. It’s hard to explain, but once you see what it does you will understand it better.
Not even I can make it all that intuitive until you actually test it out and start browsing the web with it. If you get frustrated, settle down and relax. You can make it work. It will take some time to get used to the new paradigm. You can browse much faster (more so than from just blocking ads) when you’re not loading a bunch of 3rd party cruft.
You might as well know where to get it. It’s available for the two major browsers, plus in Opera’s own little extension store. These extensions work fine on same-family browsers, like Pale Moon or Google Chromium.
Give it a shot. Commit to browsing with it for a full day and see for yourself what the web is like when you’re not loading tracking cookies, scripts, ad images loaded from other domain names, and so much more.
By the way…
I worried more about these things years ago, back when I was a Windows user and for the times when broadband wasn’t a realistic option. I was more concerned with my security and letting scripts load in the browser, so I’d use uMatrix. It had the added benefit of doing a great deal to protect my privacy by making it extremely difficult to track my movements across the web. These days, browsers are much more secure and run in their own containers and I care less about privacy.
Even just blocking remote scripts, media, and images will speed up your browsing noticeably. By the time you have it configured for the sites you visit, you’ll have a pretty secure and private browsing experience. You should also consider making it work in incognito mode if you make regular use of private browsing.
Closure:
There you have it, another article. This one is a review of uMatrix, one of my favorite browser extensions even though I don’t actually bother with it for most of my browsing. I used to browse with it exclusively, but I’ve given up caring. If you care, and many of my readers do, then I highly recommend trying it for a full day. Commit to a full day and then leave a comment telling us of your experiences.
Thanks for reading! If you want to help, or if the site has helped you, you can donate, register to help, write an article, or buy inexpensive hosting to start your own site. If you scroll down, you can sign up for the newsletter, vote for the article, and comment.