Turn A JPG Into A PDF

Today’s article is an article that few folks are going to need, but those folks who do need to turn a JPG into a PDF will be happy with it. If you want to do that, this article will help you with that task.

There are times when you want to need to share an image but the people you’re working with expect a PDF. This happens if you’re sending stuff off to be printed and things like that. They only accept PDFs and all you’ve got is a JPG. 

Well, it’s easy to turn a JPG into a PDF.

JPG, or JPEG, stands for Joint Photographic Experts Group and has been a standard since 1992. Obviously, it is an image format. According to Wikipedia, JPG “… was largely responsible for the proliferation of digital images.” That sounds reasonable to me.

I’ve covered a lot of PDF stuff lately. Can you tell where I am in my notes? PDF stands for Portable Document Format and is useful when you want to print something exactly as you see it. That’s why print houses use PDFs a great deal.

I’m sure this isn’t something everyone is going to need to do. That’s fine. Not all of my articles need to apply to everyone. I’m also hoping to use this opportunity to expose you to one of the more powerful Linux applications.

ImageMagick:

The tool we’re using is a complicated tool known as ImageMagick. Once installed, you should check the man page. We’ll be limiting those options to just a couple, but manipulating images in the Linux terminal is usually done with ImageMagick. It’s a versatile application.

If you do check the man page, you’ll learn that ImageMagick is described like so:

ImageMagick – is a free software suite for the creation, modification and display of bitmap images.

That’s not a very good description, because ImageMagick does a lot more than they describe, including formats other than the BMP format. It’s a potent tool that manipulates images directly in the Linux terminal. You’ll also find that ImageMagick is a great asset when dealing with large numbers of files.

Once you’ve installed ImageMagick, you have access to the convert command. You can’t have one without the other and you only need to install ImageMagick to have access to both. If you check the man page for convert, you’ll see that it’s the correct tool for the job.

convert – convert between image formats as well as resize an image, blur, crop, despeckle, dither, draw on, flip, join, re-sample, and much more.

If you’re observant:

The convert-im6.q16 program is a member of the ImageMagick-ims6.q16(1) suite of tools.

That’s why we have to install ImageMagick to get access to the convert command. There’s a lot to ImageMagick.

So, teach you one way to turn a JPG into a PDF…

Turn A JPG Into A PDF:

As mentioned above, you need a terminal to use ImageMagick. You don’t need a terminal to install ImageMagick, you can do that in a GUI. However, I’ll share how to install ImageMagick from the terminal. You can usually open a terminal by pressing CTRL + ALT + T on your keyboard.

With your terminal open, let’s get started:

Installing ImageMagick:

ImageMagick is not only a massively capable application, it is also widely available. You should find ImageMagick available in your default repositories. If it’s not in your default repositories, you can always compile it from the source. I’ll share how to install ImageMagick in the most popular distros:

Debian/Ubuntu/etc:

Arch/Manjaro/etc:

RHEL/CentOS/etc:

You can also install ImageMagick from source:

Turning A JPG Into a PDF:

Keep your terminal open and navigate to the folder where you’ve stored the image files. Specifically, use cd to navigate to the directory that contains those images you want to turn into PDF files.

With that done, you’re only really interested in the convert flag. You won’t be invoking the imagemagick command itself. You’ll be using the convert aspect of ImageMagick.

If you want to turn a JPG into a PDF, the syntax is quite simple:

DO NOT TRY THIS YET!

An example of that command would be:

I mean, you could try it – but it’s not going to necessarily work.

If you try the above command, you’ll likely get this error:

convert-im6.q16: attempt to perform an operation not allowed by the security policy `PDF’ @ error/constitute.c/IsCoderAuthorized/421

So, we need to edit the ImageMagic’s policy.xml file. It’s a simple edit and will only take you a few minutes. I’m going to assume that you have access to Nano, but you can use any terminal text editor you want.

First, open policy.xml for editing:

Find this line:

And edit it to match this line:

Now you need to save it. To save the new policy.xml with Nano, press CTRL + X, then Y, and then ENTER. That should save the file with the same filename and extension.

That’s all you need to edit. Now you can try this command!

Now you can turn a JPG to PDF easily in the Linux terminal with the convert command as provided by ImageMagick. Pretty complicated? I suppose so, but you only need to make that edit once and you’re good to go. 

Now that you’re done with that and are happily converting JPGs to PDFs in your spare time…

Well, it gets a little more complicated.

You might find that this command produces sideways images. If that’s the case, you’ll want to use the -auto-orient flag.

I swear, that’s the last thing you should have to tweak. In my experience, you don’t need the -auto-orient flag but it’s good to know that it exists. You might consider using it by default, just to ensure things go smoothly.

Oh, one more thing…

Let’s say you have a bunch of images in a directory and you want to turn all of those .jpg images into a .pdf en masse, you can do that! The convert command supports an asterisk (wildcard). That looks like this:

That’ll happily convert all the files ending with .jpg into a single .pdf file for you to store or share with others (such as a printing company). It’s pretty easy once you know the tricks and have edited the correct file.

BONUS:

While I only say ‘JPG’ in this article, you can also use this same command with  PNG files. The command is almost the same, you just need to specify a .png file instead of operating on a .jpg file. Like so:

That will happily perform the same operation on the .png file, just like it did with the .jpg file. The only reason it’s not mentioned previously is because it would have made the titles and headings look awkward.

So, if you need to turn a PNG into a PDF, you now know how. If you wanted to turn a JPG into a PDF, you now know how. Congratulations! You’ve learned a little about ImageMagick.

Closure:

I’ve been meaning to write this article for some time. It was just too long and I didn’t quite know how to make it simple. I finally bit the bullet and wrote it. If all goes well, this will be simple enough for anyone to follow. There are a few challenges along the way that may make this difficult for a novice, but the directions are hopefully clear enough for anyone to follow.

I know that I’ve needed to turn a JPG into a PDF. I’ve had to do so specifically for the reason mentioned above. If you ship something off to a professional printer, they may want the format to be PDF.

They do that for good reason. What you see in a PDF should be exactly what you see when you print the file. It’s a pretty handy file format and the standard is open source.

Thanks for reading! If you want to help, or if the site has helped you, you can donate, register to help, write an article, or buy inexpensive hosting to start your site. If you scroll down, you can sign up for the newsletter, vote for the article, and comment.
Take A Terminal Screenshot In Terminator

This article is going to apply to those who use the Terminator terminal emulator and want to take a terminal screenshot in Terminator. That means it applies to maybe three of you. You’re welcome.

There are a zillion and three terminal emulators.

Yes, they’re terminal emulators. They, in some form or another, mimic the look and behavior of terminals. Terminals were used on old consoles and were how you interacted with things like mainframes. 

Now, you still have terminals available. If you press CTRL + ALT F3 to F6 you should see something called TTY. That stands for Teletypewriter and is from ages past. However, some pedantic people might still call it a terminal emulator or call it a virtual terminal. The latter might be closer to correct.

By the way, if you press CTRL + ALT + F7 it should/might bring you back to your desktop from TTY. If that doesn’t work, hold the LEFT ALT and press the RIGHT ARROW until you cycle back to the desktop.

I don’t want you getting lost and unable to get back to the desktop, after all.

I’ve mentioned Terminator before:

It’s Time To Introduce You To The Terminator!

This is one of my favorite terminal emulators! I use it all the time. Because I have it with a weird theme, I don’t often use it for screenshots. I should because you can take screenshots with a built-in plugin! It’s remarkably simple.

Did I mention that Terminator supports plugins? If I didn’t, well, it does!

If you want, this is a far from complete list of Terminator Plugins.

If you search online, you will find more Terminator plugins that you can use to make your terminal-based computing even easier. What you pick is up to you but one of my favorites is one that you don’t even have to work for. It’s something that should be available by default in all Terminator installs. If it’s not available, your distro chose to package Terminator without plugins. 

Terminator:

The name is as awesome as it implies and it will likely be available in any distro you choose to run as your daily driver. If you check the man page, you’ll see this:

Terminator – Multiple GNOME terminals in one window

That’s just the start of it. Also, while it’s ‘for’ GNOME doesn’t mean that it doesn’t work just fine with other desktop environments. It suits them just fine and I’ve yet to find a desktop environment that doesn’t allow me to use Terminator.

It’s a multi-windowed (if you want, and I do not) terminal with a ton of options. More importantly, for the sake of this article, it also supports plugins. 

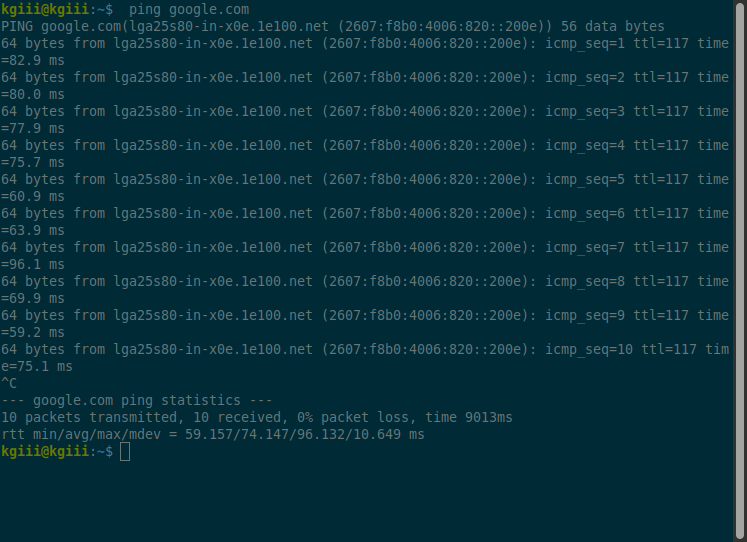
One of those plugins lets me take screenshots that look like this:

terminator screenshot
This was taken without any additional software. It’s just Terminator doing Terminator things.

So, how is this done? What is this witchcraft?

Take A Terminal Screenshot In Terminator:

Terminator is a terminal-based application. It is a terminal emulator, after all. So, it’s going to require a terminal. You can install Terminator with your GUI package manager or you can install it via the terminal. You know what we’ll be doing, so press CTRL + ALT + T, and let’s get started.

I’m going to assume that you’re not like me and that you don’t have Terminator already installed. So, pick the right command for your package manager so that you can install Terminator.

Keep in mind that these commands are from my notes. They might be old or outdated. Be sure to verify them and let me know if I made any mistakes!

Debian/Ubuntu/etc:

Fedora/etc:

RHEL/CentOS:

Arch/Manjaro/etc:

One of those commands should work for you. If you use a different package manager, you’ll likely find that Terminator is an option. It’s a pretty popular terminal. 

Now that you have Terminator installed, you can set it as the default (if you want) or you can open it from your application menu.

With Terminator now open, right-click within the terminal menu and click on the Preferences option to continue…

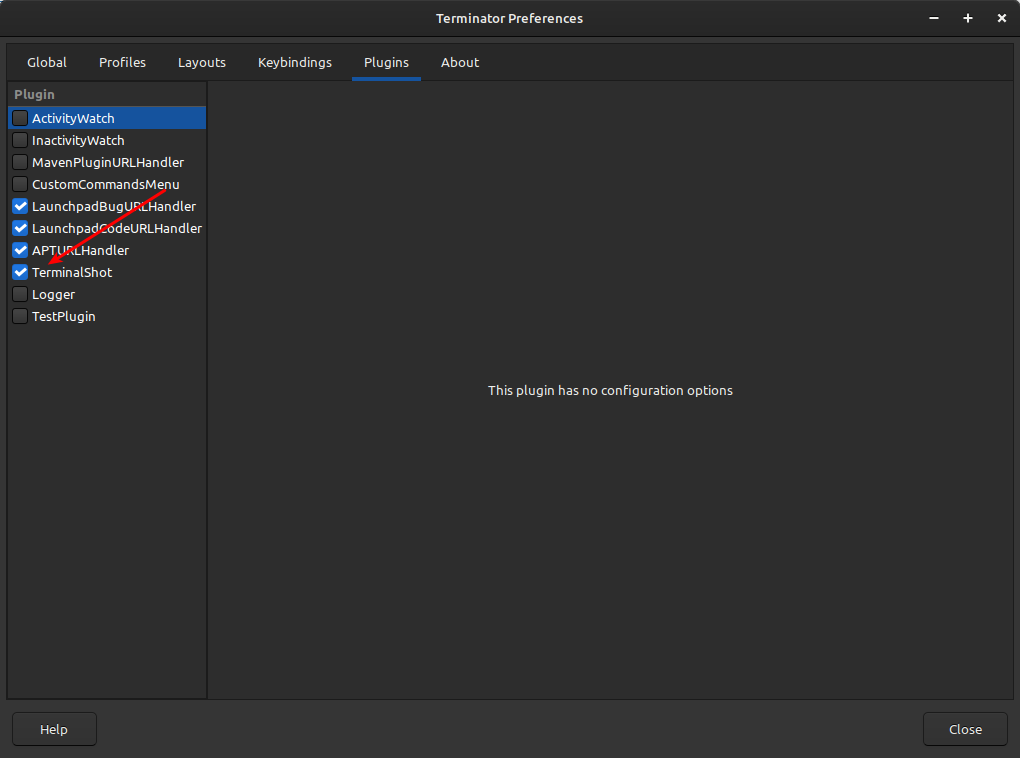
Now, click on Plugins and enable “TerminalShot”, which looks like this:

Enable plugins in Terminator via the prefefrences.
This should be fairly easy to explain and I have faith that my readers will understand it.

With that enabled, you just close the preferences window.

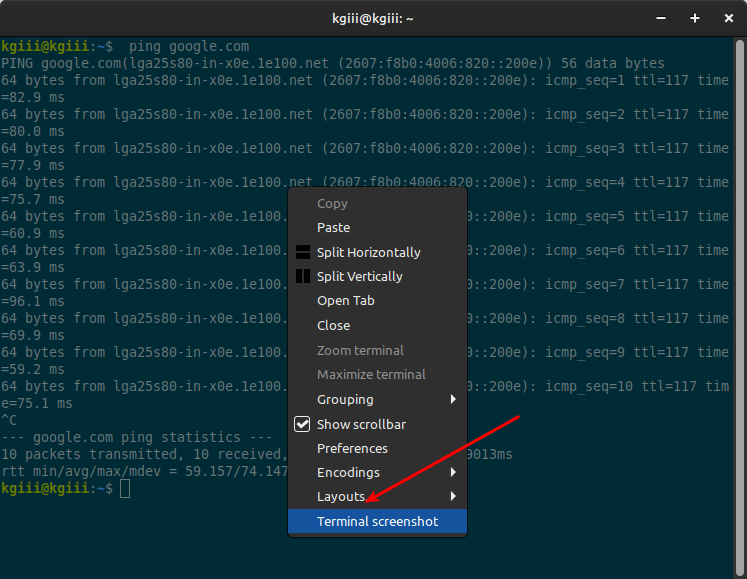
From there,  you have this as an option when you right-click on the window:

Take screenshots within Terminator.
That’s about it, now you can save the device as a .png or a .jpg file, picking your directory first.

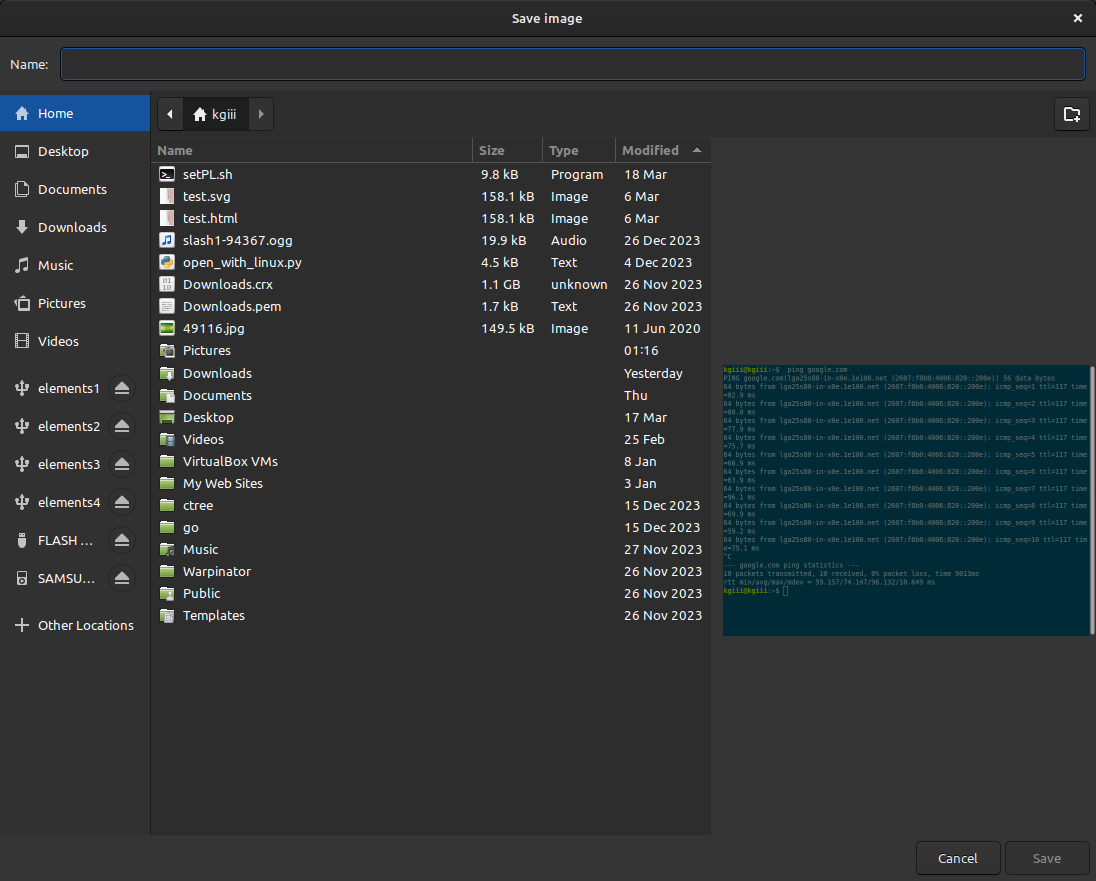
You’ll then be faced with a screen that looks like this:

Save the screenshot from Terminator.
If this one needs me to describe it, you probably shouldn’t be following this article…

That’s pretty obvious. What might not be obvious is that it seems to work for both .png and .jpg file formats. I’ve had good luck with both and both seem to open appropriately. I seldom use these screenshots for this site, but I have and the reason I don’t is because the color just doesn’t look good with the site’s theme. Sometimes it stands out but other times it just looks murky.

Anyhow, that’s how to take a terminal screenshot in Terminator… Pretty sweet!

Closure:

You know… I don’t know how many people are going to want to take a terminal screenshot in Terminator. I forgot to take my sleepy meds and this is the middle of the night. I’ve also been sipping away at my glass of blueberry wine. It seemed like a perfectly good article.

I was watching YouTube videos and I thought about how I do this fairly often and decided that I’d turn it into an article. There were no dissenting opinions offered, so it was turned into an article. Fortunately, I use software that makes it look like I can type coherent words! (Nah, I can do that no matter what! Plus, I’m relatively sober, just tired.)

So, if you’ve ever used Terminator, look into the various plugins available. It extends the application even more and there are some useful things in there. Terminator is one of the best terminal emulators on the planet and I’d consider dying on this hill. It’s really that good.

If you don’t agree, leave a comment. I won’t change my mind, but I will publish it. You’re welcome.

Thanks for reading! If you want to help, or if the site has helped you, you can donate, register to help, write an article, or buy inexpensive hosting to start your site. If you scroll down, you can sign up for the newsletter, vote for the article, and comment.
Reboot From The Terminal

The weather has had a bit of an impact on my internet connection, so this is just going to be a quick article about how you reboot from the terminal. I want to schedule this as soon as possible, so it’ll be a fairly low-effort article. This should not take long!

There are times when you may want to know how to reboot from the terminal. Then, there are times when you can’t access a GUI, and using the terminal is the cleanest method of rebooting your computer. Knowing how to reboot from the terminal might be a skill worth having. I’ll show you a couple of quick and easy ways to do this.

As the title says, this is going to take place in the terminal. You can usually just press CTRL + ALT + T to open your default terminal. You could otherwise reboot with REISUB.

So, with your terminal open…

Reboot With systemd:

The first command we’ll use to reboot your computer. We’ll be using systemd. This will only work if you’re using a distro with systemd.

Reboot With shutdown:

It should be fairly obvious that the shutdown command can be used to reboot your computer. This is one of the generic utilities, so you won’t need to install anything.

(Check the man page because there are a lot of options available.)

Reboot With reboot:

Finally, we’ll use the reboot command to reboot your computer. This might be the easiest to remember and you shouldn’t need to install anything new. You need the following command:

In some distros, you can drop the ‘now’ and the command will still reboot your computer immediately. 

Closure:

So, there you have it. You have a new article and it should even be published on time. It’s not a long article. The subject is easy enough. You’ll never know when you need to reboot from the terminal, and now you do.

Ah well…

Thanks for reading! If you want to help, or if the site has helped you, you can donate, register to help, write an article, or buy inexpensive hosting to start your site. If you scroll down, you can sign up for the newsletter, vote for the article, and comment.
 

Change Between CLI and GUI Mode

If you use Linux you’re probably familiar with the CLI (Command Line Interface) and a GUI (Graphical User Interface, but you can also change between CLI and GUI mode. With a simple terminal command, you can change between CLI and GUI mode at will.

Now, this isn’t talking about switching to a TTY. That’s another option and you can switch between them just as easily, perhaps even easier. I think I’ll touch on TTY first.

TTY:

TTY stands for Teletype with origins back when teletype terminals were how you interacted with a computer. There’s still some use for TTY, typically when the GUI has issues responding (at least at my house).

If you want to visit the TTY, read all these directions.

Let’s enter tty3. Press CTRL + ALT + F3.

Congratulations, you’re in tty mode. You can log in and run commands. The output of such will appear on your screen.

Now you’re stuck. This is why you read the directions first.

Most often, you can press CTRL + ALT + F7 to return to the desktop.

If that doesn’t work, press CTRL + ALT + and keep pressing over and over again until you return to a graphical environment. As this is not standardized, you may need to press various combinations of the CTRL + ALTFunction Keys or even the back arrow button. No, I do not know why this isn’t standardized.

That’s all well and good, but we’ll be showing you how to change between CLI and GUI mode with init and changing your runlevel.

Runlevel:

You’ll need an open terminal for this. You can usually press CTRL + ALT + T to open your default terminal.

With your terminal open, you can check your current runlevel. To do that, you just run runlevel in the terminal. If you do so, you’ll likely find out that your runlevel is 5, which is where it should be as my readers are generally GUI desktop users. It looks like this:

If the output is a 3, you’re in CLI mode.

Change Between CLI And GUI Mode:

By keeping that terminal open AND reading the directions before acting on this information, we can start switching between CLI and GUI modes. You want to read all the directions so that you don’t get stuck so that you’re able to find your way back to the GUI mode.

Very simply, 3 is CLI and 5 is GUI. Got it?

If you’re in a CLI mode (and a GUI is available) you can switch to the GUI mode with the following command:

If you’re in a GUI mode and you want to switch to a CLI mode, the command is just as simple. You just need to change the value, like so:

That’s all you need to know if you want to change between CLI and GUI mode. It’s not very complicated, though you should make sure you know how to return to the previous mode so that you’re not stuck and need to reboot your computer to return to your more comfortable GUI mode.

Well, that’s a short article!

Ha, just kidding!

Change Between CLI And GUI Mode (With systemd):

Most users can be assumed to be using systemd at this point. If you’re not sure if you’re using systemd, you can run the following command:

If you’re using systemd, the output should look like this:

Now, you can use systemd to change between CLI and GUI mode. To ensure you can return to a GUI mode after running this command, you should probably read the entire directions for doing this with systemd.

If you’re in CLI mode and you wish to switch to a GUI mode (again, assuming such is available – which it may not be on servers), the command is quite simple. Just run:

If you’re in GUI mode and you want to switch to CLI mode, the command is quite similar. That command looks like this:

See that? There’s a way to change between CLI and GUI mode with systemd and it’s quite an easy task. These commands are easy enough to remember, though you could always add them to your handy notes so that you have these commands available when you can’t recall them off the top of your head.

There are times when a GUI is better than a CLI. There are times when a CLI is better than a GUI. Then, for example, there are times when a full screen of text is better than just using a terminal. If you’re processing a lot in the terminal, using a full-screen CLI isn’t necessarily a bad idea. You’d certainly not be alone in doing so.

Closure:

I expected to split this into two different articles, but I decided to add the bit about systemd to this article as it was simply too short without it. I’ve been trying to ensure my articles are 800+ words, more often than not, and folks seem to appreciate the longer articles with more information.

This site has been and always will be, a work in progress. I learn and grow as I write these articles. This is reflected by the changes I make along the way. I’m sure that I’ll continue to grow for as long as I write these articles. I’m equally sure that things will change as time passes.

Thanks for reading! If you want to help, or if the site has helped you, you can donate, register to help, write an article, or buy inexpensive hosting to start your site. If you scroll down, you can sign up for the newsletter, vote for the article, and comment.
Open ‘WebP’ Images In Linux Mint

Today’s article shouldn’t be all that complicated, as we’re just going to touch on how to open WebP images in Linux Mint. I am not sure how many people this will help, but it seems like a good idea for an article. It’s also something I’ve recently dealt with, so it’s fresh in my memory. So, if you want to open WebP images in Linux Mint, read on!

Why Linux Mint? Well, because I know it works in Linux Mint. I just happened to be using one of my Linux Mint systems when I encountered this problem. I’m positive this works in other distros, but I’ve only tested this with Linux Mint.

The Story:

I wrote an article about how to disable window grouping in Lubuntu. A lovely friend pinged me to a question on AskUbuntu that involved this subject, suggesting that I answer it. I decided to answer the question.

Being lazy, I wanted to answer the question using the same screenshot I’d used in the article. I did the rational thing and downloaded the file from the linked page. 

The image had a border around it and I wanted to remove that border. I went to open the file with the WebP extension in my image viewer only to learn that there was no native support. When I opened the file, it showed the image in a new browser tab.

I could open the file in XnView and be done with it, but that wasn’t good enough. I wanted to be able to open the file natively, in my default image viewer. Alas, time was of the essence and I put that task aside so that I could answer the question. Later, I’d return to the problem and find a solution.

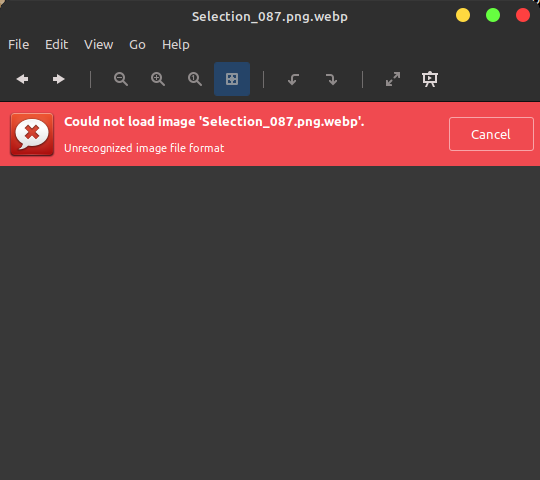
For reference, this is what it looked like when I tried to open a WebP file with the default image viewer:

there's no webp support
As you can see, that’s hardly a productive image.

It would happily show the image in the browser I had open because the WebP format is meant for the internet. That’s hardly useful and opening a browser to view an image just seemed like a step too far.

If you don’t know what WebP files are, you see and deal with them constantly – even if you don’t know, you can read the Wikipedia article about WebP files. They’re image files that are optimized for web use.

I wanted to find a way to open WebP images natively in Linux, specifically Linux Mint. My quest sent me down several false trails and I eventually found a solution that worked. This article shares that with you…

Open WebP Images In Linux Mint:

That’s right, there is a solution. To do this, which is open WebP images, we will need to have an open terminal. It’s okay, you only need it for a few commands. So open your terminal emulator. In many cases, you can just press CTRL + ALT + T.

With the first command, we’re going to add a repository:

Follow the directions and add the repository. Then you need to update the list of available software, like so:

Finally, install the following software with this command:

You don’t need to do anything else. That’s it. That is all you need to do. When you next open a WebP image in Linux Mint, you should be able to do so just fine with your default image viewer.

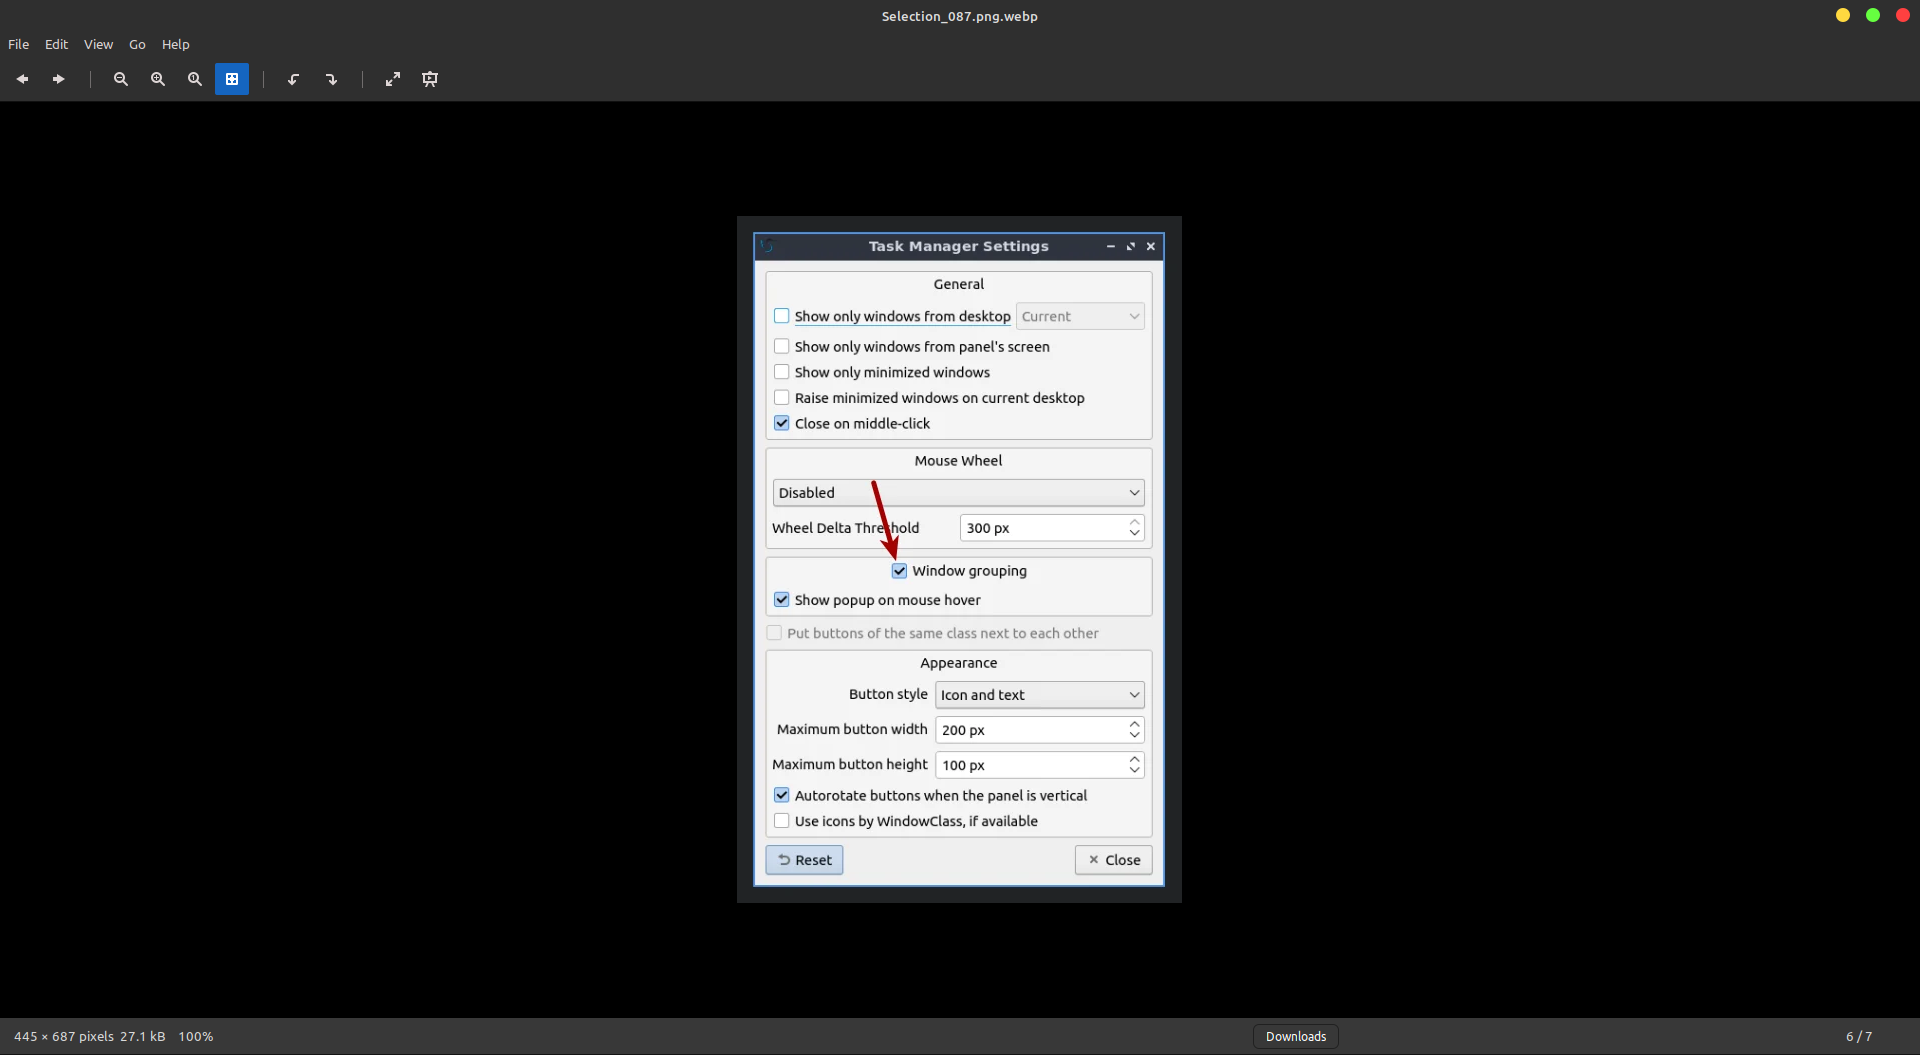
It should look something like this:

when you've completed these steps, you should be able to view WebP images in your default image viewer
See that image? That right there smells like success! It’s a WebP image!

If you click on that image, you can see that it’s a WebP image by looking at the title bar. The application should look familiar. It should look exactly like the default image viewer included with Linux Mint.

And now you know…

Closure:

That’s all there is to it. Linux is great like that. Sure, it took a bit of digging but there was a solution to my problem. Once I knew the correct solution, it was easy to implement. If you want to open WebP images in Linux Mint, you can do exactly that – without all that much effort. If you dream and work hard enough, someone else will have already done all the work and you can just use their software to accomplish your goals!

Thanks for reading! If you want to help, or if the site has helped you, you can donate, register to help, write an article, or buy inexpensive hosting to start your site. If you scroll down, you can sign up for the newsletter, vote for the article, and comment.
Subscribe To Our Newsletter
Get notified when new articles are published! It's free and I won't send you any spam.
Linux Tips
Creative Commons License
This work is licensed under a Creative Commons Attribution 4.0 International License.