Let’s Reduce The Size Of .png Files

In today’s article, we’re going to learn how to reduce the size of .png files. PNG stands for Portable Network Graphics and they can be pretty large. They are raster image format files using lossless image compression. So, today we’ll be doing just that, compressing .png files, in the terminal.

As stated, PNG stands for Portable Network Graphics. Some folks will say that it stands for “PNG’s Not GIF” but they’re incorrect – but are correct about the motive. The .png format was developed to be a free-of-patent alternative to .gif files – some 25 years ago, as of the time this article is published. You can read more about the file format at the PNG Wikipedia Page.

The tool we’ll be using is known as ‘pngquant‘, which should be available in most default repositories. You can check the man page, but it defines itself as:

pngquant — PNG converter and lossy image compressor

You’ll note that it says ‘lossy’ and that means you can lose some image quality with this compression – but from my testing it spits out a perfectly usable image, even while compressing it a great deal. It’s pretty handy. I haven’t tested it as a batch process on a bunch of files, but I have tested it on some files. In each case, I got a perfectly usable image that spit out the other side.

So, with that, let’s move on into the meat of the article, where we’ll learn to …

Reduce The Size Of .png Files:

As pngquant is a terminal-based application, it stands to reason that you’re gonna need an open terminal. If you don’t know how to open the terminal, you can do so with your keyboard – just press CTRL + ALT + T and your default terminal should open.

I’ll give you the installation instructions for Debian/Ubuntu/Mint, but you should be able to find the package in most default repositories. To install in those particular distros:

Once ‘pngquant’ has been installed, navigate to a directory where you have some .png files waiting to be compressed. Once you’re there, run this command:

That’ll tell you the size of the .png in question. Now, you’re going to compress it with the following command:

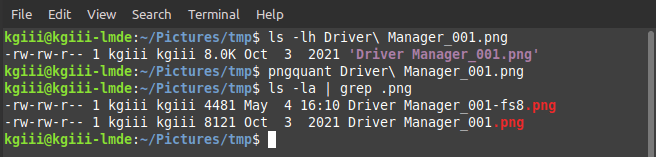
By default, ‘pngquant’ will retain the original file and create a new file that has appended – fs8 to the file name. So, foo.png becomes foo-fs8.png. You can change that behavior with the --ext flag. 

Here’s an example where an already small .png file was reduced even further by way of pngquant:

pngquant in action - reducing the size of .png files
As you can see, it reduced the file size by about half. The resulting quality was fine.

You can find GUI software that will do this for you, but this is a quick and easy way to reduce the size of .png files in the terminal. While not opensource, there’s XnViewMP and I’m pretty sure XnConvert works with Linux as well. If not, XnViewMP does and has batch conversion as an option – while the latter is specifically for batch conversion.

Closure:

And there you have it… You have a way to reduce the size of .png files in your terminal. Just what you always wanted! I don’t see my average reader doing a whole lot of this, but it’s an option if you want. I use a service that switches my images to WebP as it’s faster and lighter. It’s done by my CDN for me, which is nice and one of the reasons the site loads quickly.

Thanks for reading! If you want to help, or if the site has helped you, you can donate, register to help, write an article, or buy inexpensive hosting to start your own site. The first person to read this sentence should contact me and I’ll donate five dollars to their favorite charity that accepts PayPal. If you scroll down, you can sign up for the newsletter, vote for the article, and comment.

Take, Edit, And Upload Screenshots With Shutter

For such a minimal thing, there are some strong opinions about Shutter. Me? I love Shutter. I love Shutter, warts and all. Some folks have some pretty strong opinions regarding how much they dislike Shutter. And, well, they’re not all wrong. Their complaints can be pretty legitimate.

Man, sometimes Shutter will freeze when you try to take a screenshot limited to just a specific section of the screen. Shutter went a very long time without getting any updates – so long that it has been booted from some of the repositories, as it relied on older libraries.

But, things have changed… Well, no… No, that bug is still there and I’ve been too lazy to report it. But, on a positive note, it’s actively being developed again. It is now ported to GTK3 and is slowly making its way back into the default repositories. The author is now fixing bugs again.

Because of this, I feel comfortable putting it out there. Yeah, once in a while it’ll freeze – and you have to use a TTY to stop the processes manually – but it’s worth it. That doesn’t happen all that often.

I not only use Shutter for screenshots, I use it to do quick edits to pictures I plan on uploading. You can even upload it to a few services from within the program itself – like Imgur and DropBox. The editing is a bit better than basic editing and more than enough to redact important information, crop, add text, add arrows etc…

Screenshots With Shutter:

I usually work with Lubuntu, and in the Ubuntu family. So, I’m just going to cover how to install it with Lubuntu, or any official Ubuntu flavor. For quite some time, you’ve had to add a PPA (repository) but there’s now a new ‘official’ PPA that you can use.

This step requires an open terminal, like many other articles on this site. If you don’t know how to open the terminal, you can do so with your keyboard – just press CTRL + ALT + T.

Once you have the terminal open, you can add the official PPA with the following:

If you’re using a modern release, it should then automatically update the database. If you’re using something older, go with this next:

Once that has finished, you just need to install it. That’s done with:

Let that finish and, once installed, you can open Shutter from the menu and immediately go to work taking screenshots. 

If you want to integrate it into your system the shortcuts would be:

shutter -f for a full screenshot
shutter -a for the active window
shutter -s to manually grab an area

So, swap those to fully integrate it into your system – if you want. 

Give it a shot. You might like it. It actually works these days without installing a bunch of old library packages. If you decide you don’t like it, you can always remove it. To remove it, you’d simple run these commands:

And remove the PPA with:

Tada! It’s all gone. Again, it’ll be a bit different if you’re not using Ubuntu or an official Ubuntu flavor. Any distro that also supports PPAs should handle this by default, so there’s that. There’s a way to install it on most distros, if you want to put the effort in.

Closure:

There you have it, another article – and this one is about Shutter – a tool to take screenshots. I find it easiest to just integrate it into the system and just have the application sitting in the tray. After all, I deal with a lot of images and a whole lot of screenshots. I’m not sure how I got there, but here I am. Man, I take a lot of screenshots.

Like I said, you can use it to edit regular images too. Then, you just click the button to export them and you upload them to sites like Imgur. If you’re curious, it looks a bit like this:

shutter in action
Shutter can be used all sorts of ways – including editing pictures.

Anyhow, it’s worth looking at again. I’ve used it all along, but there are bug fixes and the whole porting to GTK3 thing. If you’ve shunned it, or overlooked it, it’s time to try it again – warts and all. Just try reporting bugs (me too) and we’ll see where it goes.

Thanks for reading! If you want to help, or if the site has helped you, you can donate, register to help, write an article, or buy inexpensive hosting to start your own site. If you scroll down, you can sign up for the newsletter, vote for the article, and comment.

Subscribe To Our Newsletter
Get notified when new articles are published! It's free and I won't send you any spam.
Linux Tips
Creative Commons License
This work is licensed under a Creative Commons Attribution 4.0 International License.