Get Some System Information With Archey

Today’s article will be a fun one, where we figure out how to get some system information with Archey. It’s a mostly unnecessary article and Archey is definitely replicating work done elsewhere, but it’ll be fun!

Well, I think it’ll be fun…

I suppose you can decide that for yourself as you read the article. If you want to get some system information with Archey, read on (and maybe have fun)!

As regular readers might know, I’ve covered a variety of *fetch articles.

How To: Display System Information With screenFetch
Screenfetch vs. Neofetch, You Decide!
Show RAM Information With Ramfetch
Get Some Prettified CPU Information in Your Terminal With ‘CPUFETCH’

In fact, the ‘Screenfetch vs. Neofetch’ article is oddly one of the most searched articles on the site, at least from Google’s traffic.

Anyhow, Archey is like those (but written in Python, if that matters). If I understand correctly, it was Archey4 – a maintained fork of Archey. The original Archey project ceased development and now this project is just called Archey as it is no longer a fork but is the actual project.

I think I’m understanding that properly. If I’m not, hopefully, someone chimes in and lets me know the full story. Often my articles are visited by project leaders, so maybe that’ll happen in this instance and someone will set the story straight.

Either way, it doesn’t matter much – but it does explain why I’m simply referring to the project as ‘Archey’. If you check the man page, you’ll learn that Archey describes itself like:

A simple system information tool written in Python

Got it? Good! Let’s get started getting some system information with Archey!

Let’s Get System Information With Archey:

So, the first thing you’re going to need is a copy of Archey. That’s easily accomplished if you want .deb or .rpm. There are some odds that you’ll find it’s already in your repositories (like Arch or BSD). You can also use “pip” (Python packages from PyPI) to install Archey. There’s even a ‘homebrew’ version for Mac users.

Otherwise, if none of those will work for you, you might find you need the source code to build and install Archey.

This link should take you to the current release:

https://github.com/HorlogeSkynet/archey4/releases/latest

From there you can install Archey. Due to the huge variety of installation methods, I’m just going to tell you to follow the directions to install Archey. If you can’t get it installed, you can always ask for help and someone will hopefully get you sorted.

Once you have Archy installed, you can start getting system information with Archey. You just run the archey command and it’ll spit out something like this:

Achey displays system information.
I don’t think you’ll need me to explain. The screenshot should be adequate.

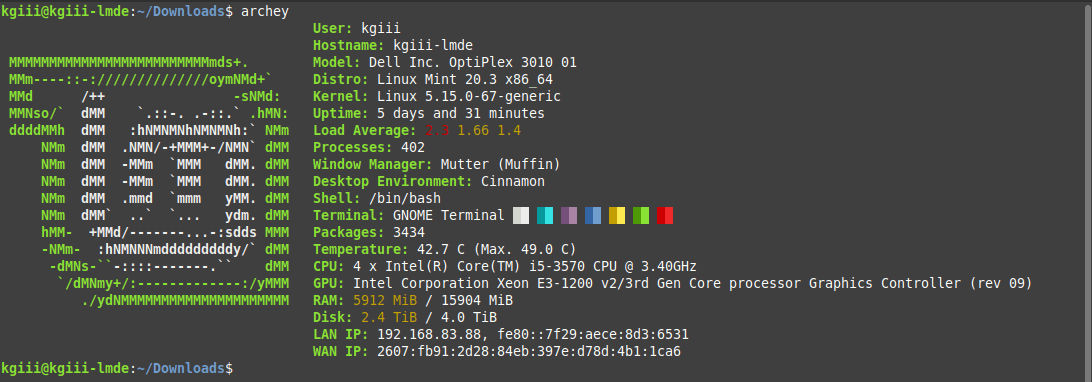
As you can see, Archey’s output is fairly normal. It likely reminds you of things we’ve already covered in earlier articles. That’s okay – it should remind you of things like Screenfetch and Neofetch.

Just like some of the other previously covered *fetch applications, you can take a screenshot automatically. After all, the goal of these applications is to give you some information that si easily captured as a screenshot so that you can show it off to your forum buddies.

However, possibly because I have Flameshot installed (which seems to have taken over the ‘screenshot’ command that Archey uses), I am unable to actually verify the screenshot bit. I dutifully took the screenshot with Shutter. But, the -s flag should work for other people. I tried a few times with Archey but got conflicting errors. Someone smarter than I probably have this sorted out.

I’m not going to go uninstalling stuff just to demonstrate it. If it doesn’t work for you, file a bug at the above-linked GitHub site. Also, you have some additional options with Archey. There’s nothing too fancy, but be sure to check the man page (by using man archey) to learn more about the application.

Closure:

There you have it, you have another article. This article covers how to get system information with Archey. It’s an easy and, likely, familiar task. If you’ve followed along, you’ve learned all sorts of ways to get system information.

Do you really need Archey? No, probably not… I figured I’d cover it because my site shows up in some Archey queries. If people are looking for it, it might as well be here. That’s my line of thinking, at any rate.

Thanks for reading! If you want to help, or if the site has helped you, you can donate, register to help, write an article, or buy inexpensive hosting to start your own site. If you scroll down, you can sign up for the newsletter, vote for the article, and comment.

Make A Website Screenshot With CutyCapt

In today’s article, we’re going to use the terminal and make a website screenshot with CutyCapt. It’ll be a short and easily followed article, but one for everyone to follow. Even a rank beginner will easily be able to make a website screenshot with CutyCapt! (That’s the link to the project homepage, or where you need to go to learn more about CutyCapt.)

There are pretty much a zillion screenshot tools. There are even a metric-ton of browser extensions that specialize in taking a website screenshot. You can use any of those, or you can just install CutyCapt and use that from the terminal. There are even multiple choices when it comes to taking website screenshots from within the terminal, but  we’ll just be using this CutyCapt in this article.

If you’re curious, CutyCapt defines itself on SourceForge as:

CutyCapt is a small cross-platform command-line utility to capture WebKit’s rendering of a web page into a variety of vector and bitmap formats, including SVG, PDF, PS, PNG, JPEG, TIFF, GIF, and BMP.

That appears to be a pretty solid definition. The CutyCapt tool does what it says on the tin and that’s it. You can’t really expect anything more – which is not a bad thing. You have one job and you need one tool. If the goal is to take a screenshot of a website via the terminal, the tool is CutyCat.

Make A Website Screenshot With CutyCapt:

Like oh so many, this article also requires an open terminal. If you don’t know how to open the terminal, you can do so with your keyboard – just press CTRL + ALT + T and your default terminal should open.

With your terminal open, you’re going to need to install said CutyCapt. This may not be available for in all default repositories, but it’s in Debian/Ubuntu/Mint’s default repositories. So, using those as my example, you can install CutyCapt with:

Just know that your distro may not have this packaged, so follow the link in the preamble and find a way to install it in your distro of choice. You can compile it easily enough, should you need to go that far.

Once you have CutyCapt installed, it’s actually pretty easy. If you want use CutyCapt to take a screenshot of linux-tips.us, your command might look a little like this:

Or, in other words, it’s pretty basic:

It might look complicated, but CutyCapt is not all that complicated when you break it down. If the output size isn’t quite what you’re after (and it might not be), you can just keep playing with it until you get it exactly how you want it. The output format and expected screenshot size is all you need to worry about getting right.

Either way, as mentioned in the preamble, you can change the output. In our example, we specified .png. You need only change that and the output will change to what you specified. If you need any further assistance, you can use the classic man cutycapt to learn more about the application.

Closure:

See? You have yet another article. This one teaches you how to make a website screenshot with CutyCapt. It’s a pretty handy application to have on-hand if you’re into taking screenshots of websites. CutyCapt is only used for making screenshots and not a whole lot more than that, so it’s a one-trick-pony and intentionally so.

Thanks for reading! If you want to help, or if the site has helped you, you can donate, register to help, write an article, or buy inexpensive hosting to start your own site. If you scroll down, you can sign up for the newsletter, vote for the article, and comment.

Take, Edit, And Upload Screenshots With Shutter

For such a minimal thing, there are some strong opinions about Shutter. Me? I love Shutter. I love Shutter, warts and all. Some folks have some pretty strong opinions regarding how much they dislike Shutter. And, well, they’re not all wrong. Their complaints can be pretty legitimate.

Man, sometimes Shutter will freeze when you try to take a screenshot limited to just a specific section of the screen. Shutter went a very long time without getting any updates – so long that it has been booted from some of the repositories, as it relied on older libraries.

But, things have changed… Well, no… No, that bug is still there and I’ve been too lazy to report it. But, on a positive note, it’s actively being developed again. It is now ported to GTK3 and is slowly making its way back into the default repositories. The author is now fixing bugs again.

Because of this, I feel comfortable putting it out there. Yeah, once in a while it’ll freeze – and you have to use a TTY to stop the processes manually – but it’s worth it. That doesn’t happen all that often.

I not only use Shutter for screenshots, I use it to do quick edits to pictures I plan on uploading. You can even upload it to a few services from within the program itself – like Imgur and DropBox. The editing is a bit better than basic editing and more than enough to redact important information, crop, add text, add arrows etc…

Screenshots With Shutter:

I usually work with Lubuntu, and in the Ubuntu family. So, I’m just going to cover how to install it with Lubuntu, or any official Ubuntu flavor. For quite some time, you’ve had to add a PPA (repository) but there’s now a new ‘official’ PPA that you can use.

This step requires an open terminal, like many other articles on this site. If you don’t know how to open the terminal, you can do so with your keyboard – just press CTRL + ALT + T.

Once you have the terminal open, you can add the official PPA with the following:

If you’re using a modern release, it should then automatically update the database. If you’re using something older, go with this next:

Once that has finished, you just need to install it. That’s done with:

Let that finish and, once installed, you can open Shutter from the menu and immediately go to work taking screenshots. 

If you want to integrate it into your system the shortcuts would be:

shutter -f for a full screenshot
shutter -a for the active window
shutter -s to manually grab an area

So, swap those to fully integrate it into your system – if you want. 

Give it a shot. You might like it. It actually works these days without installing a bunch of old library packages. If you decide you don’t like it, you can always remove it. To remove it, you’d simple run these commands:

And remove the PPA with:

Tada! It’s all gone. Again, it’ll be a bit different if you’re not using Ubuntu or an official Ubuntu flavor. Any distro that also supports PPAs should handle this by default, so there’s that. There’s a way to install it on most distros, if you want to put the effort in.

Closure:

There you have it, another article – and this one is about Shutter – a tool to take screenshots. I find it easiest to just integrate it into the system and just have the application sitting in the tray. After all, I deal with a lot of images and a whole lot of screenshots. I’m not sure how I got there, but here I am. Man, I take a lot of screenshots.

Like I said, you can use it to edit regular images too. Then, you just click the button to export them and you upload them to sites like Imgur. If you’re curious, it looks a bit like this:

shutter in action
Shutter can be used all sorts of ways – including editing pictures.

Anyhow, it’s worth looking at again. I’ve used it all along, but there are bug fixes and the whole porting to GTK3 thing. If you’ve shunned it, or overlooked it, it’s time to try it again – warts and all. Just try reporting bugs (me too) and we’ll see where it goes.

Thanks for reading! If you want to help, or if the site has helped you, you can donate, register to help, write an article, or buy inexpensive hosting to start your own site. If you scroll down, you can sign up for the newsletter, vote for the article, and comment.

Subscribe To Our Newsletter
Get notified when new articles are published! It's free and I won't send you any spam.
Linux Tips
Creative Commons License
This work is licensed under a Creative Commons Attribution 4.0 International License.