Extract Text From Multiple File Types

Today we will have a fairly simple exercise as we’re going to just use a Python application to extract text from multiple file types. This is a pretty standard operation but will require some preparation.

Fortunately, I’m ahead of the game! You’re good to go if you follow along on the site and have already enabled PIP. Otherwise…

You will need to install PIP for this article. This is not complicated.

First, read this article:

Install Python’s PIP Part One

Technically, you could just do that. However, you should add the path so that you don’t have to specify the location of your Python applications and can easily use them from the terminal.

So, read this article:

Install Python’s PIP Part Two

Now that you’ve done those two things, you’re good to proceed. See? It was worth the time to write those articles! They’re useful and save a lot of time.

The tool we’re going to use is known as “Textract“. Don’t quote me on this, but I believe this could also apply to Windows users, though installing the dependencies for this would be a different process. I’m not a Windows user. If you are, feel free to comment and let us know how things work on your side of life.

Textract: 

While there is no built-in man page, the Textract application is described like this:

While several packages exist for extracting content from each of these formats on their own, this package provides a single interface for extracting content from any type of file, without any irrelevant markup.

It is a pretty handy application and claims to extract the text from more file types than I could reasonably expect to test. Here’s a list of files that you should be able to extract text from.

.csv via python builtins
.doc via antiword
.docx via python-docx2txt
.eml via python builtins
.epub via ebooklib
.gif via tesseract-ocr
.jpg and .jpeg via tesseract-ocr
.json via python builtins
.html and .htm via beautifulsoup4
.mp3 via sox, SpeechRecognition, and pocketsphinx
.msg via msg-extractor
.odt via python builtins
.ogg via sox, SpeechRecognition, and pocketsphinx
.pdf via pdftotext (default) or pdfminer.six
.png via tesseract-ocr
.pptx via python-pptx
.ps via ps2text
.rtf via unrtf
.tiff and .tif via tesseract-ocr
.txt via python builtins
.wav via SpeechRecognition and pocketsphinx
.xlsx via xlrd
.xls via xlrd

You may need to install specific packages for some of these file formats. Those packages can usually be found in your default repositories. It otherwise comes with quite a lot of functionality out of the box.

I did test some of those formats and it seemed to work okay. Your mileage may vary, of course. However, Textract was able to extract text from multiple file types.

Extract Text From Multiple File Types:

If you want to extract text from multiple file types with Textract (a fantastic name for an application) then you’ll first need to install it. I’ve yet to find a working GUI PIP installation tool, so that means you’re going to need an open terminal.

More often than not, you can open your terminal by simply pressing CTRL + ALT + T on your keyboard. If your distro doesn’t adhere to the norms, you can find a terminal in your application menu. If you don’t use an application menu, you already know how to open a terminal and you don’t need any help from me.

First, let’s install Textract:

Note the lack of sudo. You’re installing this for your user account and do not need elevated permissions for this. Python packages go right into your ~/ directory. See below, as you’ll want to install some dependencies for full functionality.

You may see an error or two during installation but that doesn’t seem to matter. It will take a minute to install and watching the installation chug along is good fun.

Using Textract:

With Textract installed, you can now extract text from a whole variety of file types. The syntax is as follows:

That sends the output to the standard output (your terminal). I suspect that most folks are going to want to save the output to a file. For that, you just need to add the -o flag and a file name. So, something like this:

That’s going to extract the text from some file types but not all of them.

Now, this is from a Lubuntu installation…

This isn’t going to work with all the listed file types at this time. You need some dependencies to be installed. For me, and it’s a long one, the command was:

That’s slightly different from the command they include on their page, but it appears to do the trick. You’ll have some of those installed by default but running the command will sort itself out. You’ll have to modify the command to suit your distro, but that should work with Debian, Ubuntu, Linux Mint, and other Debian-based distros.

With that installed, I can even grab the text from image files.

Here’s an example:

a simple picture with simple text
This is some simple text to test how well Textract really works.

Here’s the command:

Here’s the output:

I dare say that’s pretty good. I tried other pictures and it was good enough to get the gist of things. Complicated image files with many columns appear to be a bit of a stumbling block. But it’s not terrible.

It has no trouble at all with other file formats.

It can be a bit fussy to get Textract properly installed but it seems to do the trick once installed. If you want to extract text from multiple file types, Textract is a pretty good piece of software.

Closure:

If you want to extract text from multiple file types, this is definitely a good tool for the job. It certainly handles a lot of files and does a good job with them. It’s not perfect. None of these tools are. Complicated image files threw it off a bit, but Textract lives up to its name.

There was a reason I wrote those articles about PIP. Being able to install Python packages via a repository is a great thing. There’s some great Python software out there and we’ve barely touched the surface. Linux is great like that, that is offering great Python support.

Do you have a use for this in your daily activities? If so, leave a comment letting us know how you use Textract and what makes you pick it over other applications. You can even use a real email address. I never send spam. I never sell your information.

Thanks for reading! If you want to help, or if the site has helped you, you can donate, register to help, write an article, or buy inexpensive hosting to start your site. If you scroll down, you can sign up for the newsletter, vote for the article, and comment.
Increase The Volume Of Thunderbird Notifications

Today’s article is one of a personal nature, an issue that affected me personally, where I needed to increase the volume of Thunderbird notifications. It was a bit of a problem and one easily resolved – at least in my case. I think it will be trivial to overcome this for others and thought that I’d make a quick article about this.

Thunderbird is an email client. The Thunderbird email client is brought to you by the same people, that is Mozilla, that brings you the Firefox web browser. As far as graphical email clients for Linux goes, you’re probably better off using Thunderbird.

This article is specifically about the calendar. It is only applicable if you have the calendar (sometimes called Lightning) installed. Further, it is only applicable if you then also have it set to chime an audio file when a scheduled activity is due. If none of those things are true, this article is not meant for you.

I don’t allow most audio notifications, but I do rely on Thunderbird for scheduling and noting appointments. If you’ve configured Thunderbird to show notifications and to create a sound to denote those notifications, you may notice that the notification is quieter than you’d like.

I searched for a solution for the low volume of Thunderbird notifications. I had a solution in mind, but I looked for something more graceful. The goal was to find something ‘in-app’ that let me set the notification volume. Not only was I unable to find a solution in that direction, I was unable to find anyone suggesting this path to increase the volume of Thunderbird notifications.

I’ll be giving directions for Debian (and derivatives such as Ubuntu, and all official Ubuntu flavors, Linux Mint, ElementaryOS, and such) but you can adapt these directions for your needs. The tool we’ll be using is ‘Audacity’ and that’s probably going to be in everyone’s default repositories.

If you’re unfamiliar with Audacity, the application is used to edit audio. As a general rule, I don’t bother with full-fledged DAWs and prefer the simplicity that Audacity offers. So, I guess that does make it my DAW of choice.

Odds are good that you don’t have Audacity installed by default. Again, assuming you use a distro with apt, you’d simply install Audacity with the following command:

If you’re curious, the man page describes it like this:

audacity – Graphical cross-platform audio editor

That’s a fine description and Audacity is the only tool you’ll need to increase the volume of Thunderbird notifications. As near as I can tell, this will work on default sounds or the sounds you add as your notification sounds.

So then, let’s get on with it… Let’s learn how to…

Increase The Volume Of Thunderbird Notifications:

If you read the intro correctly, or at least as how I expected it to be read, then you should have already installed Audacity. You can do this with any DAW (Digital Audio Workstation) but Audacity is quick and easy, easy enough for me to use.

So, I’ll assume you have Audacity installed.

You can do this with Ocenaudio. If you want a full-blown DAW, you can do this in Reaper. You have choices, but these directions are for Audacity.

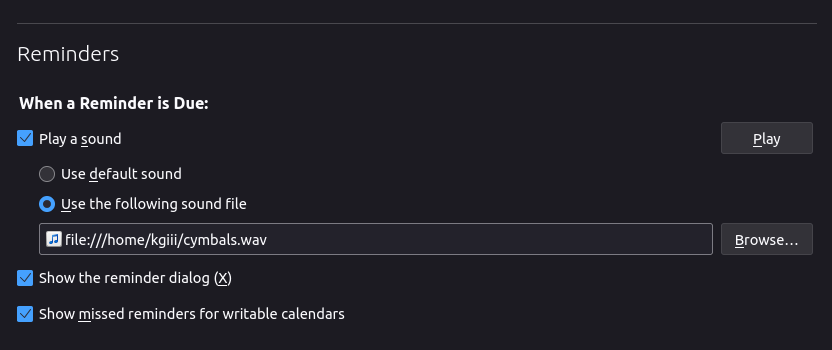
Your first step is to open your file manager. With your file manager now open, double-check in Thunderbird to see where your notification sound file is located. It’s in the Settings menu, under the Calendar settings.

Thunderbird's notifications settings.
This should be fairly easily explained. A picture is worth 1,000 words!

As you can see, I’ve chosen a custom audio file. The process is the same. You need to find the file in question or add your file. If you wanted to you could root around and find the default file, but I suggest adding your own.

Once you have found the sound file, right-click on it and open it in Audacity. You can also open Audacity and then open the file by clicking on File and then Open. Both should work on most distros.

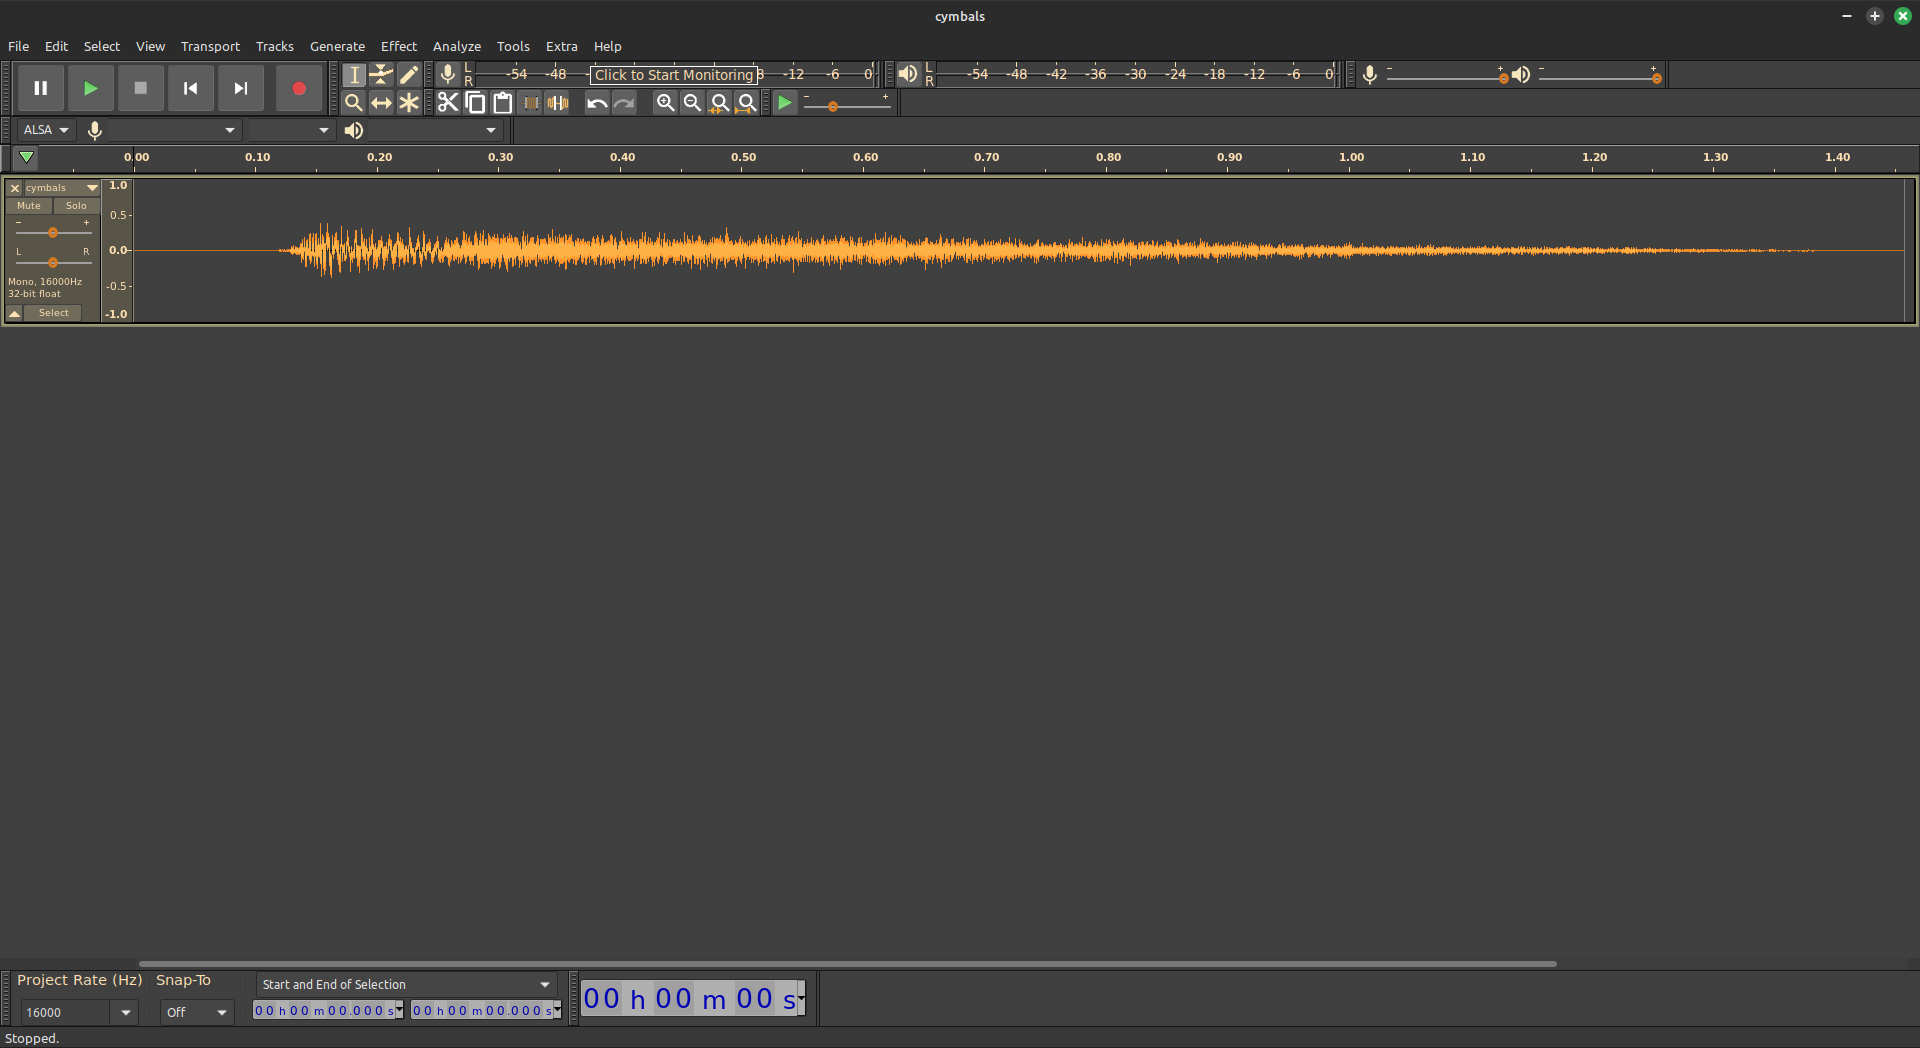
You’ll then see a screen that looks similar to this:

We'll increase the volume with Audacity.
That’s the waveform of my ‘cymbals’ notification chime.

What you do from here is right-click on any part of the spectrum shown in the image above.

You then press CTRL + A to select the full file.

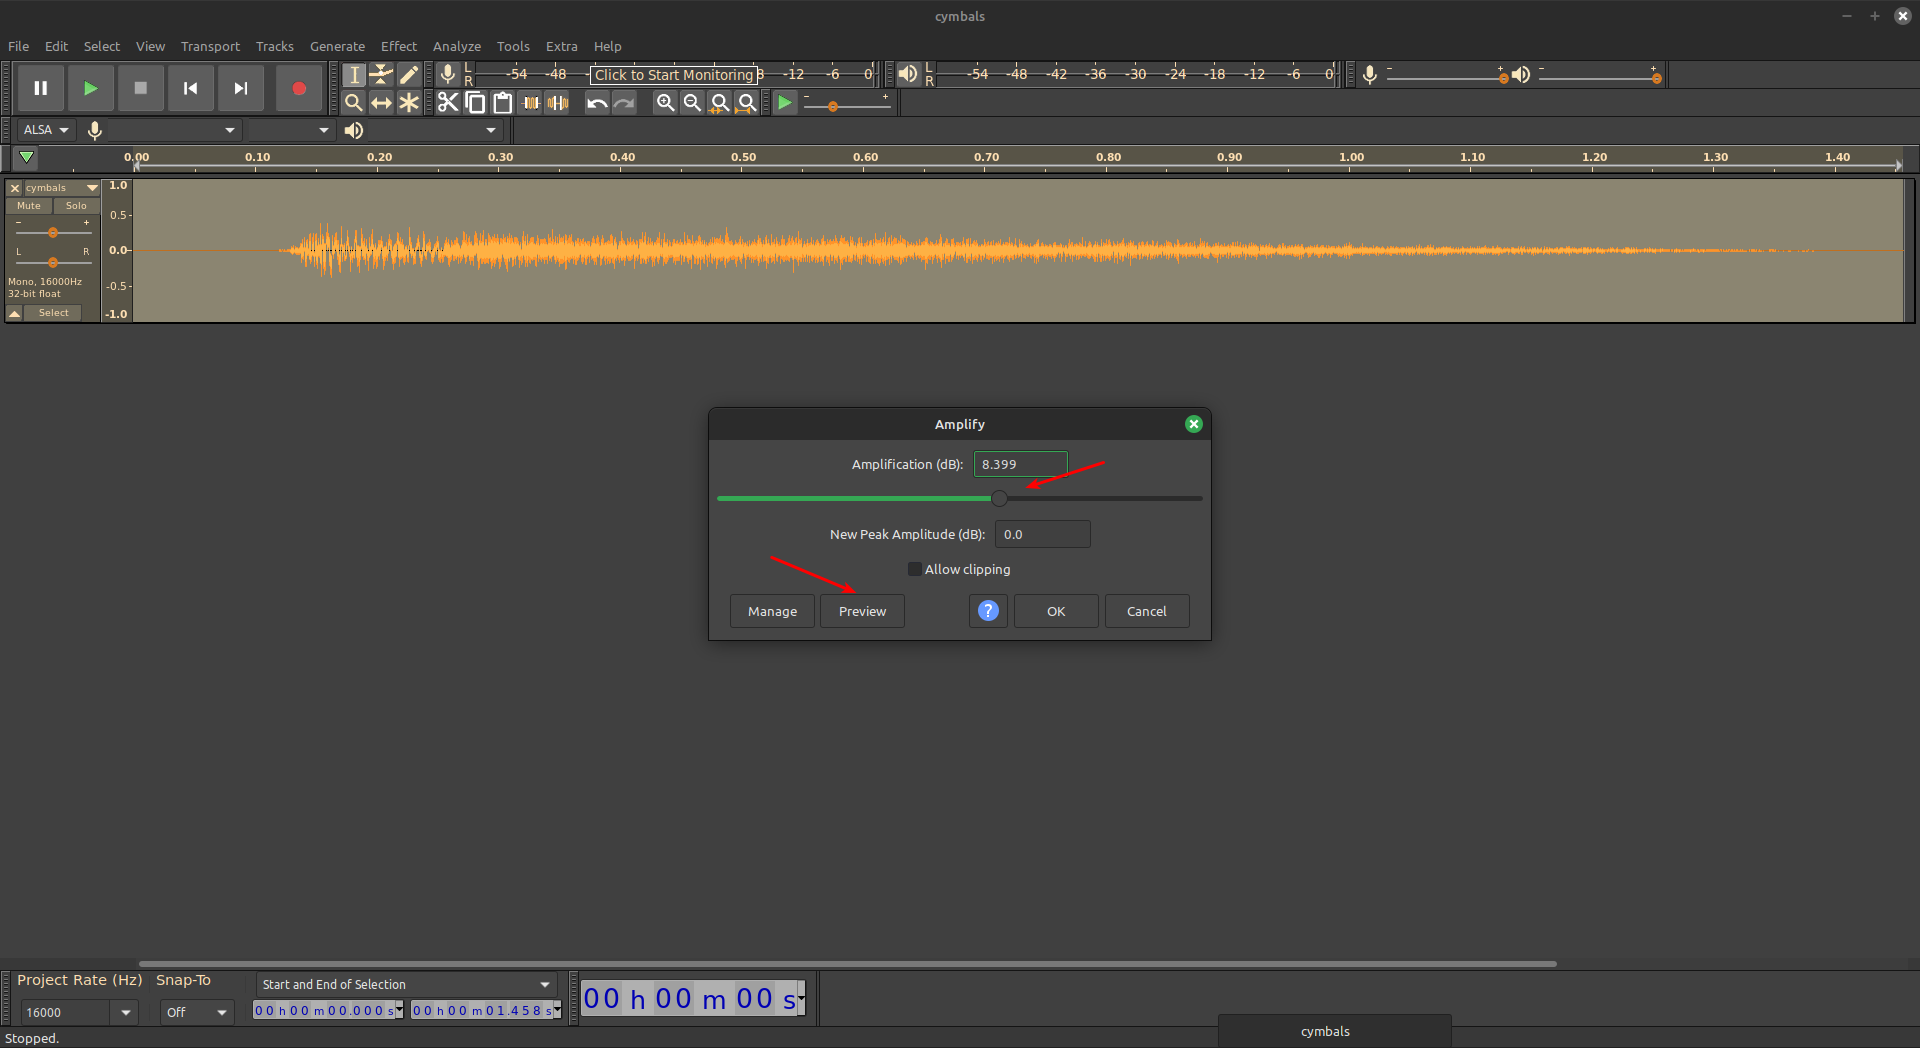
You next click on Effect and then you click on Amplify. Adjust the amplification to suit and use the preview button to judge the volume level you’d like to achieve. That screen would look something like this:

Using Audacity to control the reminder sounds from Thunderbird.
If you want to hear your Thunderbird notifications easily, this is how you do it.

This works with more than just increasing the volume of Thunderbird notifications. You can raise and lower the volumes of almost any sound file quickly and easily. Rather than mucking about with some Thunderbird extension, you can just raise the volumes yourself.

Closure:

I’m not sure how many folks will be helped by this article, but I hope it’s some. This was an itch that I needed to scratch and this was how I went about doing so. I figured I’d share that with you by making it into an article. That seemed like a reasonable choice at the time.

Thanks for reading! If you want to help, or if the site has helped you, you can donate, register to help, write an article, or buy inexpensive hosting to start your site. If you scroll down, you can sign up for the newsletter, vote for the article, and comment.
A Few Geeky YouTube Channels

Today we’ll have an absolutely meaningless article, as I share a few geeky YouTube channels with you for your appreciation. I’ve done similar before, with the ‘few good channels‘ article. It was fairly well received and today will be a bit similar, though probably a bit shorter. After all, there have been a few long articles lately. I might as well mix things up a bit.

I am also curious about AdSense. I’m not sure what’s happening, but it hasn’t registered any clicks lately. That’s not good! So, if you want to do me a favor, you can whitelist the site and let me know if you saw any ads. (Don’t click on them just to help me! Ads should only be clicked if you have a legitimate interest in the product! Otherwise, Google gets made and throws a hissy fit and takes away some credit for clicks.)

If you check the headline for this article, it should kinda give you an idea of what’s to come. The previous video article was just about Linux channels. This article will have very little to do with Linux itself, so it’s even an appropriate article for our Windows-geek friends!

As a general rule, I’m not a huge TV watcher, but I do watch video content. I have more video content to watch than I will ever have time to watch. A great deal of what I watch has to do with automobiles, but I make time for other subjects – such as Linux and geeky topics. Today, I’m just going to share a few geeky YouTube channels. That’s it…

Geeky YouTube Channels:

So, crack open your favorite brand of popcorn…

Open up your favorite media-watching browser…

Take the rest of today’s to-do list and throw it straight in the trash…

Ready? 

The very first channel I want to share is called TechMoan. This guy loves old stuff, mostly media players. If it plays video or (especially) reproduces sound, he’s probably interested. From Edison’s wax disks modern MP3 players with Bluetooth, he’s interested in it. His videos are full of useful (and delightfully useless) information. If there’s a media format out there, he wants to be able to play it. It’s awesome!

Link:
TechMoan

Next on the list of geeky YouTube channels would be LGR. That once stood for “Lazy Game Reviews”, but now it just stands for nothing. He’s long since changed direction and covers old computers. For the people who read this site, this might be the most interesting of the channels. LGR covers a lot of older computers and tech. You’ll find a goodly amount of content from the 80s and 90s, and even some modern stuff sprinkled in for good measure.

Link:
LGR

Finally, on my list of geeky YouTube channels you might enjoy, is a channel from a real museum. They don’t have dinosaur bones and you won’t find a wooly mammoth in their museum. What you will find is the dinosaurs and mammoths of the computer industry. From some of the earliest computers to some of the obscure computers that fall into the ‘also ran’ category, you’ll find it all. All sorts of long-format videos will inform and entertain you for hours. The CHM (Computer History Museum) backlog is large enough so that you might never catch up and watch them all.

Link:
CHM

Closure:

There you have it! You have a new article. This one doesn’t require much effort – but might require a bunch of your time. There are other geeky YouTube channels, but I figured I’d limit this to just a few of my favorites. I watch some other channels with a more narrow topic and I picked these for their (moderately) broader appeal.

Given what I know about my readers, I think almost all of them will appreciate these geeky channels. Feel free to leave a comment sharing your favorite geeky videos. I’ll have to manually approve them (as they’d contain links) but I’m pretty good at doing that promptly. The system’s pretty good at letting me know when there are new comments! It’s also pretty good at avoiding false positives where spam is concerned.

Thanks for reading! If you want to help, or if the site has helped you, you can donate, register to help, write an article, or buy inexpensive hosting to start your site. If you scroll down, you can sign up for the newsletter, vote for the article, and comment.

A Few Good Linux Channels

Today’s article is going to be a nice and quick one, where I show you (what I think) a few good Linux channels – on YouTube, of course. Why? Because why not! It’s a good thing to share more content and all sorts of people like video content. So, to find my opinion on a few good Linux channels, read on!

I actually may have different picks than other sites. Well, I assume other sites have top-ten lists of good Linux channels. See, I don’t prefer to learn via video, at least not Linux things. I prefer text, as it’s far more information-dense per unit of time invested. Well, it *can* be far more information-dense per unit of time.

However, that doesn’t mean I don’t watch any Linux content, it’s just not that often and my picks might be different than what you pick. If you have a favorite channel list, you can always add it as a comment. Heck, if you leave that comment here this might turn into some sort of repository of solid Linux channels. I have an edit button!

Alright, this intro is long enough. It’s a quick and easy article!

A Few Good Linux Channels (On YouTube):

You don’t need an open terminal for this exercise! Imagine that! You have a browser open already, so you’re all set. 

I don’t know how to embed a full channel, though I do know I can embed single videos. You don’t want to watch those channels on this site, you want to watch them where they came from, so I’m not going to bother embedding a video or trying to figure out how to embed a full channel.

1. Linus Tech Tips

Description:

Linus Tech Tips is a passionate team of “professionally curious” experts in consumer technology and video production who aim to educate and entertain.

Link:

https://www.youtube.com/@LinusTechTips

2. Switched To Linux

Description:

Switched to Linux is a channel about Technology, Privacy, and Linux. What sets this channel apart from my colleagues is that this channel focuses on real world applications with Linux. We have moved beyond theory and get down to what is important: Production.

https://www.youtube.com/channel/UCoryWpk4QVYKFCJul9KBdyw

3. Brodie Robertson

Description:

He hasn’t written one. So, I’d say:

Good, solid contributions to the Linux-education realm. He’s fairly opinionated but a fun channel to watch.

https://www.youtube.com/channel/UCld68syR8Wi-GY_n4CaoJGA

4. Average Linux User

Description:

His has not written a good description. I’ll say:

More great content. His content is definitely one of the more thought-out content out there. He also offers his videos in text format. That’s something I appreciate.

And there you have it… I ended up sharing four of them because I figure we’d count Linus’ page by default. I figure most Linux users (that frequently consume video) will already be subscribed to his channel.

Again, feel free to add your favorites. Who knows? It might end up as an article that gets edited with new material when said material becomes available. 

Closure:

There you have it, another article! This time, we’ve covered what I think are a few good Linux channels. If you’re going to watch Linux content, you might appreciate these channels as much (perhaps more than) I do. I will not be doing a YouTube channel. You’re welcome!

Thanks for reading! If you want to help, or if the site has helped you, you can donate, register to help, write an article, or buy inexpensive hosting to start your site. If you scroll down, you can sign up for the newsletter, vote for the article, and comment.

Find Your Graphics Card Information

Today’s article isn’t all that spectacular, but it is useful, as we’re going to discuss a few ways to find your graphics card information. That’s handy stuff to know, especially if you are new to the computer or are looking to do things like find drivers for said graphics card. This should be remarkably quick and easy, actually.

We will be using tools we’ve used before. These are simple tools, tools used to learn hardware information. Well, they can all be narrowed down to show just the graphics card information. They can also give information about other hardware, not just graphics card information.

All the tools we’ll be using should be installed by default. We will use one program that isn’t necessarily installed by default. That program will be inxi. You can learn how to install inxi easily enough, and the rest should be installed by default. If inxi is not installed, install it.

Like I said, the article should be fairly quick and easy. You only need a few specific commands. ‘Snot all that complicated, now is it? 

So, let’s take a minute to read an article that tells you how to learn more about your…

Graphics Card Information:

As is often the case, this article requires an open terminal. If you don’t know how to open the terminal, you can do so with your keyboard – just press CTRL + ALT + T and your default terminal should open.

With your terminal open, let’s go ahead and use the inxi command first:

See? Plenty of graphics card information.

How about we use ‘lshw’, a tool for listing hardware information? Well, the command for that would be pretty easy. You just need to specify that you want graphics card information. It looks like:

Finally, we can use ‘grep’ and ‘lspci’. We’ll also use the -k flag to list kernel drivers. It’s easy. You don’t have to memorize it, you can just refer back here later when you actually have a need for your graphics card information. It looks like:

That should do it. You can use any of those three methods (or more) to find your graphics card info. I just use on-board graphics, so a screenshot would be quite boring.

Closure:

Well, there you have it. You have yet another article. I didn’t go deep into the usage of each tool because there’s no reason to. Each program has a help file associated with it. Consult the help file if you wish to know more. This article’s goal was to demonstrate a specific use.

Thanks for reading! If you want to help, or if the site has helped you, you can donate, register to help, write an article, or buy inexpensive hosting to start your own site. If you scroll down, you can sign up for the newsletter, vote for the article, and comment.

Subscribe To Our Newsletter
Get notified when new articles are published! It's free and I won't send you any spam.
Linux Tips
Creative Commons License
This work is licensed under a Creative Commons Attribution 4.0 International License.