Update Python Packages (PIP)

We’ve had a run of Python packages recently and you can tell that I’m a fan because today we will discuss how to update Python packages that were installed via PIP. This should be a pretty easy article to follow along with.

Before diving into the world of installing Python packages from a centralized repository (via PIP), you should probably be familiar with the entire process. So, read these two articles before proceeding:

Install Python’s PIP Part One

And then follow up with this article:

Install Python’s PIP Part Two

It’s important to upgrade the packages you’ve installed with PIP. All software requires updates. Bugs are fixed with newer software but, more importantly, security issues are addressed with updates. This doesn’t just apply to Python. It applies to your whole computer. Software gets updated and you need to apply those updates.

So, today we’re going to do some maintenance and we’re going to update Python packages. Rather than waste time with a long intro, let’s get started!

Update Python Packages:

Just so you know, Python packages are installed in the terminal. So, it stands to reason that updates are also done in the terminal. To follow along in this article, you will need an open terminal. So, if you want to update Python packages you should start by opening a terminal. You can usually just CTRL + ALT + T to open your default terminal emulator.

With your terminal open, let’s first ensure PIP is installed with this command:

Next, make sure PIP is updated to the newest version:

With PIP upgraded to the most current version, you can check to see which Python packages you have previously installed. That’s done like this:

Now, you can see which packages can be updated to newer packages:

That will give you an output similar to this:

Now, you can update the packages, like so:

You can also do multiple packages at the same time:

By doing this, you can update your Python packages, at least those installed via PIP. That is indeed pretty easy.

However, I have a command that I certainly didn’t come up with. This is a command I found in my notes and I do not see a reference URL – or I’d cite the source. Doing some searching, I saw that this command is referenced at multiple sites. So, finding the source is problematic for me.

If you want to upgrade all the Python packages at once, try this command:

I tested this and it appears to work well enough. PIP does love to throw errors in the terminal but generally works okay. That command should update all the packages you’ve installed with PIP – including any Python dependencies that were installed at the same time.

See? It’s pretty easy to update Python packages…

Closure:

Well, now you know how to update Python packages. I figured that this was an important article to write. If you’re going to use PIP to install Python packages, you might as well know how to keep yourself secure and how to keep yourself updated. That seemed reasonable.

However, my Python skills aren’t that great. I can do a Hello World program and that’s about it. I haven’t even done that in a while. So, don’t go asking me detailed Python questions! I probably won’t have an answer. My use is pretty limited to things I can trivially install with PIP.

Also, you may not want to ask me questions. While I’ll be polite, my time is constrained these days. I’m just as likely to refer you to a forum or two. You can ask questions. If they’re good, I’ll maybe answer them in an article. I’m just pointing out that you shouldn’t expect too much from me.

“If you don’t expect too much from me, you might not be let down.”

Thanks for reading! If you want to help, or if the site has helped you, you can donate, register to help, write an article, or buy inexpensive hosting to start your site. If you scroll down, you can sign up for the newsletter, vote for the article, and comment.

Extract Text From Multiple File Types

Today we will have a fairly simple exercise as we’re going to just use a Python application to extract text from multiple file types. This is a pretty standard operation but will require some preparation.

Fortunately, I’m ahead of the game! You’re good to go if you follow along on the site and have already enabled PIP. Otherwise…

You will need to install PIP for this article. This is not complicated.

First, read this article:

Install Python’s PIP Part One

Technically, you could just do that. However, you should add the path so that you don’t have to specify the location of your Python applications and can easily use them from the terminal.

So, read this article:

Install Python’s PIP Part Two

Now that you’ve done those two things, you’re good to proceed. See? It was worth the time to write those articles! They’re useful and save a lot of time.

The tool we’re going to use is known as “Textract“. Don’t quote me on this, but I believe this could also apply to Windows users, though installing the dependencies for this would be a different process. I’m not a Windows user. If you are, feel free to comment and let us know how things work on your side of life.

Textract: 

While there is no built-in man page, the Textract application is described like this:

While several packages exist for extracting content from each of these formats on their own, this package provides a single interface for extracting content from any type of file, without any irrelevant markup.

It is a pretty handy application and claims to extract the text from more file types than I could reasonably expect to test. Here’s a list of files that you should be able to extract text from.

.csv via python builtins
.doc via antiword
.docx via python-docx2txt
.eml via python builtins
.epub via ebooklib
.gif via tesseract-ocr
.jpg and .jpeg via tesseract-ocr
.json via python builtins
.html and .htm via beautifulsoup4
.mp3 via sox, SpeechRecognition, and pocketsphinx
.msg via msg-extractor
.odt via python builtins
.ogg via sox, SpeechRecognition, and pocketsphinx
.pdf via pdftotext (default) or pdfminer.six
.png via tesseract-ocr
.pptx via python-pptx
.ps via ps2text
.rtf via unrtf
.tiff and .tif via tesseract-ocr
.txt via python builtins
.wav via SpeechRecognition and pocketsphinx
.xlsx via xlrd
.xls via xlrd

You may need to install specific packages for some of these file formats. Those packages can usually be found in your default repositories. It otherwise comes with quite a lot of functionality out of the box.

I did test some of those formats and it seemed to work okay. Your mileage may vary, of course. However, Textract was able to extract text from multiple file types.

Extract Text From Multiple File Types:

If you want to extract text from multiple file types with Textract (a fantastic name for an application) then you’ll first need to install it. I’ve yet to find a working GUI PIP installation tool, so that means you’re going to need an open terminal.

More often than not, you can open your terminal by simply pressing CTRL + ALT + T on your keyboard. If your distro doesn’t adhere to the norms, you can find a terminal in your application menu. If you don’t use an application menu, you already know how to open a terminal and you don’t need any help from me.

First, let’s install Textract:

Note the lack of sudo. You’re installing this for your user account and do not need elevated permissions for this. Python packages go right into your ~/ directory. See below, as you’ll want to install some dependencies for full functionality.

You may see an error or two during installation but that doesn’t seem to matter. It will take a minute to install and watching the installation chug along is good fun.

Using Textract:

With Textract installed, you can now extract text from a whole variety of file types. The syntax is as follows:

That sends the output to the standard output (your terminal). I suspect that most folks are going to want to save the output to a file. For that, you just need to add the -o flag and a file name. So, something like this:

That’s going to extract the text from some file types but not all of them.

Now, this is from a Lubuntu installation…

This isn’t going to work with all the listed file types at this time. You need some dependencies to be installed. For me, and it’s a long one, the command was:

That’s slightly different from the command they include on their page, but it appears to do the trick. You’ll have some of those installed by default but running the command will sort itself out. You’ll have to modify the command to suit your distro, but that should work with Debian, Ubuntu, Linux Mint, and other Debian-based distros.

With that installed, I can even grab the text from image files.

Here’s an example:

a simple picture with simple text
This is some simple text to test how well Textract really works.

Here’s the command:

Here’s the output:

I dare say that’s pretty good. I tried other pictures and it was good enough to get the gist of things. Complicated image files with many columns appear to be a bit of a stumbling block. But it’s not terrible.

It has no trouble at all with other file formats.

It can be a bit fussy to get Textract properly installed but it seems to do the trick once installed. If you want to extract text from multiple file types, Textract is a pretty good piece of software.

Closure:

If you want to extract text from multiple file types, this is definitely a good tool for the job. It certainly handles a lot of files and does a good job with them. It’s not perfect. None of these tools are. Complicated image files threw it off a bit, but Textract lives up to its name.

There was a reason I wrote those articles about PIP. Being able to install Python packages via a repository is a great thing. There’s some great Python software out there and we’ve barely touched the surface. Linux is great like that, that is offering great Python support.

Do you have a use for this in your daily activities? If so, leave a comment letting us know how you use Textract and what makes you pick it over other applications. You can even use a real email address. I never send spam. I never sell your information.

Thanks for reading! If you want to help, or if the site has helped you, you can donate, register to help, write an article, or buy inexpensive hosting to start your site. If you scroll down, you can sign up for the newsletter, vote for the article, and comment.

View Disk Usage

This article might seem like it has been written before but this is an entirely new way to view disk usage. To write this article I had to write two other articles. Tell me that that doesn’t sound like fun!

So, let’s see here… And, yes, I’m aware that they’re not disks anymore.

Yup. It’s official. There are too many ways to view disk usage in Linux – especially in the terminal. Why am I writing yet another article on the subject of disk usage? Because I can! I love showing how there are many ways to do the same thing in Linux. This is great because you can pick and use your favorite methods.

As for the subject of monitoring disk usage…

Monitor Disk Usage With GDU
Show Disk Usage With ‘ncdu’
A Few Ways To Visualize Disk Usage In Linux
How To: Check Disk Usage With ‘df’
Yet Another Way To Check Filesystem Space Use

Those are just the first five links when I searched for ‘disk usage’. That’s just five ways to check disk usage in Linux. I’m willing to bet that we can easily come up with five more ways to do this.

What’s special about this way of viewing disk usage?

Well, today we’ll be monitoring your drive space with a tool written in Python. You’ll need to enable PIP, a Python packaging tool. Once you’ve done that, this is universal. It will work in any distro that supports PIP – which, as you’ll see, is just about every major distro on the planet.

Read the following before going further:

Install Python’s PIP Part One
Install Python’s PIP Part Two

If you haven’t already installed Python’s PIP, this article will be of no use to you. You’ll need PIP enabled to proceed. You should also add the $PATH as defined in the second article. From here on out, the article will assume you’ve done both of those things.

View Disk Usage With Vizex:

The tool we’ll be using is known as Vizex. You can see the Vizex project page here. If you bother going there, you’ll see that Vizex is indeed the correct tool for the job. You’ll see that this is (one of the many) correct tools for the job.

vizex is the terminal program for the UNIX/Linux systems which helps the user to visualize the disk space usage for every partition and media on the user’s machine. vizex is highly customizable and can fit any user’s taste and preferences.

Hmm… It is at this point that I noticed that they don’t capitalize it. I’m going to capitalize it because it’s keeping the system from saying I didn’t spell it properly. 

Anyhow, as you’re using PIP, you’ll need an open terminal. You can use your GUI to open your terminal. On many systems, just press CTRL + ALT + T and your default terminal will open.

To install Vizex, run the following command:

If you’ve never installed a Python package with PIP before, then be sure to keep an eye on the screen. It’s a fascinating process and watching stuff happen in the terminal is pretty sweet!

Now that you have Vizex installed, you simply run that command in the terminal. If you didn’t follow the 2nd part of the Python PIP article you’ll have to specify the path. That’s just silly. Follow the 2nd article (it’s really easy) and you don’t have to deal with that. 

Using Vizex:

Anyhow, that command is simply:

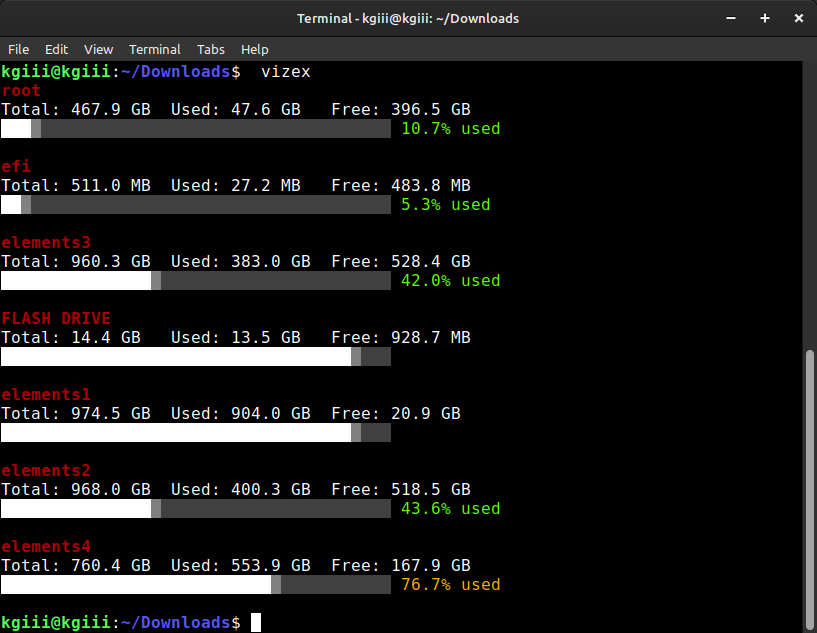
It will even color-code your drives. If they’re close to full, they’ll be red and blink (missed in the screenshot below). If you’re moderately full, they’ll be listed in the yellow. I wanted to use Vizex to view a computer will all sorts of drives, so I did! That’s how you ended up with this screenshot:

using vizex to view disk usage
If this isn’t self-explanatory, I don’t know what is! It’s so simple that I can figure it out!

If that isn’t one of the easiest ways to view disk usage, I don’t know what is. This is just one of the many reasons why you should have Python’s PIP installed. There’s a bunch of software that’s available if you just know where to look. It took a while, but I finally got around to sharing this information. In my defense, it did take a couple of articles to share it properly.

Closure:

There are all sorts of ways to view disk usage. This is just another way, though it’s an interesting way. I’m quite sure that I’ll cover this very same subject again in another article. For now, I’ve covered a way to do so with Python and that’s something different than you’ve previously seen on the site.

I may not place ads on the site and just opt to accept sponsored articles as a way to cover the bills. That seems like a good thing to do. Some stuff may already be in the works, so look for that in the future. If you’re interested in sponsoring an article, be sure to hit me up. We get good traffic and rank well in the search engines. So, get some extra traffic and some SEO benefits by sponsoring an article!

Thanks for reading! If you want to help, or if the site has helped you, you can donate, register to help, write an article, or buy inexpensive hosting to start your site. If you scroll down, you can sign up for the newsletter, vote for the article, and comment.

Install Python’s PIP Part Two

This article may also seem a bit unusual because I covered how to install Python’s PIP in the last article. This article is the second part of that. This is something that seemed like it should be two articles, so it is two articles.

Additionally, I share this information so that I can write future articles. So, by themselves, these two articles won’t accomplish much by themselves. They will come in handy for future reference and that’s the point of this.

In the previous article about how to install Python’s PIP, you learned the basics. In that article, you learned how to install PIP. That’s all well and good, but then you might be confused when you go to install a package installed by PIP.

During the package installation, you may see a warning that looks like this:

This is because PIP installs the packages somewhere like your ~/local/.bin directory. If you then try to run the package from the terminal, it won’t be found. 

For the record, this is for people using Bash. I’m not sure about other shells.

You can still use PIP packages just fine, you just have to specify the path. That’s a pain in the butt and not something you should have to do. Instead, we’re going to add the path as suggested. If you’ve done that, you can just type the package name into the terminal to run your PIP-installed Python applications.

So, let’s do that…

Install Python’s PIP Part Two:

By now it should be obvious that this requires an open terminal. You did read the first article, right? As such, you can usually open your terminal with your keyboard, simply press CTRL + ALT + T, and your default terminal should open.

With your terminal open, we need to add some text to your ~/.bashrc file that sets the path. It’s pretty straightforward and we’ll be using Nano for this. Click that link if you’re not sure if you have Nano installed.

Let’s open the file for editing with this command:

Then scroll to the bottom.

At the bottom, add a new line.

Copy and paste the following:

Next, we save the changes and exit Nano by pressing CTRL + X, then Y, and then ENTER on your keyboard.

No changes will have been made just yet. You could reboot or reload your desktop session if you wanted, but you can tell the shell to reload the file and thus have the changes take effect. To do that, you’d enter this:

At that point, you can install PIP packages and have them run when you just type the command into the terminal. There’s no need to add anything else to the command. This sets the path that PIP was complaining about.

And now you’re ready to install Python PIP packages. This is an important step after you install Python’s PIP. It should serve you well, assuming you want Python packages installed in a pretty simple manner.

IMPORTANT: Read Part 1 to install Python’s PIP.

Closure:

As you can tell by the length, there’s a reason that this is a second article. I’ll have to remember to edit the first article when this article gets published. It’s not that it’s complicated, it’s just long.

So, it seemed best to turn this into a second article – especially because it’s not technically a necessary step. You can comfortably run Python packages by using the file path, but this is much easier.

Thanks for reading! If you want to help, or if the site has helped you, you can donate, register to help, write an article, or buy inexpensive hosting to start your site. If you scroll down, you can sign up for the newsletter, vote for the article, and comment.

Install Python’s PIP Part One

At first blush, today’s article may seem a bit weird – but I am writing this article to write future articles, so let’s install Python’s PIP. Yes, it may seem strange, but there’s a madness to my method! Yes, yes there is. 

Also, there’s going to be a second part to this article. I’ll link to it when it’s time.

This is something many of you may want to do, even if it doesn’t seem appropriate at this point. There are likely to be several future articles that refer back to this article. You’ll likely guess why after reading this article.

Python is a “high-level” programming language. To some of us, it’s one of the ‘new kids on the block’ but it has been around since 1991. It didn’t gain a lot of popularity until fairly recently, which might be why it seems more modern than it is. Well, to be fair, Python is modern. The language has been upgraded consistently.

So, what is PIP? It stands for PIP Installs Python, or maybe PIP Installs Packages. It depends on who you ask. Much like your regular Linux software, there are applications (written in Python) that can be installed from a central repository. This is, of course, done in the terminal – though I’m sure someone’s authored a GUI PIP installer. (Is ‘installer’ redundant?)

Now, here’s the thing… You can install PIP on pretty much every Linux distro out there. There are a zillion (and three) Python applications that can be trivially installed with PIP. This is a pretty good start at making some new and interesting software immediately available for your use.

So, this article is just going to cover how to install Python’s PIP in a variety of Linux distros. This will, of course, be in the terminal!

IMPORTANT: Read Part 2 to finish installing Python’s PIP.

Install Python’s PIP:

PIP is a terminal-based tool – to me.

Some searching sent me to this package to install Python’s PIP in a GUI. I’ve never tried it, so I can’t speak about the quality. Click the following link to learn more about using PIP in a GUI.

Use a GUI to Manage Python Packages.

Edit: I can’t actually make the above work. It also requires PIP to install it.

For the rest of you, it’s time to crack open your default terminal emulator. The majority of you can open the terminal simply by pressing CTRL + ALT + T. If that’s not an option, the shortcut to open your terminal will be in your application menu. 

Now, the syntax to install Python’s PIP is a bit varied. I can only cover those distros that I know about. If your distro isn’t covered, figure it out and let me know. If I make a mistake for your distro, you should also let me know that too!

I’m going to assume that you’re using a modern distro. There’s an older Python 2 PIP. Your modern distro should require Python 3’s PIP. So, we’ll make that assumption and run with it.

Installation Instructions for Python PIP:

Debian/Ubuntu/etc:

SUSE/OpenSUSE/etc:

Fedora/etc:

Arch/Manjaro/etc:

RHEL/CentOS/etc:

There are other ways to install Python’s PIP, I’m sure. Those directions should cover most of the more popular distros. I did a bunch of searching and that’s what I came up with to fill in what was already in my notes.

I hope the information I found is accurate because I tested only one of those commands and ran that command long ago. If you are a regular reader, you might want to go ahead with the installation at this point. You can be reasonably sure that other articles will reference this one – plus you get to enjoy the warm embrace of Python packages even without my help! (You can find ’em on your own.)

By the way, the installation syntax for Python applications via PIP is simple:

It’s that easy to install Python packages (via the terminal) when you have PIP installed. There are so many packages available and we’ll explore some of my favorites in the future.

Right now, I just wanted to prepare you for the task – and to write an article that I can refer back to, which will save me so much time. Can you imagine if I had to include this information in every article that referred to installing Python packages? Man, don’t underestimate my laziness!

IMPORTANT: Read Part 2 to finish installing Python’s PIP.

Closure:

Today’s article didn’t do a whole lot by itself. You didn’t end up with anything new, other than the ability to install Python’s PIP packages. (That ‘packages’ bit seems rather redundant!) Trust me when I say this will come in handy at some point in your Linux journey. Well, it’ll come in handy if you know about it and use it… It otherwise won’t come in handy. So, make it handy!

If you don’t want to wait for future articles, you can start exploring right now! Head to your nearest search engine and look for packages that can be installed with PIP. I’m almost certain that you’ll find at least some system utility that can be installed. You might even find some games that can be installed via PIP. You never know!

Seriously! Don’t wait for me! If you’re new to Python’s PIP, have fun with it! You can look around and find information on your own. I just facilitate things. Every article on my site could at least be figured out by reading other articles (and some documentation). You don’t need me for anything!

Thanks for reading! If you want to help, or if the site has helped you, you can donate, register to help, write an article, or buy inexpensive hosting to start your site. If you scroll down, you can sign up for the newsletter, vote for the article, and comment.

Subscribe To Our Newsletter
Get notified when new articles are published! It's free and I won't send you any spam.
Linux Tips
Creative Commons License
This work is licensed under a Creative Commons Attribution 4.0 International License.