Increase The Volume Of Thunderbird Notifications

Today’s article is one of a personal nature, an issue that affected me personally, where I needed to increase the volume of Thunderbird notifications. It was a bit of a problem and one easily resolved – at least in my case. I think it will be trivial to overcome this for others and thought that I’d make a quick article about this.

Thunderbird is an email client. The Thunderbird email client is brought to you by the same people, that is Mozilla, that brings you the Firefox web browser. As far as graphical email clients for Linux goes, you’re probably better off using Thunderbird.

This article is specifically about the calendar. It is only applicable if you have the calendar (sometimes called Lightning) installed. Further, it is only applicable if you then also have it set to chime an audio file when a scheduled activity is due. If none of those things are true, this article is not meant for you.

I don’t allow most audio notifications, but I do rely on Thunderbird for scheduling and noting appointments. If you’ve configured Thunderbird to show notifications and to create a sound to denote those notifications, you may notice that the notification is quieter than you’d like.

I searched for a solution for the low volume of Thunderbird notifications. I had a solution in mind, but I looked for something more graceful. The goal was to find something ‘in-app’ that let me set the notification volume. Not only was I unable to find a solution in that direction, I was unable to find anyone suggesting this path to increase the volume of Thunderbird notifications.

I’ll be giving directions for Debian (and derivatives such as Ubuntu, and all official Ubuntu flavors, Linux Mint, ElementaryOS, and such) but you can adapt these directions for your needs. The tool we’ll be using is ‘Audacity’ and that’s probably going to be in everyone’s default repositories.

If you’re unfamiliar with Audacity, the application is used to edit audio. As a general rule, I don’t bother with full-fledged DAWs and prefer the simplicity that Audacity offers. So, I guess that does make it my DAW of choice.

Odds are good that you don’t have Audacity installed by default. Again, assuming you use a distro with apt, you’d simply install Audacity with the following command:

If you’re curious, the man page describes it like this:

audacity – Graphical cross-platform audio editor

That’s a fine description and Audacity is the only tool you’ll need to increase the volume of Thunderbird notifications. As near as I can tell, this will work on default sounds or the sounds you add as your notification sounds.

So then, let’s get on with it… Let’s learn how to…

Increase The Volume Of Thunderbird Notifications:

If you read the intro correctly, or at least as how I expected it to be read, then you should have already installed Audacity. You can do this with any DAW (Digital Audio Workstation) but Audacity is quick and easy, easy enough for me to use.

So, I’ll assume you have Audacity installed.

You can do this with Ocenaudio. If you want a full-blown DAW, you can do this in Reaper. You have choices, but these directions are for Audacity.

Your first step is to open your file manager. With your file manager now open, double-check in Thunderbird to see where your notification sound file is located. It’s in the Settings menu, under the Calendar settings.

Thunderbird's notifications settings.
This should be fairly easily explained. A picture is worth 1,000 words!

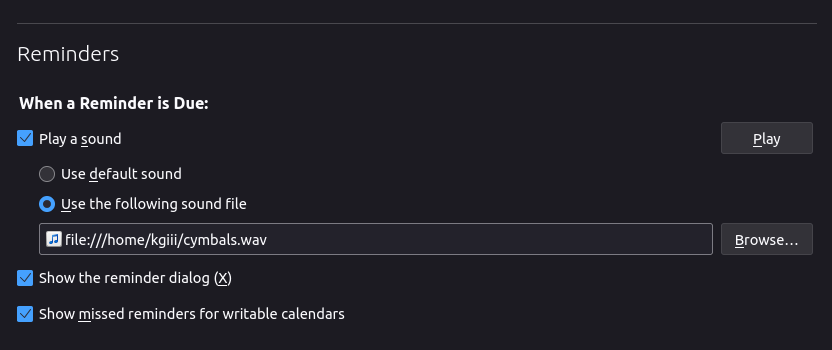
As you can see, I’ve chosen a custom audio file. The process is the same. You need to find the file in question or add your file. If you wanted to you could root around and find the default file, but I suggest adding your own.

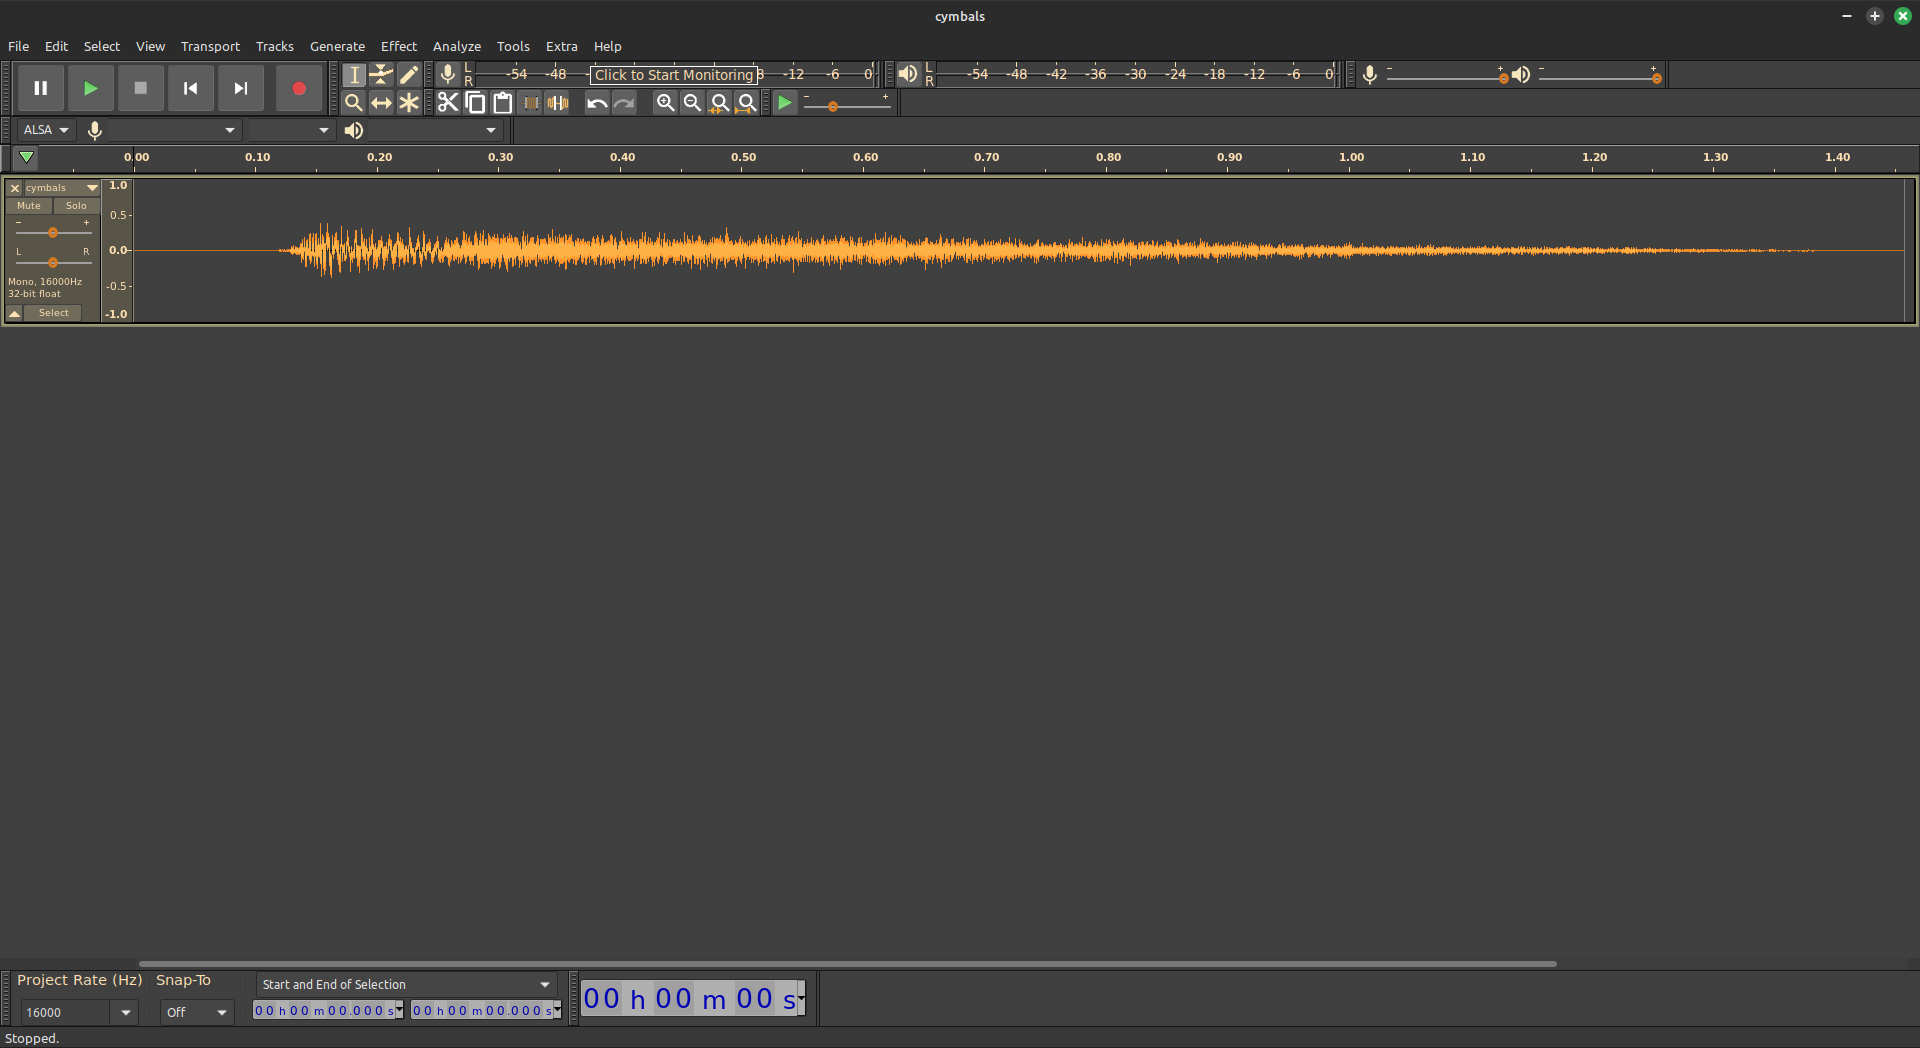
Once you have found the sound file, right-click on it and open it in Audacity. You can also open Audacity and then open the file by clicking on File and then Open. Both should work on most distros.

You’ll then see a screen that looks similar to this:

We'll increase the volume with Audacity.
That’s the waveform of my ‘cymbals’ notification chime.

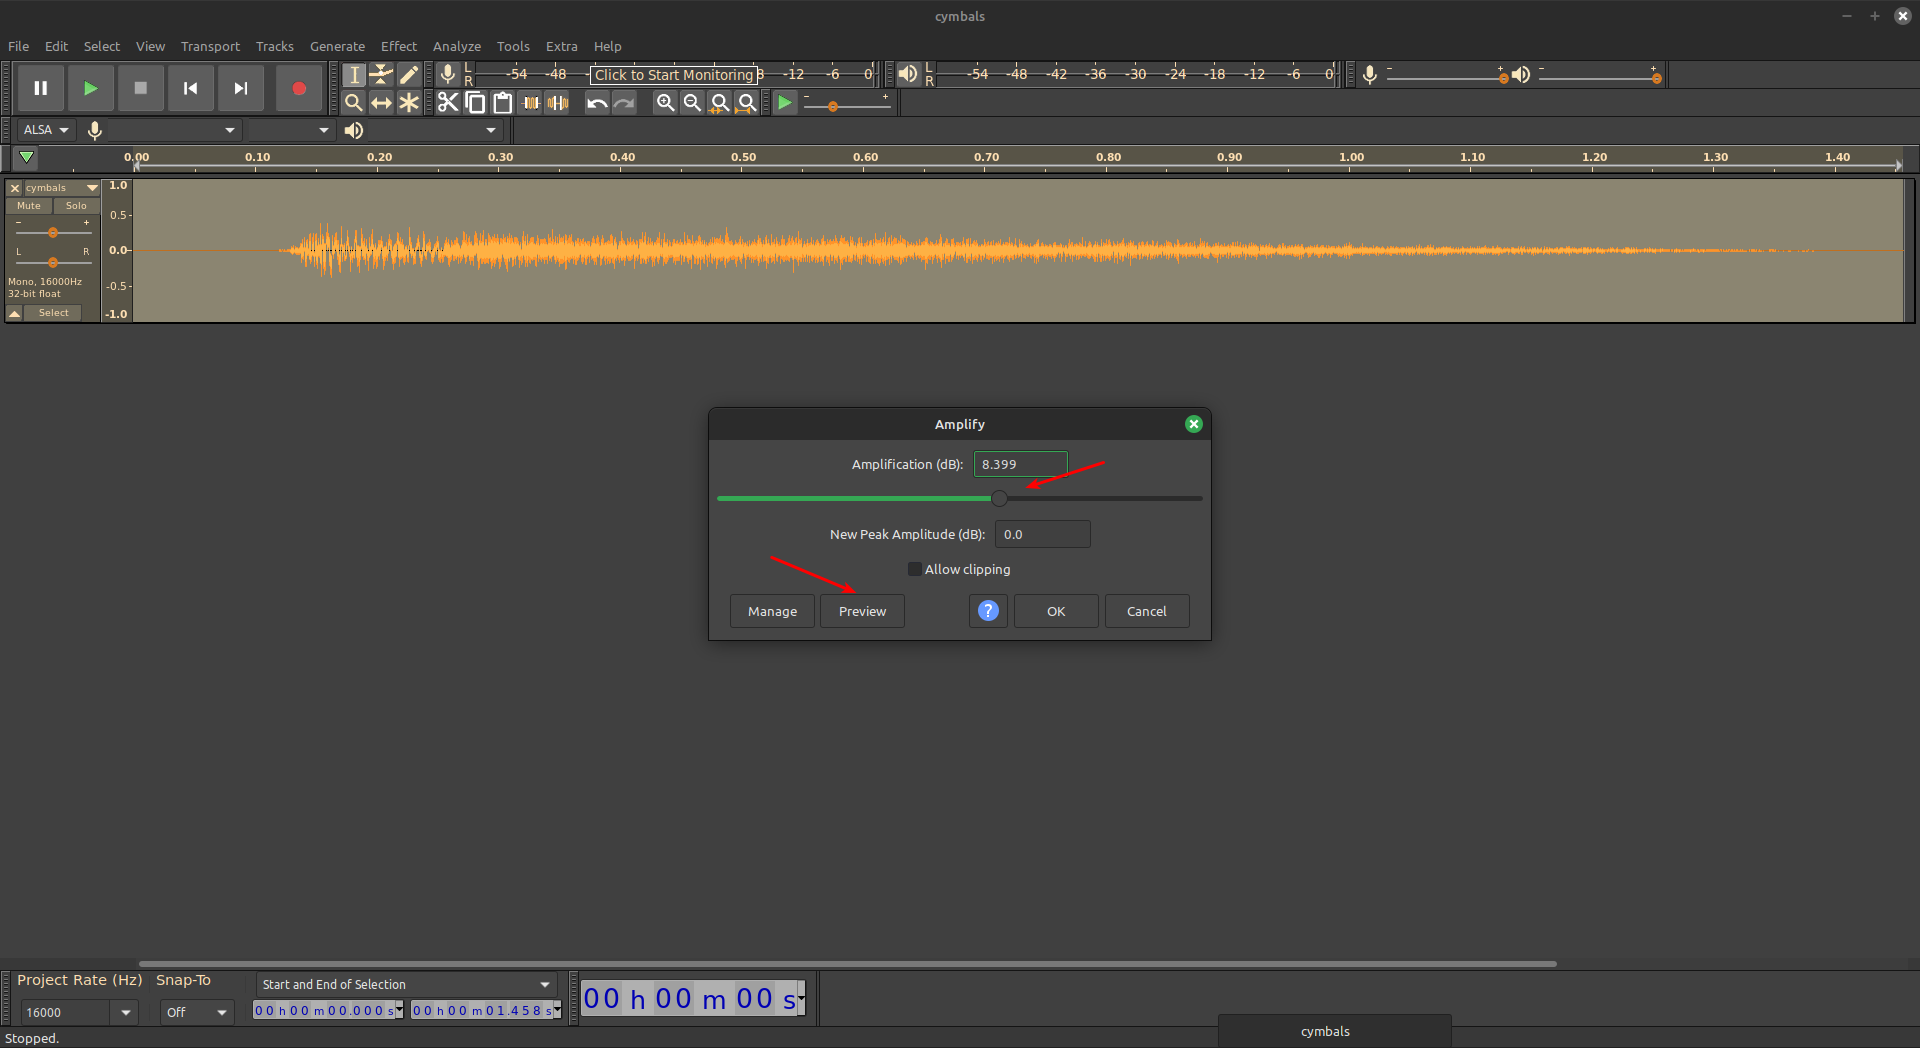
What you do from here is right-click on any part of the spectrum shown in the image above.

You then press CTRL + A to select the full file.

You next click on Effect and then you click on Amplify. Adjust the amplification to suit and use the preview button to judge the volume level you’d like to achieve. That screen would look something like this:

Using Audacity to control the reminder sounds from Thunderbird.
If you want to hear your Thunderbird notifications easily, this is how you do it.

This works with more than just increasing the volume of Thunderbird notifications. You can raise and lower the volumes of almost any sound file quickly and easily. Rather than mucking about with some Thunderbird extension, you can just raise the volumes yourself.

Closure:

I’m not sure how many folks will be helped by this article, but I hope it’s some. This was an itch that I needed to scratch and this was how I went about doing so. I figured I’d share that with you by making it into an article. That seemed like a reasonable choice at the time.

Thanks for reading! If you want to help, or if the site has helped you, you can donate, register to help, write an article, or buy inexpensive hosting to start your site. If you scroll down, you can sign up for the newsletter, vote for the article, and comment.

Review: MetaClean (Clean Exif/meta Data From Email Attachments Automatically)

Today’s article is about MetaClean, a Thunderbird plugin that you can use to automatically clean Exif (and other meta data) from email attachments. This is not the type of article I usually write, but it’s a very interesting extension for the Thunderbird email client. It’s good enough to help make folks aware of it.

Just the other day, I updated this article:

How To: Sanitize Exif Data From Your Digital Images For Privacy Sake

The update was largely a link that went to a study regarding the privacy implications of Exif data. If you’re unfamiliar with Exif data and its importance, I would strongly encourage you to read the article. I’d also strongly encourage you to read the linked article. If you’re concerned with your privacy, or are regulated to be concerned with the privacy of others, this might just be one of the best extensions you’ve ever used.

See, Exif data is just one type of meta data. Lots of files, from pictures to text documents, contain meta data. For example, a file generated by a rich text editor (such as LibreOffice) will contain your username, may contain a record of edits, and may contain a list of usernames that have also edited it. Meta data contains all that and more.

Enter MetaClean…

Note: MetaClean is a proprietary product with an enterprise/business solution that offer their services free for personal use. It’s a closed source product and using it means you trust them to perform the services claimed and adhere to their claims.

The file remains on the server for the time necessary for its processing, depending on the size of the file the processing time varies from 10 milliseconds to 600 milliseconds, after this time the file is removed and it will be impossible to restore it (GDPR compliant).

Read on to learn more about using MetaClean.

MetaClean Automatically Removes Meta Data:

It’s easy enough to add MetaClean to Thunderbird. Just click on Add-Ons and Themes, and then in the search box put “MetaClean.” The search result should contain the extension and you can install it with a single click. It’s remarkably easy.

MetaClean basically uploads all of your attachments to their own server, strips out the meta data (but will leave their own branding in the field, for free users) and then returns the sanitized file to your computer before the email actually sends. I tested this with a number of files and it’s amazingly fast.

Again, it requires that you trust them – and not care that they leave a comment in your meta data. The comment is harmless and won’t lead to you in any way. Your privacy will not be compromised.

Here’s the amazing thing, it not only does all that – but it even works on compressed files – though it only currently supports 7Zip and .zip formats. With them supporting Thunderbird (and it working fine on Linux), we can hope that they’ll expand that to .gz and some folks may like it if it could also work with .rar files. For now, it works just fine with the compressed files I tested.

Meta data is in all sorts of things that you create or touch, though it’s not always a bad thing. It’s sometimes useful to have meta data. I, for one, like to include the ID3 tags with my music files. But, you don’t always want to share the meta data. In fact, in some industries you have to not share it – to be compliant with privacy laws. However, if that’s you, you might be interested in their professional options – where the server that strips the meta data is actually owned and run by you.

Basically, once you’ve added it as an extension, it will automatically sanitize your files – removing any personal meta data from the file. It does this all without any user intervention (once you tell it to automatically do so). If you want to send a file while including the meta information you can also tell the plugin to let that email through with the personal information attached.

Closure:

It’s really that simple. Just install MetaClean and forget it. You won’t have to wonder if you remembered to sanitize your meta data before you sent it. You can be pretty confident that it was sent without that private data still attached. It’s definitely one of the most beneficial and easiest Thunderbird extensions that I’ve worked with lately.

I realize that I forgot to give it a number rating! In this case, it does what it says on the tin. I wish their privacy policy (while excellent) spelled it out a bit better. The tools could be a bit more fine-grained. They could see about adding support for more compression formats. As for the rest, they do great. I’m going to award them a solid 8 out of 10.

Thanks for reading! If you want to help, or if the site has helped you, you can donate, register to help, write an article, or buy inexpensive hosting to start your own site. If you scroll down, you can sign up for the newsletter, vote for the article, and comment.

Subscribe To Our Newsletter
Get notified when new articles are published! It's free and I won't send you any spam.
Linux Tips
Creative Commons License
This work is licensed under a Creative Commons Attribution 4.0 International License.