Change Between CLI and GUI Mode

If you use Linux you’re probably familiar with the CLI (Command Line Interface) and a GUI (Graphical User Interface, but you can also change between CLI and GUI mode. With a simple terminal command, you can change between CLI and GUI mode at will.

Now, this isn’t talking about switching to a TTY. That’s another option and you can switch between them just as easily, perhaps even easier. I think I’ll touch on TTY first.

TTY:

TTY stands for Teletype with origins back when teletype terminals were how you interacted with a computer. There’s still some use for TTY, typically when the GUI has issues responding (at least at my house).

If you want to visit the TTY, read all these directions.

Let’s enter tty3. Press CTRL + ALT + F3.

Congratulations, you’re in tty mode. You can log in and run commands. The output of such will appear on your screen.

Now you’re stuck. This is why you read the directions first.

Most often, you can press CTRL + ALT + F7 to return to the desktop.

If that doesn’t work, press CTRL + ALT + and keep pressing over and over again until you return to a graphical environment. As this is not standardized, you may need to press various combinations of the CTRL + ALTFunction Keys or even the back arrow button. No, I do not know why this isn’t standardized.

That’s all well and good, but we’ll be showing you how to change between CLI and GUI mode with init and changing your runlevel.

Runlevel:

You’ll need an open terminal for this. You can usually press CTRL + ALT + T to open your default terminal.

With your terminal open, you can check your current runlevel. To do that, you just run runlevel in the terminal. If you do so, you’ll likely find out that your runlevel is 5, which is where it should be as my readers are generally GUI desktop users. It looks like this:

If the output is a 3, you’re in CLI mode.

Change Between CLI And GUI Mode:

By keeping that terminal open AND reading the directions before acting on this information, we can start switching between CLI and GUI modes. You want to read all the directions so that you don’t get stuck so that you’re able to find your way back to the GUI mode.

Very simply, 3 is CLI and 5 is GUI. Got it?

If you’re in a CLI mode (and a GUI is available) you can switch to the GUI mode with the following command:

If you’re in a GUI mode and you want to switch to a CLI mode, the command is just as simple. You just need to change the value, like so:

That’s all you need to know if you want to change between CLI and GUI mode. It’s not very complicated, though you should make sure you know how to return to the previous mode so that you’re not stuck and need to reboot your computer to return to your more comfortable GUI mode.

Well, that’s a short article!

Ha, just kidding!

Change Between CLI And GUI Mode (With systemd):

Most users can be assumed to be using systemd at this point. If you’re not sure if you’re using systemd, you can run the following command:

If you’re using systemd, the output should look like this:

Now, you can use systemd to change between CLI and GUI mode. To ensure you can return to a GUI mode after running this command, you should probably read the entire directions for doing this with systemd.

If you’re in CLI mode and you wish to switch to a GUI mode (again, assuming such is available – which it may not be on servers), the command is quite simple. Just run:

If you’re in GUI mode and you want to switch to CLI mode, the command is quite similar. That command looks like this:

See that? There’s a way to change between CLI and GUI mode with systemd and it’s quite an easy task. These commands are easy enough to remember, though you could always add them to your handy notes so that you have these commands available when you can’t recall them off the top of your head.

There are times when a GUI is better than a CLI. There are times when a CLI is better than a GUI. Then, for example, there are times when a full screen of text is better than just using a terminal. If you’re processing a lot in the terminal, using a full-screen CLI isn’t necessarily a bad idea. You’d certainly not be alone in doing so.

Closure:

I expected to split this into two different articles, but I decided to add the bit about systemd to this article as it was simply too short without it. I’ve been trying to ensure my articles are 800+ words, more often than not, and folks seem to appreciate the longer articles with more information.

This site has been and always will be, a work in progress. I learn and grow as I write these articles. This is reflected by the changes I make along the way. I’m sure that I’ll continue to grow for as long as I write these articles. I’m equally sure that things will change as time passes.

Thanks for reading! If you want to help, or if the site has helped you, you can donate, register to help, write an article, or buy inexpensive hosting to start your site. If you scroll down, you can sign up for the newsletter, vote for the article, and comment.

How To: Determine Your Desktop Environment

Today’s article will help you determine your desktop environment. Often abbreviated as “DE”, your desktop can be any number of choices – including none at all. This should be a relatively short and easy article. If you don’t know, the desktop environment is a bunch of software that provides the GUI system you use to navigate, load files, and manage your computer.

Once in a while, an article should get back to the basics. This is one of those articles. When someone poses a question and you need to know their desktop environment, you can just tell them that you need that information and link to an article like this one.

As such, it’s not exhaustive nor is it expected to be all that deep. There are a number of ways to get your desktop information. For a more universal approach, these ways will all be through the terminal. In most other situations, you can use the GUI and figure it out. For example, you might use HardInfo and get the data that way. Not everyone will have that installed, so we can just do it though the terminal.

Determine Your Desktop Environment:

This article requires an open terminal, like many other articles on this site. If you don’t know how to open the terminal, you can do so with your keyboard – just press CTRL + ALT + T and your default terminal should open.

Now that you have your terminal open, you can try either ‘neofetch‘ or ‘screenfetch‘. Both of them will happily spit out the information you need. The screenfetch may be better here, as it also gives the version of your desktop environment – from what I can tell. Both are easy to install and may already be installed.

Here’s an example of the relevant output from running screenfetch in the terminal:

screenfetch displaying desktop environment information
See? It’s right there! Easy enough!

You can also do the same thing with running neofetch in your terminal. Once again, it looks something like this:

neofetch showing desktop environment
Once again, it’s nice and easy! Tada!

Now, there’s some chance you just want to determine your desktop environment and don’t need or want any additional information. You can do that. It’s not hard, it’s not hard at all. In fact, both are environment variables that you can easily get to echo as stdout.

You can also use:

Both of those will tell you the desktop environment that you’re using. See:

using echo to view the desktop environment
See? You can use either one effectively and efficiently.

As suggested by @wizardfromoz, of Linux.org fame, I completely forgot to include my beloved inxi. The inxi system information tool is increasingly installed by default, but the link will show you how to install it. It’s a great tool, providing a ton of information, that’s used frequently for support questions.

To use inxi to determine your desktop environment, you can just run:

That’s an uppercase S and it’ll look something like this:

inxi showing the desktop environment
See? It’s even included in the inxi output! inxi does it all!

And there you have it, a few different ways to determine your desktop environment from the terminal. You should probably just know this information, but newer users may not know and may need help in finding this information. 

Closure:

So, there’s another one… Yet another article, said and done. This one is pretty easy and aimed at rank beginners, but it’s not without use. It may even save some time as people might actually search before asking questions! Well, they could… 

Thanks for reading! If you want to help, or if the site has helped you, you can donate, register to help, write an article, or buy inexpensive hosting to start your own site. If you scroll down, you can sign up for the newsletter, vote for the article, and comment.

Enable x11 Forwarding With SSH (Remotely Use GUI Applications)

In the last article, I explained how to enable SSH. In today’s article, we’re going to learn how to forward GUI application windows with SSH. x11 forwarding is easy and beneficial. Once you learn how, you may decide to stop using VNC or TeamViewer.

Just to quickly clear up a misconception, x11 forwarding works just fine with Wayland. Way back in the earliest days of Wayland development, it was agreed that it should retain backwards compatibility with x11 forwarding.

What is this strange thing, this x11 forwarding?

Well, when you’re connected to another computer via SSH you can use the terminal to control the computer. That’s great, but what if you want to use a GUI application? Sure, you could set up some sort of remote desktop application, such as VNC. Or, alternatively, and often more simply, you can just forward graphic applications over SSH. It’s remarkably easy!

Perhaps a picture is in order. Check this:

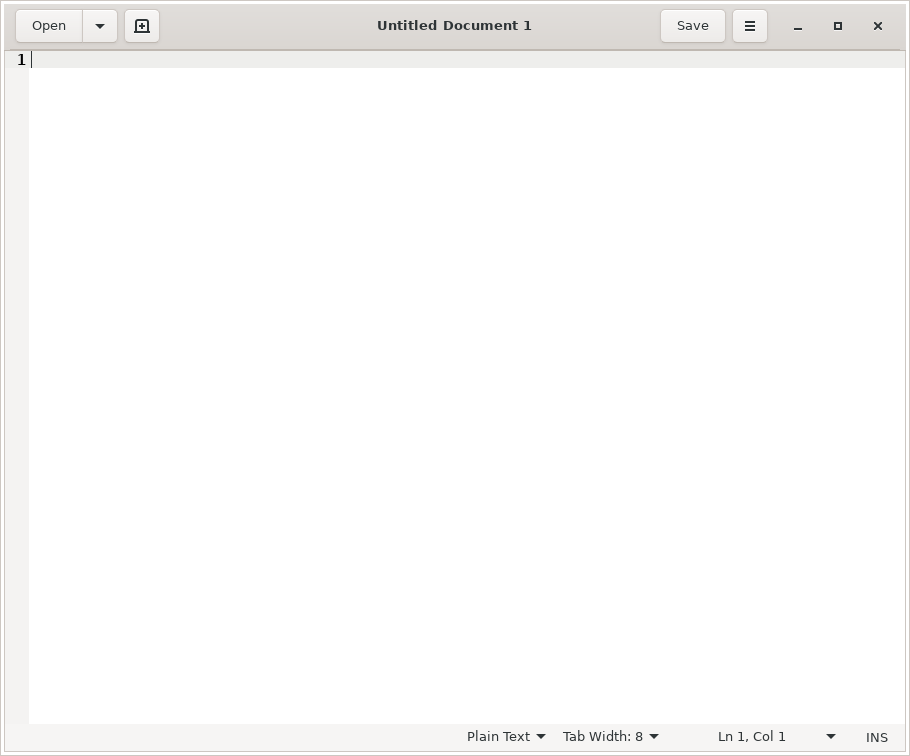
gedit in action
That’s GEdit running on a different computer, but forwarded to this one. Pretty neat, huh?

That’s right. That’s GEdit running on my laptop. I’ve just forwarded the GUI application to this computer. If I write something and save it, it’d be saved on the computer that I’m connected to and not the computer that I’m using.

Amusingly, I used this exact process just recently. I had to move a complex password to my laptop and I was being lazy. So, I opened GEdit remotely and pasted in my password, transferring my new password to the other device. See? It comes in handier than you might think.

Let’s Enable x11 Forwarding:

How do you do this? Well, first you need to crack open your terminal. To do that, you just press CTRL + ALT + T on your keyboard and your default terminal emulator should open.

Now, in said terminal, you need to run the following command:

Once you have that file opened with nano, you just need to remove the appropriate pound sign (“uncomment” it out) for the right line. Look for the line that says:

And change it to:

Then save the file with nano by pressing CTRL + X, then Y, and then ENTER. (You may want to learn that, as that’s how you save files in nano.)

Next up, you’ll restart the SSH service and be done with it:

And that’s it! You can now use x11 forwarding over SSH. To do so, you just need to add the -X switch. That’s not as complicated as you might think. Nothing in this article is all that difficult.

To try to make sense of that above command, if I were to remotely connect to the MSI laptop, then my command would look just like:

You can also use the IP address, instead of the hostname, just like we discussed in the previous article about SSH. To do that, it looks like this:

x11 Forwarding in Action:

Once you’re there, just go ahead and start an application. For example, open gedit by typing just that into the terminal. You may find some applications won’t work, often due to ownership and permissions issues, but you’ll find many that work just fine. If you find one that doesn’t work, you can always check any errors thrown and go from there.

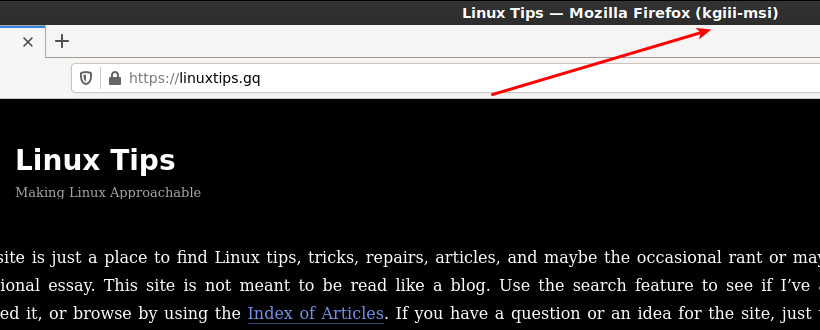
Firefox forwarded over SSH
See? Note the carefully drawn arrow that shows where it was forwarded from. Tada!

That’s an example of Firefox forwarded over SSH using x11 forwarding and you may notice the washed out look. I haven’t really dug into it, but I am reasonably confident that washed out look is because of compression. I’ve never needed to dig into that and, amazingly enough, I don’t know everything.

Conclusion:

Anyhow, there you have it. One more article in the books and one more bit of knowledge plastered across the internet. Thanks for reading! If you want to help, you can donate, you can share the site on social media, you can vote to show what type of articles you enjoy, and sign up for the newsletter. You can even buy inexpensive hosting and start your own site while supporting this site or write your own article!

Subscribe To Our Newsletter
Get notified when new articles are published! It's free and I won't send you any spam.
Linux Tips
Creative Commons License
This work is licensed under a Creative Commons Attribution 4.0 International License.