Reinstall A Package In Ubuntu

There may come a time when your software has gone awry and you’ll want to know how to reinstall a package in Ubuntu. This article will cover this because it seems like a fine (and short) article and this is indeed a weekend article.

While this is specific to Ubuntu, it’s going to work in any distro out there that uses apt or apt-get. Technically, I’m doing this in Lubuntu, but Ubuntu is a more widely searched term. That’s why I’m going with this one.

So, what are we doing?

Well, we’re going to reinstall a package, that is software, in Ubuntu. We’ll be doing so from the terminal and it’s a very easy process. We will be using the terminal, so open your default terminal by pressing CTRL + ALT + T.

The tools… You won’t need to install anything new!

apt:

If you’ve installed software in the terminal, you’ve probably used apt (Advanced Package Tool). If you do some digging, you’ll see that it’s a front end for apt-get (which is in itself a front end for dpkg, more or less). Apt is the less-stable binary compatible with apt-get. If you want something long-term, use apt-get. If you’re writing an article for this moment in time, feel free to use apt.

When you check the man page, you’ll see apt is described like so:

apt – command-line interface

That’s not particularly helpful. Let’s check the real description:

apt provides a high-level commandline interface for the package management system. It is intended as an end user interface and enables some options better suited for interactive usage by default compared to more specialized APT tools like apt-get(8) and apt-cache(8).

So, as you can now see, this is the correct tool for the job. We’ll definitely be doing stuff in the ‘package management’ category.

apt-get:

I’ll be including apt-get commands by default. Why? For the sake of completeness. It’s not that much effort to add them and the article would be shorter without them. So, I’m using them. Let’s check the man page…

apt-get – APT package handling utility — command-line interface

That’s descriptive enough. You can see that apt-get is a package handling utility and that’s what we’ll be doing. We’ll be handling (managing, if you prefer) packages. 

These sorts of tools are installed by default on Ubuntu. They’re also installed by default on Lubuntu, Mint, ElementaryOS, Debian, and many more Debian derivatives. As I said, you won’t have to install anything new for the sake of this article.

Reinstall A Package In Ubuntu:

Let’s say you have some software that’s not behaving quite right. One of the steps you might take is reinstalling the software. Bits may go awry and sometimes things get messed up as you tinker. For whatever reason, you may want to know how to reinstall a package in Ubuntu. Again, that’s what this article covers. (So many people skip the intro!)

I’ve already told you how to open a terminal. This is done in the terminal.

First, we want to talk about how you reinstall a package. The syntax is simple:

You can do the same thing with apt-get.

That will reinstall an application, all nice and easy. It will only reinstall the application. Many applications don’t stand alone but have dependencies.

Fortunately, you can not just reinstall a package in Ubuntu – you can reinstall a package in Ubuntu and reinstall the dependencies. You just need to know what the dependencies are. For that, you’d run this command:

Once you have that information, you can combine the whole thing into a single command. All you need to do is add the package names to the commands. For example:

So, it’s pretty easy to reinstall a package in Ubuntu. 

Closure:

Technically, this was written on a Friday. It’ll be published on a Saturday. So, it’s a weekend article! That means it’s fairly short and fairly easy. I might as well have an easy day. Besides, I wrote another article already today. You won’t see it for a while, but it is written and scheduled for publication. I’m kind of ahead of the game in some regards.

Thanks for reading! If you want to help, or if the site has helped you, you can donate, register to help, write an article, or buy inexpensive hosting to start your site. If you scroll down, you can sign up for the newsletter, vote for the article, and comment.
Access Recovery Mode On Ubuntu

Today’s article shouldn’t be too long, but covers something important, which is how to access recovery mode on Ubuntu. If your Linux system has problems, you may need to access the recovery mode in order to fix it. This shouldn’t be a very long article, and I don’t think it’s all that complicated. Others may view this as complicated, but it seems pretty basic to me.

It isn’t all that complicated a process, but it’s something you should memorize, just in case you have no other way to access a search engine to learn this information. This is one of those skills you really ought to know by rote. It is one of those things about Linux that you probably should have memorized. 

What is Recovery Mode?

When you boot to recovery mode, you’ll be given a choice of booting to any of your currently installed kernels. The system then boots with the minimal amount of resources and mounts the root partition as read only.

You might be interested in a recent article on the subject of multiple kernels:

Show Installed Kernels In Ubuntu

Recovery mode lets you access the system to troubleshoot problems. It probably isn’t a necessary step for most issues, but it’s a necessary step that you will want to take if your desktop isn’t otherwise loading. If you’re unable to get to the GUI desktop, you should try recovery mode.

You can also try previous kernels by doing this. Recovery mode is just one option you’ll have from the GRUB menu. You get to pick your other kernels and even enter a text mode to work on your system via the CLI. For most folks that have had the kind of difficulties that stop the GUI from loading, trying recovery mode is a good step to take.

This may very well work in other operating systems. I’m being specific to Ubuntu because that’s what I have pictures for. Well, technically I’m using Lubuntu in a VM to get the pictures, but this should work for all sorts of distros. Do me a favor and leave a comment if you know this works in other distros. It’s way too late in the day and I don’t have time to check.

Access Recovery Mode On Ubuntu:

Well, you don’t need a terminal for this exercise, but you do need to reboot your computer. I suppose we can do this from a terminal, if you really want. You can just as easily use the GUI, or you can close things down gracefully and then run the following command in the terminal:

BEFORE YOU DO THAT…

We need to know if you are using EUFI/EFI boot or if you’re using the legacy BIOS mode to boot your computer. Fortunately, I’ve already covered this!

How To: Tell If You Are You Using UEFI or BIOS

Now, when your computer reboots, it’s going to perform a quick POST (Power On Self Test). That’s the point when you can decide to just let it boot or decide to enter a temporary boot menu. These shouldn’t be confused. If you’re interested in accessing your temporary boot menu, read this article:

How do I ‘Boot to USB’? (Or CD/DVD, if Such is Available)

As soon as POST ends and the OS starts to load, there’s a very brief window of time when you can press a key and access the GRUB menu. Trust me, this works. You may have to try multiple times before you get the hang of it, but this 100% works.

If you have a working keyboard, this works. You just need to time it right. You can try pressing and holding the right key as soon as you reboot, or you can try tapping the key over and over again. Should you have issues getting it right, check your settings for “Fast Boot” and temporarily disable that to give you more time.

If you’re using UEFI, the key you’ll press is the ESC key.
If you’re using BIOS, the key you’ll press is the SHIFT key.

Assuming you’ve done this right, you’re now at the GRUB menu…

The GRUB Menu:

GRUB stands for “Grand Unified Bootloader” and is what you’ll be seeing (and using) on a stock Ubuntu configuration. There are other bootloaders out there, but we’re assuming you’ve not changed from the default.

If you’ve done the above steps properly, you’ll see a GRUB screen. If you haven’t done this correctly, you’ll see the splash screen as the operating system starts to load. When you see the splash screen, you might as well just reboot so that you can try this all over again.

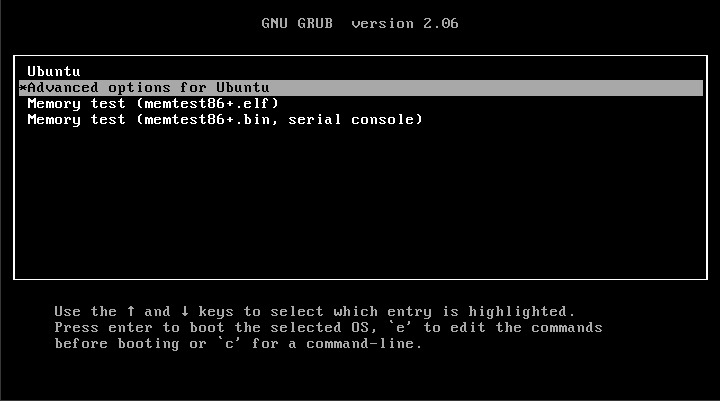
The first screen you’ll see will look like this:

the grub boot screen
I’ve highlighted the choice you want to select with your arrow keys and enter button.

As indicated, you want to select the advanced options for Ubuntu. Of course, that won’t be the case if you’re using a different distro. You’ll want to pick the advanced options for that distro.

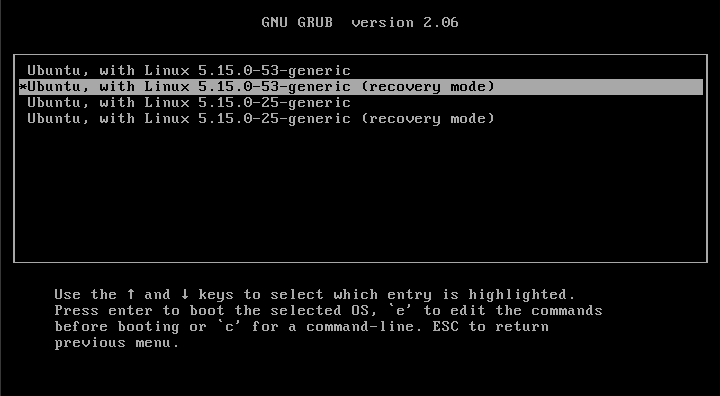
Finally, you need to select the correct option to access the recovery mode on Ubuntu. It’s really obvious, but here’s a handy picture:

grub option to pick the recovery mode for ubuntu
You can see that you can also select the recovery mode from an older kernel.

Once you’ve done that, and with any luck, your computer will boot to the recovery mode, and you’ll have learned how to access recovery mode on Ubuntu. You can see the option to boot to an older kernel is there as well. That’s another useful tool to have in your Linux toolbox.

Closure:

Well, if everything goes perfect (and it seldom does), you won’t need to access recovery mode on Ubuntu. It’s just not something you’ll need to do. But, if things don’t go perfect – and we tend to tweak, modify, and break things as Linux users, you do have a recovery mode, and it’s not too hard to access it. Of course, what you do once you’ve entered recovery mode is up to you and will depend on your problems, but you now know how to access it.

Thanks for reading! If you want to help, or if the site has helped you, you can donate, register to help, write an article, or buy inexpensive hosting to start your site. If you scroll down, you can sign up for the newsletter, vote for the article, and comment.

Show Installed Kernels In Ubuntu

Today’s article should be fairly short and straight to the point, as we discuss how to show installed kernels in Ubuntu. This isn’t a very complicated thing and we’ll be showing these kernels in the terminal. Sure, there are GUI tools you can use, but you might as well learn to do this in the terminal.

A lot of people ask the question, “What is Linux?”

Well, Linux is just the kernel. The kernel schedules tasks, interfaces with hardware, and generally manages the stuff that goes on at a lower level. This is surrounded by GNU’s tools and you will generally add a window manager and desktop environment on top to turn it into a useable desktop system with a fancy GUI.

You might enjoy reading this article:

The “Linux” or “GNU/Linux” Debate

Under all that is the kernel. It’s very important! Without it, we’d have no Linux. There are other kernels out there, but the topic of this site is Linux Tips. But, without a kernel, your computer would be dead in the water. 

In the course of updating your system, and depending on how you do your updates, you’ll install new kernels as they are released. GRUB will default to the newest kernel in most configurations, but there are other kernels installed and those can be selected from an advanced menu during the boot process.

Unless you have a brand new install that hasn’t been updated recently (kernel updates are common), you’ll have more than one kernel installed. Even if you upgrade Ubuntu in the terminal, even if you use ‘autoremove‘, Ubuntu will store the previous kernel. This is a good thing, as you can boot to that kernel if the new one should give you trouble.

It’s sometimes necessary to wait out a kernel version because it doesn’t run properly on your system. That’s not common, but it does happen. When that does happen, you should update manually and control what software is removed so that you don’t remove the working kernel and can still have a usable system. It happens, it’s just not all that common.

By the way, the kernel is mostly worked on by paid developers these days. The current kernel has more than thirty million lines of code. Of course, it contains drivers for hardware new and old and those folks using the older equipment will scream bloody murder if you remove their drivers from the kernel. Still, stuff gets culled regularly – it’s for the good of the herd! Maintaining all that for three users is asking too much.

What have we learned?

We’ve learned that the kernel is important and kind of what it does. We’ve also learned that you have more than one kernel installed. Additionally, we’ve learned why that’s a good thing. So, we’re doing okay so far!

Show Installed Kernels In Ubuntu:

As the first paragraph said, you’re going to need an open terminal. This is true for most of my articles. You should know how to open a terminal by now. If not, press CTRL + ALT + T and hope for the best! That keyboard shortcut is not quite universal, but fairly close.

These instructions are going to work in Debian, Ubuntu, Mint, etc… At least one of them may work for other distros. I can’t say that I’ve tried recently and I’m not going to make any claims. Where we use ‘dpkg‘, that’s going to be exclusive to those distros with dpkg – the Debian Package Manager.

Seeing as I mentioned dpgk, we can start with that command first. If you want to show installed kernels in Ubuntu using dpkg, the command is simply:

That might look something like this:

showing the installed kernels in Ubuntu
See? There are multiple kernels installed at this point on this particular system.

If you search the ‘net, you’ll find there are all sorts of ways to do this – including some fancy commands that use egrep and show colors. I don’t see any reason to include those. What we have here works.

If you want, you can also use the find command. That’s a nice and handy command and I suppose this command might work on other distros. To show installed kernels in Ubuntu using the find command, try this command:

That should list your installed kernels quickly and without any fuss (and no muss). There are all sorts of ways to find this information but we’ve just covered the two quickest and easiest ways I can think of (in the terminal). It’s probably quicker in the terminal than it is for any other method, especially if you’ve always got an open terminal (or three).

Closure:

Well, there you have it… You have learned how to show installed kernels in Ubuntu, a useful skill to have (especially if you’re having kernel issues). These are easy enough to remember commands, or you can always use this site’s search function to find what you need. I do that myself. I’m always referring to articles I’ve written and the search function isn’t great but it does work.

Thanks for reading! If you want to help, or if the site has helped you, you can donate, register to help, write an article, or buy inexpensive hosting to start your site. If you scroll down, you can sign up for the newsletter, vote for the article, and comment.

Let’s Update Ubuntu In The Terminal

Today’s article will be a nice basic article, where we discuss how to update Ubuntu in the terminal. It seems like a fine article to write and one that not everyone will be versed in. There are lots of folks who don’t use the terminal for much of anything. Then, there are people like me who use the terminal for all sorts of stuff.

If you know how to update Ubuntu in the terminal, this really won’t be a very interesting article. We’ll just be covering the basics and I’ll explain how I do it. You’ll see that I tend to throw caution to the wind and just blindly hope for the best. This strategy is fine for me, ’cause I can fix pretty much anything. (I can fix pretty much anything because I’ve broken pretty much everything.)

Of course, this article applies to Debian. This article applies to Linux Mint. This article should apply to anything that uses apt as the package manager. So, if your distro is related to Debian then this will probably work just fine for you.

Well, there’s no reason to make the intro any longer… I think I’ve covered all that you need to know to get started.

Update Ubuntu In The Terminal:

As you can guess, we need an open terminal if we’re going to update Ubuntu in the terminal. That only stands to reason… Press CTRL + ALT + T and your default terminal should open.

With your terminal now open, let’s update the list of software that’s available. Let’s see what software can be updated. To do that, you just run:

That will tell you the software that’s available to update. You can see what those updates are with the following command:

You can then upgrade those applications one by one if you want to. Some cautious people do this. Some businesses do this – and do this to a staging environment to test – ’cause they need to keep things running. If you want to upgrade just a single package, try this:

Now, most folks are probably going to want to upgrade all the software that has new versions. They get it easy, they just type:

This will give you the chance to see everything that’s going to be upgraded and the chance to decline or agree. Me? I automatically agree. You might want to be more cautious, but I like running the command closer to this:

That automatically says yes that I’d like to upgrade all the things. After all, even if stuff were to break, I’d have had to have upgraded to find it anyhow. 

I go a step further and just tie the two commands together. The command I run would look closer to this:

That will find all the available upgrades and install them automatically, that is without any further input from me. I’ve done this for years and it hasn’t been a problem or any more of a problem any other method would cause me. So, in short, that works for me.

Closure:

I don’t know that you wanted to learn how to update Ubuntu in the terminal, but that’s today’s lesson. It’s not very complicated. I could keep going, as my actually command also includes the ‘clean’ option. I use an alias to tie it all together, rather than typing it out each time. There are also similar commands you can use for other distros with different package managers.

Thanks for reading! If you want to help, or if the site has helped you, you can donate, register to help, write an article, or buy inexpensive hosting to start your site. If you scroll down, you can sign up for the newsletter, vote for the article, and comment.

Make Applications Start Faster in Ubuntu

Today’s article is pretty specific as we discuss one way to make applications start faster in Ubuntu. However, I feel like I need to make you aware that this isn’t some sort of miracle software. The usage and results are pretty limited and I’m mostly covering this because it was in my notes and a question I saw recently on Reddit.

Now, for reasons, I’m not sure what format this article will take. I haven’t written it yet and the information I want to share is kinda mixed. I guess we could have a longer intro than normal.

So, the tool in question is called ‘Preload’. The man page describes Preload like this:

preload – Adaptive readahead daemon

Though I think it’s important to also quote this (also from the man page):

preload is an adaptive readahead daemon that prefetches files mapped by applications from the disk to reduce application startup time.

So, what is this Preload? It’s a daemon that runs in the background and monitors what you do. It pays attention to what applications you open (for example) and loads the various files into memory. Then, when you open the application it will open faster. This is mostly useful if you’ve opened the application, closed it, and wish to open it again. The second time you open the application, the theory is that it’ll open faster.

Does it work? I haven’t lied to you yet and I’m not going to start now. I haven’t tested it enough to claim it has any great benefits. Oh, I’ve installed it before and left it running. I just didn’t do any verification and I’m not going to cite my observations as factual without having data to back that up. I will say that I didn’t notice it slowing anything down. Of course, I have fast hardware, and using a stopwatch to test the results would be full of all sorts of inaccuracies. 

Do I recommend it? Well, it doesn’t seem to hurt anything. It does seem faster when I close Thunderbird and open it back up again. I use an NVMe M.2 SSD, which is already pretty speedy, so I doubt I’d see much. I’ve never tried with a slower SSD nor on an older spinning platter HDD – which is where I’d expect this Preload to work best. If you’re using older disks, it may be worth trying Preload. But, you won’t break anything if you install it on more modern hardware.

Make Applications Start Faster:

So, installing Preload is pretty simple. Once you’ve installed Preload, you are done. There’s no need to tinker with settings. There’s no need to configure it. It should even automatically set itself up as a self-starting daemon.

Crack open your terminal (you know how to do that by now) and enter the following to install Preload in Ubuntu:

Agree to install and enter your password. That’s it. That’s all you need to do. You can check the man page:

See? I told you this would look like a weird article.

Closure:

Have you had good luck with Preload? Have you been using it all along? Did you use it back when you were using a spinning hard drive? Did it help to make applications start faster? Let me know in a comment. I mean, it’s not snake oil, but how much could it help an average user with modern hardware? I’m not sure how much it’ll help those folks.

Thanks for reading! If you want to help, or if the site has helped you, you can donate, register to help, write an article, or buy inexpensive hosting to start your site. If you scroll down, you can sign up for the newsletter, vote for the article, and comment.

Subscribe To Our Newsletter
Get notified when new articles are published! It's free and I won't send you any spam.
Linux Tips
Creative Commons License
This work is licensed under a Creative Commons Attribution 4.0 International License.