Make Applications Start Faster in Ubuntu

Today’s article is pretty specific as we discuss one way to make applications start faster in Ubuntu. However, I feel like I need to make you aware that this isn’t some sort of miracle software. The usage and results are pretty limited and I’m mostly covering this because it was in my notes and a question I saw recently on Reddit.

Now, for reasons, I’m not sure what format this article will take. I haven’t written it yet and the information I want to share is kinda mixed. I guess we could have a longer intro than normal.

So, the tool in question is called ‘Preload’. The man page describes Preload like this:

preload – Adaptive readahead daemon

Though I think it’s important to also quote this (also from the man page):

preload is an adaptive readahead daemon that prefetches files mapped by applications from the disk to reduce application startup time.

So, what is this Preload? It’s a daemon that runs in the background and monitors what you do. It pays attention to what applications you open (for example) and loads the various files into memory. Then, when you open the application it will open faster. This is mostly useful if you’ve opened the application, closed it, and wish to open it again. The second time you open the application, the theory is that it’ll open faster.

Does it work? I haven’t lied to you yet and I’m not going to start now. I haven’t tested it enough to claim it has any great benefits. Oh, I’ve installed it before and left it running. I just didn’t do any verification and I’m not going to cite my observations as factual without having data to back that up. I will say that I didn’t notice it slowing anything down. Of course, I have fast hardware, and using a stopwatch to test the results would be full of all sorts of inaccuracies. 

Do I recommend it? Well, it doesn’t seem to hurt anything. It does seem faster when I close Thunderbird and open it back up again. I use an NVMe M.2 SSD, which is already pretty speedy, so I doubt I’d see much. I’ve never tried with a slower SSD nor on an older spinning platter HDD – which is where I’d expect this Preload to work best. If you’re using older disks, it may be worth trying Preload. But, you won’t break anything if you install it on more modern hardware.

Make Applications Start Faster:

So, installing Preload is pretty simple. Once you’ve installed Preload, you are done. There’s no need to tinker with settings. There’s no need to configure it. It should even automatically set itself up as a self-starting daemon.

Crack open your terminal (you know how to do that by now) and enter the following to install Preload in Ubuntu:

Agree to install and enter your password. That’s it. That’s all you need to do. You can check the man page:

See? I told you this would look like a weird article.

Closure:

Have you had good luck with Preload? Have you been using it all along? Did you use it back when you were using a spinning hard drive? Did it help to make applications start faster? Let me know in a comment. I mean, it’s not snake oil, but how much could it help an average user with modern hardware? I’m not sure how much it’ll help those folks.

Thanks for reading! If you want to help, or if the site has helped you, you can donate, register to help, write an article, or buy inexpensive hosting to start your site. If you scroll down, you can sign up for the newsletter, vote for the article, and comment.
Smash a button!
[Total: 3 Average: 5]

Let’s Play With Touch And Time

Today’s article is just a fun article where we get the chance to play with touch and time. This article won’t necessarily be something you rely on daily, but it should at least be informative. That and there’s surely a subset of users who use these commands. There’s bound to be! Otherwise, why would they make touch flags for adjusting the time?!?

We’ve used the ‘touch’ command before.

Some Useful Ways To Use The Touch Command In Linux

I’m pretty sure we’ve also used the touch command in at least another article. There are a lot of search results for the word and it’s not important enough to go looking. The key point is that touch is a command you use in the terminal and it describes itself as:

touch – change file timestamps

See, we (and perhaps most other sites) have used the touch command to *make* files, but it’s useful (and intended for) changing file timestamps. Like oh so many commands, there are all sorts of ways to use it and so many folks do things in their own way. The great thing about Linux is that we have so many choices.

This is why I figure I’ll cover touch and time in this article. It’s just a few commands that we’ll be using, so it’s not all that advanced. A beginner probably won’t need to know this sort of information, but it’s information worth sharing.

Playing With Touch And Time:

As we use touch in the terminal, you’re going to need to have an open terminal to play with touch and time. If you don’t know how to open a terminal, press CTRL + ALT + T and your default terminal should open.

With your terminal now open, let’s start by creating a file:

That command will create a file with a created timestamp from the time you ran the command. If you want, you can change the access time, that is the time stored with the file that says when it was last accessed. Run the following command with the -a flag:

That’ll change the ‘foo file’s access time to the time when you ran the command. All well and good? Alright… Let’s remove that file with:

Now, we’re going to create the foo file again, but we’re going to give it a specific timestamp. The format you want is:

Or, something like this:

That will give the file a timestamp from March 3rd at one minute and one second past midnight. Note the period denoting seconds as that’s the only modifier you need for this command.

NOTE: If you use a different time format, that command might be different for you. I don’t think it is, but I’m not set up to test that. If it does matter, please let us know in a comment, thanks!

Finally, let’s say you have a file named ‘bar’ and you want ‘foo’ to have the same timestamp that bar has. You can do that with the touch command. It’s relatively easy to do with the -r flag:

That command will give foo the same timestamp that bar has, should you be inclined to do so. It’s pretty easy to use the touch command to change a timestamp on files, which is why you might not want to rely too much on timestamps. They can be useful, but they are not immutable. 

You can run the command above to delete the foo file when you’re done playing around with the touch command:

Closure:

There you go, another article. This time, we’ve had an article about using touch and time, which is kinda why the touch command exists in the first place. It’s far more useful than just creating files. Be sure to run man touch (no inappropriate jokes) in the terminal to learn more about the touch command. There are other touch commands that you may find yourself interested in, I’ve just covered a few of them.

Thanks for reading! If you want to help, or if the site has helped you, you can donate, register to help, write an article, or buy inexpensive hosting to start your site. If you scroll down, you can sign up for the newsletter, vote for the article, and comment.

Smash a button!
[Total: 4 Average: 5]

Find Your Linux System’s Timezone

This article, telling you how to find your system’s timezone, is more aimed at server users than desktop users. Desktop users probably know this already.

This command is most useful when you’re dealing with servers across the globe. You may want to schedule things (for one small example) to run at local times and knowing the local time will help with that. Knowing the timezone is pretty important, and the timezone itself is important.

The timezone dictates things like when your clocks change to adjust for Daylight Savings Time. While that may not seem like a big deal, having the proper date and time is a big deal. So, this article will tell you a couple of quick and easy ways to find your Linux system’s timezone.

Find Your Linux System’s Timezone:

This is going to need an open terminal. You probably could have guessed that. You can open a terminal with your keyboard – just press CTRL + ALT + T and your default terminal should open.

With your terminal open, you can try one of the following commands (I prefer the first):

The second option is easier to remember, but you don’t get the full name of your timezone. It may require a bit more thinking, just to be sure. Try:

And the timezone will be at the end of that string of characters. If you’re still confused, you can type the abbreviation into your favorite search engine and they’ll get you sorted out.

Thee is a third way, but keeping that way crammed into memory isn’t as easy as the date command. It’s just:

Of course, you can just use ​’timedatectl’ without grep. That’s a viable option, it just spits out more information. So, if you were to remember just one of the commands, the third one is probably the best.

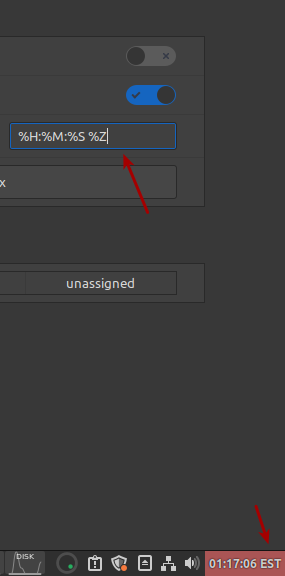
Those are three ways I know of to find the timezone within the Linux terminal. It may show up in the GUI. If you want to add it to your system’s time display, you add %Z to the string (ISO 8601 standardizes this) and it’d look something like this when you changed it and the change took place:

Using the #Z to show the timezone in the system clock.
Tada! That’d be how you’d do that!

So, you can display the timezone in the GUI if you really needed to. But, this article is mainly for those who admin servers across the globe and need to know the timezone the system is in.

Closure:

Woohoo! Another article done and ready to publish. However, I’m going to leave this one unscheduled (scheduled way in the future) so that I have an ’emergency’ article, an article that can be used when Mother Nature has taken out my ‘net or motivation just isn’t there.

Either way, this article covered how to find your timezone in Linux. It’s information you may want, and information you may want to check before rolling out changes. The data is in the system, we just need to pry it out.

Smash a button!
[Total: 3 Average: 5]

Show Date And Time In The Terminal

Today’s article is a nice and easy one, where I show you how to show the date and time in the terminal. It seems like a nice and easy article to write when I’m not feeling well. I’ll try to not let my ailments hamper the article in any way. 

Normally, I’d have a few articles written ahead of time. This time, I only have one article written ahead of time and it’s my ’emergency’ article. I’m not doing that poorly, so I’ll write this one. I’m pretty dedicated to doing an article every other day.

Anyhow, as I said, this article will show you how to get the date and time from the terminal. You can actually get the time just from running uptime, but there’s more to it. Linux actually has a ‘date’ command, which is what we’ll be using for this exercise. The date command’s man page describes it like:

date – print or set the system date and time

We will only be using the date command to print the time in the terminal. There are easier ways to set and maintain the time. With NTP being common, you really shouldn’t have to worry much about keeping the time accurate enough on your system.

Why would you want to know the date and time? Not everyone uses a desktop environment with a GUI and a clock. You may need to know the system time when you’re working on it remotely. There are all sorts of reasons. In fact, I once wrote an entire article about finding your timezone in Linux.

Show Date And Time In The Terminal:

This article requires an open terminal, just like many other articles on this site. Just press CTRL + ALT + T and your default terminal should open.

Now, this is nice and obvious… With your terminal open, just type in:

You’ll get an output similar to this one:

Tada! You’re done!

Just kidding! There’s more to it. If you want to show just the time, you can just use this command:

If you want to show the date and have it formatted like we do in the US, you can use this command:

Want to know the date 3 weeks ago? (You can also use days for this command)? Well then, you can try this command:

How about if you want to know how many days into the year you are? Well, you can do that with:

Those are about the most interesting ways to show the date and time in the terminal, at least the most interesting ways that I can think of at this moment in time. If you use the date command for anything else, let us know by leaving a comment!

Closure:

There you have it, yet another article! This one shows you how to show the date and time in the terminal, just in case you want to do that. It’s a nice and easy exercise and, as far as tools go, is one that’s at least easy to remember. It’s probably not the most important tool you can have in your toolbox, but at least it’s in there. (Please be gentle pointing out any errors, part of this article was written with the help of a heating pad.)

Thanks for reading! If you want to help, or if the site has helped you, you can donate, register to help, write an article, or buy inexpensive hosting to start your own site. If you scroll down, you can sign up for the newsletter, vote for the article, and comment.

Smash a button!
[Total: 5 Average: 5]

Automatically Logout Of Your Shell

For security reasons, you’ll possibly automatically logout of your user sessions. If you didn’t know, you can actually do that with your shell, in the terminal. There’s already a variable (TMOUT) just for this reason, should you want to add it as a layer of security.

Basically, for today, we’re going to set it up so that it automatically logs inactive users out of their shell session. It doesn’t log you out of your complete user session, it just logs you out of your shell – after a set period of activity. It even closes the open terminal windows when it does so.

So, depending on the interval you use, you can set it up to log you out of your shell instances after just a few minutes of inactivity. If you have nosy neighbors, like people physically near your computer, it can be a nice way to make sure things are all locked before you head off to the bathroom.

It’s useful for that sort of stuff. It’s just an added layer of security. I think that it is a pretty handy feature. I’ll explain how to enable it on a user-by-user basis and how to make it system-wide, giving you a choice. It’s actually pretty easy, so read on!

Automatically Logout Of Your Shell:

Like most good things in the Linux world, you’ll need an open terminal to take advantage of this article. If you don’t know how to open the terminal, you can do so with your keyboard – just press CTRL + ALT + T and your default terminal should open.

Both of these ways are pretty simple, in each case you add some text (using nano) to a profile file. The text in either case is the same. If you want to do it for just one user, the user you’re currently using, then run the following:

Add the following:

So, if you wanted it to be 10 minutes of inactivity before being logged out, you’d use TMOUT=600, because 600 seconds is 10 minutes. As you’re using nano, you can press CTRL + X, then Y, and then ENTER to save the file.

You’ll then force the profile to load, the command taking effect immediately, with this:

If you want to do it with the full system, the online guides will tell you to edit /etc/profile and that it’ll work if you do. My experiences are different and this is tested across multiple systems. You’ll be editing /etc/bash.bashrc, just like you did above but with sudo. (Using /etc/profile has not worked for me.)

Again, you add ‘TMOUT=600″ or however many seconds you want to wait. Personally? I scrolled to the bottom of the file, made a new line, and added the text that way. You could be all professional and add a comment indicating when and why you were there. I did nothing of the sort.

Unlike the first command, you’ll not be able to reload the second method (system-wide configuration) with ‘source ~/…’. As near as I can tell, you’ll have to restart the system for the changes to take place. If someone has a way to load it without rebooting, I’ll update the article. Please leave a comment if you do know of a way!

Closure:

There you have it, another article! This one tells you how to automatically logout from your shell. I’m not sure if it works for all shells, so feel free to test and see what sort of results you get. I’m pretty sure the 2nd option could be reloaded without rebooting, but I can’t think of which command. Which service would need restarting? I dunno?

Thanks for reading! If you want to help, or if the site has helped you, you can donate, register to help, write an article, or buy inexpensive hosting to start your own site. If you scroll down, you can sign up for the newsletter, vote for the article, and comment.

Smash a button!
[Total: 4 Average: 5]
Creative Commons License
This work is licensed under a Creative Commons Attribution 4.0 International License.
Zoom to top!