Today’s article should be fairly short and straight to the point, as we discuss how to show installed kernels in Ubuntu. This isn’t a very complicated thing and we’ll be showing these kernels in the terminal. Sure, there are GUI tools you can use, but you might as well learn to do this in the terminal.
A lot of people ask the question, “What is Linux?”
Well, Linux is just the kernel. The kernel schedules tasks, interfaces with hardware, and generally manages the stuff that goes on at a lower level. This is surrounded by GNU’s tools and you will generally add a window manager and desktop environment on top to turn it into a useable desktop system with a fancy GUI.
You might enjoy reading this article:
The “Linux” or “GNU/Linux” Debate
Under all that is the kernel. It’s very important! Without it, we’d have no Linux. There are other kernels out there, but the topic of this site is Linux Tips. But, without a kernel, your computer would be dead in the water.
In the course of updating your system, and depending on how you do your updates, you’ll install new kernels as they are released. GRUB will default to the newest kernel in most configurations, but there are other kernels installed and those can be selected from an advanced menu during the boot process.
Unless you have a brand new install that hasn’t been updated recently (kernel updates are common), you’ll have more than one kernel installed. Even if you upgrade Ubuntu in the terminal, even if you use ‘autoremove‘, Ubuntu will store the previous kernel. This is a good thing, as you can boot to that kernel if the new one should give you trouble.
It’s sometimes necessary to wait out a kernel version because it doesn’t run properly on your system. That’s not common, but it does happen. When that does happen, you should update manually and control what software is removed so that you don’t remove the working kernel and can still have a usable system. It happens, it’s just not all that common.
By the way, the kernel is mostly worked on by paid developers these days. The current kernel has more than thirty million lines of code. Of course, it contains drivers for hardware new and old and those folks using the older equipment will scream bloody murder if you remove their drivers from the kernel. Still, stuff gets culled regularly – it’s for the good of the herd! Maintaining all that for three users is asking too much.
What have we learned?
We’ve learned that the kernel is important and kind of what it does. We’ve also learned that you have more than one kernel installed. Additionally, we’ve learned why that’s a good thing. So, we’re doing okay so far!
Show Installed Kernels In Ubuntu:
As the first paragraph said, you’re going to need an open terminal. This is true for most of my articles. You should know how to open a terminal by now. If not, press
These instructions are going to work in Debian, Ubuntu, Mint, etc… At least one of them may work for other distros. I can’t say that I’ve tried recently and I’m not going to make any claims. Where we use ‘dpkg‘, that’s going to be exclusive to those distros with dpkg – the Debian Package Manager.
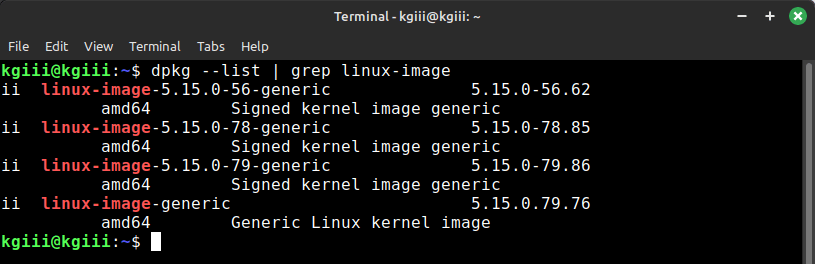
Seeing as I mentioned dpgk, we can start with that command first. If you want to show installed kernels in Ubuntu using dpkg, the command is simply:
1 | dpkg --list | grep linux-image |
That might look something like this:
If you search the ‘net, you’ll find there are all sorts of ways to do this – including some fancy commands that use egrep and show colors. I don’t see any reason to include those. What we have here works.
If you want, you can also use the find command. That’s a nice and handy command and I suppose this command might work on other distros. To show installed kernels in Ubuntu using the find command, try this command:
1 | find /boot/vmli* |
That should list your installed kernels quickly and without any fuss (and no muss). There are all sorts of ways to find this information but we’ve just covered the two quickest and easiest ways I can think of (in the terminal). It’s probably quicker in the terminal than it is for any other method, especially if you’ve always got an open terminal (or three).
Closure:
Well, there you have it… You have learned how to show installed kernels in Ubuntu, a useful skill to have (especially if you’re having kernel issues). These are easy enough to remember commands, or you can always use this site’s search function to find what you need. I do that myself. I’m always referring to articles I’ve written and the search function isn’t great but it does work.
Thanks for reading! If you want to help, or if the site has helped you, you can donate, register to help, write an article, or buy inexpensive hosting to start your site. If you scroll down, you can sign up for the newsletter, vote for the article, and comment.
Your articles just keep getting better and better.
Thanks! I’ve been kind of playing with how I write them. We’ll see if it matters and makes a difference.