How To: Use sudo Without A Password

It is possible to use sudo without a password. Doing so is probably a pretty bad idea for most people, but it can be done. Password-less sudo is an option that you have, but it’s one heck of a security risk.

I have pretty good physical security and the risks of someone physically accessing my devices are pretty minimal. There’s no neighbors that can access my WiFi, or anything like that. Because of this, I can, and sometimes do, set up my computers so that I don’t need to use a password when I use sudo.

I feel like I need to make this clear:

If you set it up to use sudo without a password, you’re removing a key security element. If you can use sudo without a password, so can’t someone who’d be doing so with malice aforethought. It’d be even more risky if you did this on a laptop that might get misplaced or stolen.

In short: DO NOT DO THIS (without considering the security implications).

By the way, if you don’t know what sudo is, it stands for “superuser do”. It’s what you use to temporarily elevate your permissions, to read, write, or execute administrative (or otherwise restricted) files. Basically, it turns you into an omnipotent administrator. 

Again, be careful before doing this. If it makes you an omnipotent user, it makes anyone that can access the device an omnipotent user. You have been warned. If you’re comfortable with your physical security, this is an option. It’s an option you should consider only with care and diligence. 

SUDO Without A Password:

     See Also: Generate Complex Passwords

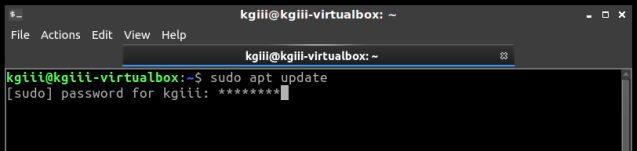
Like so many things, this too starts in the terminal. As always, you can open your terminal with your keyboard, just press CTRL + ALT + T and your default terminal should open. Once it is open, enter the following to open the file with nano:

Arrow button yourself down to the bottom and add the following line:

Where it says “<your_username>” you change it to your username – without the brackets. So, if your username were the same as mine, you’d make a line that looks like:

The ‘kgiii’ is lowercase, and your username will be lowercase. If, for some reason, you don’t actually know your username, you can find it with:

Anyhow, after you’ve added that line, you can save the file. As we’re using nano, you save it by pressing CTRL + X, then Y, and then ENTER

That should get you sorted and you should now be able to use sudo without a password. If you are aware of the security implications, this may just be something you want to do. On the other hand, it’s not exactly taxing to type your password.

Closure:

And, once again, you have another article! I’ve reached the point where I have a small buffer. I could be offline for a few days and articles will still publish themselves. I’m hoping to get even further ahead, so we shall see how it goes.

Thanks for reading! If you want to help, or if the site has helped you, you can donate, register to help, write an article, or buy inexpensive hosting to start your own site. If you scroll down, you can sign up for the newsletter, vote for the article, and comment.

Make Ubuntu Provide Feedback (Asterisks) When Typing Passwords In The Terminal

By default, Ubuntu doesn’t show anything when you type passwords in the terminal. They made this decision for security reasons. Shoulder-surfing is a thing. People looking over your shoulder could see how many characters you entered, thus narrowing down the number of possible passwords.

This article will show you how to show asterisks on the screen, as some folks prefer, when you enter your passwords in the terminal. This tip is actually rather easy and shouldn’t take very long. It’s not even all that advanced, and it can be undertaken by most anyone. You should at least understand the implications before changing the behavior.

Frankly, it’s a perfectly acceptable choice to not show anything when typing sensitive material, but others prefer to have some feedback. It makes it easier for slower typing people to keep track of where they are, for example. On top of that, there are many situations where you really don’t have to worry a whole lot about people shoulder surfing.

When you’re using a computer that’s never going to be out in public, it’s probably not much of an issue if you show asterisks. If it’s a laptop that you use in coffee shops and you’re security conscious, you may want to leave it the way it is. You have a choice. You can leave it the way it is, or you can go ahead and change it. Linux is pretty awesome like that. You get to make the decisions!

Passwords With Asterisk Feedback:

First, let’s crack open the terminal. Press CTRL + ALT + T and your default terminal should open so we can edit the sudoers file. It’s done like this:

Enter your password and hit enter, of course. (Mark it on the calendar! This should be the last time you enter your password in the terminal without some visual feedback!)

Use the down arrow until you’re at the start of the line that says:

Press the ENTER button. This should move that line down and leave a blank line above it. Use the arrow button to move up to that blank line and enter:

Note: This spacing isn’t technically required. It is done for convention and to aid in ease of reading/processing information-dense more accurately and swiftly. You can also probably put the new line anywhere in that file. For some reason, that’s how I have it in my notes.

When you’re done, you will then need to save the file. As this is nano, press CTRL + X, then Y, and then ENTER.

That’s it. That’s everything. You will probably need to close and reopen all of your terminals to notice the difference. Then you can test it by opening a new terminal window and tying in:

Type your password when prompted and you’ll hopefully see some asterisks as feedback. It should look a little like this:

password with asterisk feedback in the terminal
See? Asterisks for passwords feedback in the terminal.

As mentioned above, Ubuntu made this change for security reasons. If you change this, you’re making it so that people can see how many characters you typed when you entered your password. Of course, they can also count how many times you pressed a key on your keyboard. Just be aware of it and decide for yourself.

Closure:

And there you have it, another article published. This one is about the passwords you type and if they’ll give you any feedback by appearing as asterisks on the screen. It’s a decision that you get to make, and the security implications are real – but not universal. You may prefer asterisks when typing your passwords, or you may prefer the defaults.

Thanks for reading! If you want to help, or if the site has helped you, you can donate, register to help, write an article, or buy inexpensive hosting to start your own site. If you scroll down, you can sign up for the newsletter, vote for the article, and comment.

Let’s Use rkhunter To Look For Rootkits

In this article, we’ll go hunting for rootkits with a tool known as ‘rkhunter‘. It’s relatively easy to use rkhunter and this article will show you how. Don’t worry, it’s not all that complicated. You can do it.

Recommended reading: What You Need to Know About Linux Rootkits

So, what is a rootkit? Well, for the purposes of this exercise, a rootkit is malware that hides itself while allowing privileged access to the system. In other words, it’s the kit that allows an unauthorized person to use the system with root privileges. The word ‘malware‘ refers to software that would do you or your system harm.

A rootkit is one of many types of malware, like viruses and trojans, and Linux isn’t entirely immune to such. If you give an application privileges, it can and will use those privileges. That’s true for software you want and software you don’t want.

Malware exists for Linux! Know what you’re installing before you install it, and get your software from legitimate sources! Linux has some security advantages, and your actions can easily nullify those advantages. If you give something the permissions necessary to make it executable, it can be executed – even if it’s malware.

The rkhunter application is a software tool that will help you check your system for rootkits and some other exploits. It doesn’t help you remove them, it only helps you identify them. 

If you’re curious, rkhunter describes itself as:

rkhunter is a shell script which carries out various checks on the local system to try and detect known rootkits and malware. It also performs checks to see if commands have been modified, if the system startup files have been modified, and various checks on the network interfaces, including checks for listening applications.

Let’s put it to use!

Hunt Rootkits With ‘rkhunter’:

In order to use rkhunter, you have to install it. It’s possibly in your default repos and your package manager is ready to install it. If not, you can grab a copy from their repository and build it. Those using Debian or the likes, can just install it with:

You can adjust that for your distro to see if it’s available. If it’s a mainstream distro, it’s probably available. Once installed, you start the scan with:

This command (there are others, jcheck man rkhunter) will be interactive. You need to sit there to press ENTER once in a while. It’s quick and monitoring it means you’ll see any warnings.

Once it has finished running it will tell you about any warnings. A warning doesn’t necessarily mean an infection!

After checking the warnings, see the log for more information. Read the log every time – that’s where most of the output is stored. Read the log with:

Now it’s up to you. You need to process that information. You may see output such as this:

That doesn’t mean I have 8 rootkits, it means I need to check the logs further to see what it’s calling a potential rootkit. In this case, one of the signs of a rootkit is a process that takes up a lot of RAM. Well, my browser is taking up a bunch of RAM and that’s one of the things it is warning me about.

When I say it’s up to you, it’s really up to you. You have to read the report and the logs to understand what is going on. DO NOT PANIC! The warnings can look scary – but they’re often just warnings. Read the logs thoroughly and understand what you’re reading before you do anything drastic!

Closure:

And there you have it! Another article in the books and this one about security. If you think you have a rootkit, feel free to leave a comment, but rkhunter tends to be a little trigger-happy with the warnings.

Thanks for reading! If you want to help, or if the site has helped you, you can donate, register to help, write an article, or buy inexpensive hosting to start your own site. If you scroll down, you can sign up for the newsletter, vote for the article, and comment.

How To: Enable The Root Account in Ubuntu

This will be a quick and easy article, where I explain how to enable the root account in Ubuntu. It’s easy to enable the root account, but you may not want to. The choice is up to you.

This article really starts here, with a pet peeve. See, Ubuntu doesn’t ship with root enabled by default and it does that for security reasons. If there’s no root account, the root account can’t be compromised. Instead, it relies on sudo for elevating permissions. If you ask at some sites, they’ll give you a lecture instead of telling you how to enable root.

Me? I disagree with that. If you want to know how to enable root, I’ll tell you how to enable root. It’ll likely come with a blurb that tells you why you may want to avoid doing so – but I’ll give you the answer to your question.

About the only time I won’t give you a direct answer is when it’s obvious that you’re asking me to do your homework. I may also not tell people how to do their job. After all, I don’t want incompetence entering the workforce and I don’t want incompetent people staying staying in the field.

I view Linux as not just an OS but also as a bit of a philosophy, a philosophy of constant learning, continued improvement, and a never-ending quest for greater understanding. If someone wants to know how to enable root, I’m damned well going to tell them how to enable root.

Yes, it may lessen their security, and I’ll make sure to tell them that as well. I’ll be sure to tell them why Ubuntu made the choice and what it means if they undo it. It’s their system. If they want to enable root, I will help them do that.

Enable Root in Ubuntu:

Having said all of that above, it’s actually really trivial to enable root in Ubuntu. The first thing you’re going to do is open the terminal. Like always, you can use your keyboard, just press CTRL + ALT + T and your default terminal will open up.

Next, you’ll want to enter the following command:

Now, first it’ll ask for your current user’s password. Enter that. When you enter that, it’ll ask you to set a password for ‘root’. You’ll need to enter that password twice. Once you’re done with that, you’re done with it. That’s literally all it takes.

If you want to test this, you can login as root in TTY. Press CTRL + ALT + F3 and login as root, using the password you just assigned. To get back to your desktop, just press CTRL + ALT + F1 and it should bring you right back. If not, or if you’re not using Ubuntu, you can press and hold the left ALT button and then press the until you’re back at your desktop.

NOTE: This won’t enable GUI login as root. I’ll explain how to do that in a future article. This only enables the root account and nothing more.

If you do enable root, be aware that that means the root account can be compromised and used. Root has all the permissions. All of ’em… So, if the root account is compromised whoever has done so has complete control of the system. You should be aware of this before you make this change. Only make this change if you know what you’re doing and if you’re prepared for the consequences.

Closure:

And there you have it. You have another article in the books, this one explaining how to enable the root account. Think twice before doing so, but it’s your device and you get to make that decision. Just be aware of the consequences of doing so and you should be all set.

Thanks for reading! If you want to help, or if the site has helped you, you can donate, register to help, write an article, or buy inexpensive hosting to start your own site. If you scroll down, you can sign up for the newsletter, vote for the article, and comment.

Subscribe To Our Newsletter
Get notified when new articles are published! It's free and I won't send you any spam.
Linux Tips
Creative Commons License
This work is licensed under a Creative Commons Attribution 4.0 International License.