Find Out Which Shell You’re Using

Today’s article is going to teach you how to find out which shell you’re using. Knowing which shell you’re using is important if you’re using an unfamiliar system. Most of the time, it’s something you’d already know, but once in a while you might need to find out which shell you’re using.

As you’re visiting this site, it’s fairly safe to assume you’re using Linux (or at least interested in Linux). In that case, you’re quite likely using Bash. Bash is the most common, from my observations.

If you’re curious, Bash is a replacement for Bourne Shell – and is ‘Bourne Again SHell’. It has existed, thanks to the Brian Fox and the GNU Project, since the late eighties. It’s pretty ubiquitous, pretty stable, and pretty feature complete.

While Bash is the most common, it’s certainly not alone in the field of shell options. There are other shells, from ZSH to Fish, or from Dash to Nushell. In some distros, you might find one of them installed by default, but it’s usually going to be Bash.

So, odds are pretty good that you will already know if you’re using something other than Bash. After all, you’d likely have been the person who installed the alternative. Still, there are a couple of commands you can use when you want to figure out which shell you’re using, for when you do need to know.

Find Out Which Shell You’re Using:

This article requires an open terminal, like many other articles on this site. If you don’t know how to open the terminal, you can do so with your keyboard – just press CTRL + ALT + T and your default terminal should open.

On the off-chance that you don’t know what a shell is, Wikipedia describes the shell as:

A Unix shell is a command-line interpreter or shell that provides a command line user interface for Unix-like operating systems. The shell is both an interactive command language and a scripting language, and is used by the operating system to control the execution of the system using shell scripts.

And now, with your terminal emulator open, let’s go about finding out which shell you’re using. 

The first command you can try would be:

You can also use the echo command in a different way. It’s even a bit more clear with this command:

You can also use ‘ps’ which takes snapshots of current processes:

There are certainly other ways to find out which shell you’re using, but those are a few ways that are easy enough. If you have other ways, please feel free to leave them as a comment.

Oh, and here’s a bonus… If you want to see which shells are installed on your system, you can use the following command:

The output of this would look similar to this:

list of installed shells
This is the defaults from Lubuntu 20.04 LTS. Your output may vary, of course.

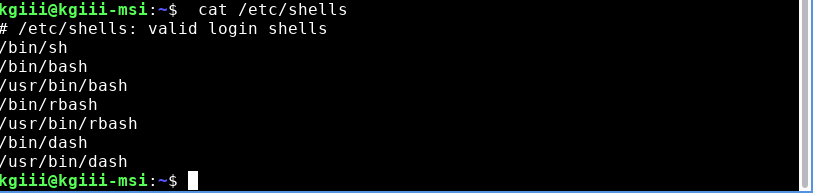
As I said, that’ll let you know which shells you have installed. In a future article, we might discuss how to change your default shell – but that’s something I seldom bother with these days. Bash works and works well.

Closure:

Yup… There it is! Another article. Now that the year is up, I’m not sure what to look forward to as a goal. I highly doubt I’ll make it a full two years, but it could happen. We shall see…

Thanks for reading! If you want to help, or if the site has helped you, you can donate, register to help, write an article, or buy inexpensive hosting to start your own site. If you scroll down, you can sign up for the newsletter, vote for the article, and comment.

Convert Disk Image Formats To .ISO

Today’s article will teach you how to convert disk image formats to .iso. It’s a pretty handy tool to have in your toolbox. This is going to be a pretty easy article to follow, so it shouldn’t be all that long.

In case you don’t know, there are all sorts of disk image formats. The .bin and .cue are the two you are most likely to be familiar with (beyond the .iso, which is the most common in the Linux world).

There are .B5I .BIN, CDI, CUE, .MDF, MDE, and .NRG. There may be more, but that’s all the tool we’ll be using handles. As I mentioned, you may well already be familiar with the .BIN and .CUE disk image formats. You see those from time to time and now you no longer have to ignore them – you’ll have just the tool you need to convert them to .ISO (which many programs expect – and work with, while not working with other formats).

The tool we’ll be using is known as iat and it’s actually just a tiny command-line application. The man page defines it as such:

iat – converts many CD-ROM image formats to iso9660

The latter part is probably important to note. That means that it only converts to .ISO format and nothing else. If you want to convert to a different format, or in the opposite direction, this is not the correct tool the job.

So then, let’s take a few minutes to use iat and learn how to …

Convert Disk Image Formats:

This article requires an open terminal, like many other articles on this site. If you don’t know how to open the terminal, you can do so with your keyboard – just press CTRL + ALT + T and your default terminal should open.

With your terminal now open, the rest is easy. It’s almost certainly in your default repositories, and unlikely to be installed by default. You can install it in your usual manner – but I’ll show you how to do it in Debian/Ubuntu/Mint derivatives:

It’ll be just as easy to install in any major distro. To use it, it’s REALLY simple… It’s just this easy:

Sure, you can check out man iat, but it’s not really all that complicated. This is pretty much the easiest tool you’ll find to convert disk image formats to .iso. Tell it which file you want to convert, tell it what you want to name the output file, and then you just pound the enter button on your keyboard and wait. The output is a handy .iso that you can use just like you would any other .iso.

Closure:

There you have it! You have a new article that teaches you how to convert disk image formats to .iso – which can seriously come in handy when you need to burn a disk image and the software you’re using only accepts .iso as the input.

It’s also the first article I hadn’t obligated myself to do! This is now over a year since the first article was published, and one published every other day. I am absolutely NOT committing to maintaining the same publication schedules, but I just don’t think I can let the site sit here idle. So, we’ll see what happens.

Thanks for reading! If you want to help, or if the site has helped you, you can donate, register to help, write an article, or buy inexpensive hosting to start your own site. If you scroll down, you can sign up for the newsletter, vote for the article, and comment.

Check To See If SELinux Is Working

In today’s article, you’ll learn how to see if SELinux Is Working on your system. Your system may not have SELinux, but many do. This article is for those people. You’re welcome!

SELinux stands for Security-Enhanced Linux and its function is to provide greater controls over who can access the system. It was actually developed by the US spy-agency – the NSA. You’ll often find SELinux in distros that fall within the RHEL family tree. The link at the start of this paragraph will give you even more details.

This article is just about checking to see if SELinux is working. It should be noted that SELinux has three operational states. I’ll cover them lightly here.

The first operational status is usually the default, which is ‘enforcing’. This means that it’s working and blocking as designed.

The second possible result is ‘permissive’. When SELinux is in this state, it is not blocking anything – but it is logging everything. So, you’ll see things after the fact, when you check the logs.

The third is simply ‘disabled’. That’s self-explanatory. If it’s disabled, it means it isn’t working. If it’s disabled, it’s easy enough to start it. If you choose not to, you’re not taking advantage of a security tool.

It’s not a very difficult article to follow, I don’t imagine. Pretty much anyone can figure this out. We won’t be going into details other than what the headline, and explaining everything about SELinux would take a lot of time and is beyond my level of expertise. 

See If SELinux Is Working:

This article requires an open terminal, like many other articles on this site. If you don’t know how to open the terminal, you can do so with your keyboard – just press CTRL + ALT + T and your default terminal should open.

With your terminal open,  the very first command you can use is simply:

That’ll spit out exactly the answer you’re looking for. However, the command that’s more interesting is the one that follows, an arguably better command to learn more about the status of SELinux:

That command outputs a ton of information. The output of that command has more information. Included in that information is the SELinux status. It’s a quick way to see if SELinux is working. 

The output of that command would look something like this:

selinux status
See? The output lets us see that everything is fine. 

See the line – which is “Current mode:”? Well, that’s how you see if SELinux is working. It also feeds you other information, for a more deep view of your SELinux status.

I suppose if you use that command and want to narrow it down, you could do something like:

Which is really just a bit silly when you already have the getenforce command available. There’s no reason to occupy one of your memory banks with that command, as it’s really just some fun with grep.

Closure:

Yup… There you have it. You have another article! ‘Snot really all that handy for those of us who don’t use SELinux. But, if you are using SELinux, this is a perfectly handy way  to see if See If SELinux Is Working.

Thanks for reading! If you want to help, or if the site has helped you, you can donate, register to help, write an article, or buy inexpensive hosting to start your own site. If you scroll down, you can sign up for the newsletter, vote for the article, and comment.

Turn Your Man Pages Into HTML

Today’s article is going to teach you how to turn your man pages into HTML. It’s a relatively straightforward process and handy if you want your man pages to be more easily read. It should be a quick article, as I have preexisting work to help along the way. 

Again, making your man pages easier to read is really the only reason why I can think of for doing this – other than preparing them for uploading to share on a web site. I’m not entirely sure why you’d want to upload them, when there are already uploaded and maintained versions of man pages.

If you recall, the last article was about showing you how to find your man page’s location on disk. In that article, you learned about the whereis command. The reason that article was done first was so that I can save some time and just refer you to the first article. 

So, yeah, click that last link and learn about the whereis command, saving me a bunch of time and typing! After all, I planned ahead! I swear, half these articles are so that I can refer to ’em later, I just forget that I wrote ’em. Wine might just be a factor.

Anyhow, with you having refreshed your memory by reading the previous article, let’s just jump right into it. Let’s learn how to…

Turn Your Man Pages Into HTML:

Like many other articles on this site, you’re gonna need an open terminal. If you don’t know how to open the terminal, you can do so with your keyboard – just press CTRL + ALT + T and your default terminal should open.

Once you have a terminal open, you’ll want to install man2html. That should be in your default repositories, so I’ll save some time and just share how to install it in Debian/Ubuntu/derivatives. It’s just:

Once installed, we can check the man page and see that it defines itself as:

man2html – format a manual page in html

Which is, well, a pretty good description. That’s what it does. That’s what we’ll be using it for. Imagine that?!?

Now, the first step in the operation is finding the location of your man pages. To do that, we’ll use the whereis command – like so:

The 3rd field is what we’re actually after, so you can use awk to help you out. That’d look more like this:

That’s the actual path to the man page for ls.  You’ll need it for the next command. That’d look like:

Now, as you can see, the command first needs to know the path of the man page and then needs to know the path where you wish to save the output HTML file. You can adjust each according to your needs, using the > operand to determine where the resulting file is saved. 

If you need a refresher on how to output the terminal to a file, click and read:

How To: Write Text To A File From The Terminal with “>” and “

(See, more foreshadowing!)

The output from your command should end up looking something like this:

man2html does its magic with the ls command
See? You get HTML as your output when you turn your man pages into HTmL! Tada!

Anyhow, that’s actually all there is to it. Use the whereis to find the location of the man page. With that information you use man2html to write the HTML to a directory of your choosing. ‘Snot all that difficult, now is it? And to think, there are people afraid of the terminal!

Closure:

Well, there you have it. It’s a pretty simple article, mostly thanks to having written a lot of the information ahead of time – in other articles. Sometimes I plan on another article to follow an article, but I forget or it just gets lost in the shuffle. The good news is that the search function works well enough and I now have a whole lot of articles to reference! If nothing else, you now know how to turn your man pages into HTML – should you want to do so.

Until next time…

Thanks for reading! If you want to help, or if the site has helped you, you can donate, register to help, write an article, or buy inexpensive hosting to start your own site. If you scroll down, you can sign up for the newsletter, vote for the article, and comment.

How To: Find Your Man Pages’ Location On Disk

Today’s article is going to teach you how to find your man pages’ location on disk. It may not be a very useful skill, but it’s one that will come in handy in a future article. (That’s called ‘foreshadowing’!) Well, it seems likely that it’ll come in handy with a future article.

By the way, if you’re curious about why the first lines in these articles are often ‘forced’, it’s because of search engine optimization. You can blame the search engines, but it works.

Many of you will be familiar with the which command. You can use that to locate a binary for an application. For example, you can go with:

Which will output something along the lines of:

And that’s great. If that’s what you need to know, that’s what you need to know. However, what if you want to also know where your man page file is located? 

It should come as no surprise that Linux will happily spit that information out, so long as you know the correct incantations. And, for that, you have Linux Tips – where I’m gonna tell you how to find your man pages’ location.

Man Pages Location:

This article requires an open terminal, like many other articles on this site. If you don’t know how to open the terminal, you can do so with your keyboard – just press CTRL + ALT + T and your default terminal should open.

The tool we’re going to be using is similar to which, and even spits out the same information. The tool in question whereis and the man page describes it as:

whereis – locate the binary, source, and manual page files for a command

As you can see, it’s a pretty simple command. It will also only show you the source if you actually have the source. In most cases, you have compiled binaries and that’s what your system uses. It’ll happily locate the binary just like the which command does.

So, let’s test it… Hmm… Let’s test it with the ‘ls’ command:

whereis command in action
See? It does exactly what i told you it would do! That’s why I make the big bucks!

So, if you want to know where your man pages are located for a specific applications, this is an easy way to do that. Obviously, it’s the 2nd bit of information. Though, I suppose if you only want the output to contain the path to the man pages, you could use a command like this:

That will just spit out the path to the man page, if that’s all you want to see. Try it with a few different commands and you’ll lock it into your memory – ’cause you never know when it’s going to come in handy.

Closure:

And there you have it… You have another article! This is just one of many articles, so feel free to browse around. You might even learn something new! I’ve officially written so many of these things that I can’t actually remember them all. I legit need to search first and make sure I haven’t already written the article. (I probably should have devised a system to avoid this, but the search function appears to be pretty good and effective.)

Thanks for reading! If you want to help, or if the site has helped you, you can donate, register to help, write an article, or buy inexpensive hosting to start your own site. If you scroll down, you can sign up for the newsletter, vote for the article, and comment.

Linux Tips
Creative Commons License
This work is licensed under a Creative Commons Attribution 4.0 International License.