Today is another easy day, but one that should be productive, where we’ll learn how to return to the previous working directory. It will be a short article, but you might find it useful. If nothing else, we’re making the more terminal accessible to new users.
These Linux tips needed to be shared some time, so it might as well be now. I don’t wish to air my medical issues, but my ailment has gone on long enough and I went to a medical professional this morning. I’m sure I’ll be fine. They say only the good die young, so I’m probably gonna live forever!
Anyhow, to learn how to return to the previous working directory (in the terminal, of course), read on! I promise, it’s easy. It’s one simple command and that’s all there is to it.
Return To The Previous Working Directory:
This article requires an open terminal, like many other articles on this site. If you don’t know how to open the terminal, you can do so with your keyboard – just press
This is probably more useful for very-nested directories with long names, but it won’t take that to demonstrate today’s subject. It’s not terribly complicated.
Let’s say that you’ve navigated to ~/foo and performed some functions there. Next, you’ve navigated to ~/bar and performed some functions there. Now, if you want to return to the ~/foo directory you can do so with just a simple – added to your cd command, like so:
1 | cd - |
If that’s confusing, I’ve made an image that explains it better than I can…
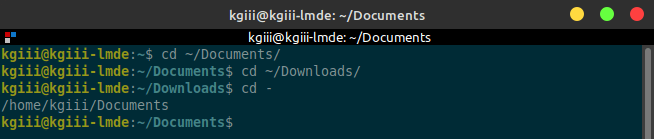
See? It’s nice and simple! If you were in one directory and left to go to a new directory, then it’s trivial to return to the previous working directory. The image should help make it clear if my description is lacking.
You might also be interested in:
Let’s Learn About Absolute And Relative Paths
How To: Find Your Present Working Directory
How To: Make A Directory In Linux
(There are a whole lot of articles with the word ‘directory’ in them!)
Closure:
I know… I know… This is a lot of short articles in a row. I’ll feel better. I’m sure of it! Amusingly, I was asked if I had any stress in my life and it was comforting to answer that I do not. My life is pretty drama free, but I do need to get an article out every other day! This time, I’ve shown you a quick and easy way to return to the previous working directory. It’s quick, easy, and effective!
Thanks for reading! If you want to help, or if the site has helped you, you can donate, register to help, write an article, or buy inexpensive hosting to start your own site. If you scroll down, you can sign up for the newsletter, vote for the article, and comment.