Today’s article is not going to be all that difficult to follow as the subject is just helping us learn a bit about the finger command. This probably isn’t useful for many of my readers, but it may be useful for those running full multi-user systems. So, let’s talk about the finger command.
The finger command is a bit weird. It’s an application you can call from the terminal and a protocol. It’s a tool used to get user information. It was more widely used back when things like a user’s real name and email address weren’t considered private information. In fact, finger has been used to compromise systems in the past.
Now, for the average reader, this isn’t a major concern. The average reader probably doesn’t need to know anything about finger.
See, the finger application gives you information about a user.
That doesn’t seem like much for my average reader but it’s possible to store a lot more information than just a username. On a multi-user system, you can store more than just a username. You can store fields like their email address, their workstation, their office address, their phone number, and many other fields.
As you can guess, that’s now considered sensitive information. A lot has changed since the early 70s, which is when the finger program was written, and then in the mid-70s when name/finger was proposed as a useful way to see if a person is online (logged into the system) and may be available for a meeting.
But, finger is still useful today. You’re not storing all that information anyhow. There are far better tools in an office environment these days.
Install finger:
If you install the finger application, you can check the man page to learn that finger identifies itself as this:
finger — user information lookup program
Which is what you can use it for today, especially for those of you who have more than one user on your system. You’re not storing things like email addresses in any of these fields, not as a regular desktop user. So, you can certainly install this (though there are other ways to see who is logged in or whatnot).
So, if you want to install finger, you’ll need an open terminal. To do that, you can usually just press
With the terminal open, you’ll find finger is easily installed from your default repositories. Some examples follow:
Debian/Ubuntu/etc:
1 | sudo apt install finger |
Fedora/derivatives:
1 | sudo dnf install finger |
RHEL/CentOS/derivatives:
1 | sudo yum install finger |
See? It’s nice and easy to install finger. It’s likely in your default repos on other systems, so try that first before hunting it down to compile it on your own.
The Finger Command:
If you followed the above directions, you installed finger with the terminal. That’s good because you need an open terminal for this. So, you should still have an open terminal. If not, you’ll need to open one, of course…
Now, the syntax is simple:
1 | finger <user_name> |
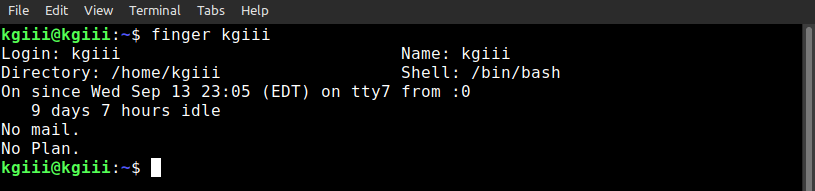
The output from this command would look similar to this:
There are many options, but that’s the most useful and the one with the information you’re likely after. However, you should read the man page for this one. It’s a beauty.
For example, you can tell finger to not show anything by having a ~/.nofinger file in your home directory. You can even include your PGP key by adding a ~/.pgpkey (containing said key) if you want. As you can see, this is very much aimed at a multi-user system.
Probably the most useful of the flags is the -m flag. If used properly, it will avoid finding real names. This is useful when you want to find just the username and not match it with any real names. Usernames are unique, while real names might not be. The syntax would be:
1 | finger -m <user_name> |
Other than that, it’s a fun command to play around with. It does output some useful user information, so it’s not useless on your regular desktop system – especially if you have multiple users (and you do, technically).
Closure:
So, there’s another one for the books. Another article is done and published. This time around, we discussed the finger command. I’m not sure how many folks will find it useful, but it’s worth sharing the information. Eventually, someone will find it useful.
Thanks for reading! If you want to help, or if the site has helped you, you can donate, register to help, write an article, or buy inexpensive hosting to start your site. If you scroll down, you can sign up for the newsletter, vote for the article, and comment.