Guest Article: What Are SSH Keys?

The following article is a guest-written article from Andy Brooks (aka captain-sensible) about SSH keys. So, let’s put our hands together for a guest author and appreciate that I got a break from writing articles! Thanks, Andy!

There are a few articles about SSH already:

Install SSH to Remotely Control Your Linux Computers
Enable x11 Forwarding With SSH (Remotely Use GUI Applications)
How To: Change The Port SSH Uses

What Are SSH Keys?

Recently, I created an account for the AUR (Arch user repository) with a view to taking over an maintaining an Aurphan AUR package. On the registration form, which included the usual user name etc, was a text box asking for my SSH public key? You might wonder what is that, why do the AUR want it, and how are they going to use it?

Well the AUR would hold my public key and that would be associated with my user account. What I would want to do with the AUR for a package would be update the PKGBUILD file and get those changes published on AUR repository. So basically that would require getting access to the server of the AUR by logging in and then pushing up my changes to it.

So how are SSH keys involved in that process ? Well on my PC in my home folder there is a directory called .ssh inside are two text files called id_rsa id_rsa.pub. The information held inside the id_rsa.pub, the AUR has a copy of.

If and when I access AUR to make changes, to any package on the repo, there is an exchange of information over my terminal that I am using as a communication channel via ssh. The server sends a challenge, which is to see if my private key matches up with the public key which the AUR server is holding a copy of.

A couple of points are the process involves encryption and the only key that should be “given out” to anybody is the public key. The private key should be, well kept private and out of peoples hands. Putting it simply, ssh-keys are a way of securely giving users access to remote servers. Secure Shell was created in 1995 by Tatu Ylönen a Finnish national following a password-sniffing attack at his university.

Now for registration for accounts such as with the AUR, there are really only two things you need to do.

1) create as a “once off” a pair of private & public keyserver-options.
2) Give the details of the public key to the AUR server.

Creating SSH Keys:

Lets start with item 1):

ssh-keygen is a utility of openSSH so you need to install that, then from a terminal simply issue the command (as a normal user not sudo): ssh-keygen

To keep things simple, you can accept the defaults by hitting return button.

At the end you should see something like in the adjacent image.
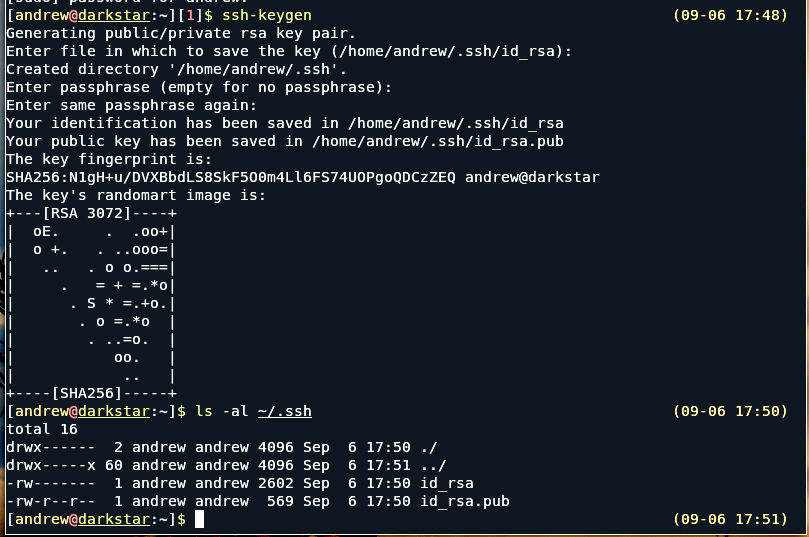
ssh keygen
Yours should look pretty similar to this!

Note: At this point, you can generate a password/passphrase. Doing so can increase the level of security, but the choice is yours to make.

Now lets look at 2):

From your terminal, check you are in your home folder, or cd to it eg ($ cd ~ )
Then change directory into the .ssh directory with cd .ssh
Then get contents via cat
cat : [andrew@darkstar:~/.ssh]$ cat id_rsa.pub

You should get something like : ssh-rsa AAAAB3NzaC1yc2EAAAAD… There will be something like 569 chars in all. 

From the terminal you can just copy starting from the ssh-rsa ….. to the end; then you can just paste that into a text box asking for your public key.

A quick warning the two keys generated are a matched pair. Once you submit your public key, don’t just repeat the default way of generating keys otherwise the keys will be overwritten and then you will be rejected from getting access to where you last put your public keys.

Also to see the .ssh directory in your home folder, you may need to click view hidden files and dirs.

Closure:

And there you have it, a guest-authored article about SSH keys! I’m very grateful for the help. If you’re interested in writing an article, you can do that. The easiest way for you is to use the Contribute Your Article link at the top of any page. The easiest way for me is if you just register and ask to be made an author. Either is awesome and even if you’re an author I will still need to edit and schedule posts.

Thanks for reading! If you want to help, or if the site has helped you, you can donate, register to help, write an article, or buy inexpensive hosting to start your own site. If you scroll down, you can sign up for the newsletter, vote for the article, and comment

How To: Change The Port SSH Uses

There are a number of things you can do to help secure SSH, and changing the port that SSH uses is one of those things that many people change. That can help, but I feel it’s important to also mention that security by obscurity isn’t really good security.

By the way, I’ve already written a couple of articles about SSH. Feel free to check ’em out, as they may get you up to speed if you’re not already there. The first link should be the link you click if you need to learn how to get started.

If you don’t know what ports are, there’s a great Wikipedia page here. We’re talking about software ports and not hardware ports. They’re well-described as this:

At the software level, within an operating system, a port is a logical construct that identifies a specific process or a type of network service.

By default, SSH uses port 22, and everybody knows it. Well, everybody that’s interested in networking knows this. And, because of this, malicious actors will scan for online computers and then check port 22 to see if SSH is running. If they find the port open, they’ll possibly try to guess the password and keep trying until they get through. 

NOTE: There are a number of ways to secure SSH, including disabling password logins entirely and using things like fail2ban to limit login attempts. I’d expect articles on those subjects in the future, but they have not yet been written by me. I’m sure other sites will have information, so use a search engine if you’re wanting to learn about those things today. (I am never gonna remember to come back and remove this.)

So, one step you can take is to make SSH listen on a different port. You can do that in isolation or along with other security methods. It’s not the greatest security fix, because people can (and do) just scan entire port ranges. While moving the port to something other than the default will help, it’s (by itself) just security by obscurity.

Knowing all that, let’s take a look at how we can change from the default port to one of your choosing. It’s actually pretty easy.

Change Your SSH Port:

To get started, we’re gonna need to open a terminal. You can do this with your keyboard, simply press CTRL + ALT + T and your default terminal should open up. By the way, you can change your default terminal.

Once that’s open, we’re going to want to edit a file using nano. You’ll do that with this command:

That will open ‘sshd_config’ (the SSH configuration file) with the nano text editor. Once that’s open, you’re going to scroll down while looking for “#Port 22”. It will look a little something like this:

changing the port SSH uses
For many of you, the next step will be obvious!

What you need to do is remove the # and then change the 22 to whatever port you want to use. So, if you wanted to change the port to 4441, you’d change the line to read:

Note the removal of the #, as the # tells the computer to ignore that line. A line starting with # (in this case) means that line is ‘commented out’, meant to be ignored.

Anyhow, once you’ve changed it to the new port you need to save it. Seeing as you’re using nano, that’s pretty easy. Just use your keyboard and press CTRL + X, then Y, and then ENTER.

Just because you’ve changed it doesn’t mean it has taken effect. You have to restart the service. To do that, you need this command:

That should restart the service, where it will now listen on the new port. From now on, you’ll connect with something like this:

Basically you’re just adding the ‘-p 4441’, except whatever port you picked, to the command. If you’re using aliases or something like Putty, be sure to change those settings as well.

NOTE: This isn’t the final step for many people. Some of you will have to change your firewall’s settings to allow TCP on the changed port. In some cases you may also have to enable it with semanage utility. In those cases, consult your documentation. If you can’t get it figured out, leave a comment and we’ll see if we can get it figured out together.

Closure:

And there you have it, another article in the books. This time, you’ve learned how to change the port that SSH uses. Hopefully that’ll come in handy for some of you. In isolation, it’s not the greatest security method – but it’s better than nothing. There’s still an article every other day!

Thanks for reading! If you want to help, or if the site has helped you, you can donate, register to help, write an article, or buy inexpensive hosting to start your own site. If you scroll down, you can sign up for the newsletter, vote for the article, and comment.

Install SSH to Remotely Control Your Linux Computers

If this article’s headline looks vaguely familiar, it’s probably because I previously wrote an article that told you how to install SSH. That article was on the earlier site. This article will show you how to install SSH, so that you can remotely control your Linux computers.

The old site, while up, will redirect to this address. It’s also a bit of a misnomer. We’ll be installing ‘OpenSSH‘ and enabling SSH. SSH is the protocol, OpenSSH is the application, specifically the ‘openssh-server’.

Let’s say your computer is in another room, in another state, over in another country, or perhaps on another continent entirely. How are you going to manage it? Servers are scattered across the world and it is not even remotely economical to send a person to administer each one of them in person. You’ll need to manage these devices remotely.

One of the best tools for this job is SSH.

As a home-use note; SSH is perfectly suitable to manage my own router. It’s quick, easy, lightweight, effective, doesn’t require an attached monitor, and more. What’s not to like? I SSH into my computers all the time! In fact, right this minute I’m connected to two other computers via SSH!

SSH has been around since 1995 and it lets you issue commands on a remote computer. In fact, the man page describes it like this:

ssh — OpenSSH remote login client

Which, as you can guess, means it lets you login to remote computers so that you can control them. It’s a pretty handy tool to have in your toolbox and it’s actually simple to install.

Install SSH:

SSH is really the protocol, and you can do many things over it. OpenSSH is the application that we’ll really be installing. Once that’s installed, you can login to the computer remotely and manage it that way. I use it quite often.

My homemade router doesn’t have a keyboard attached. It doesn’t even have a monitor attached. It’s not like I can just easily walk over and deal with it. I just got a laptop that, and it’s only used to test Lubuntu. I don’t always want to have to go over to the device and physically use it to start the test.

There’s also my dedicated server in Las Vegas – and I live in Maine. It wouldn’t be practical to fly out to Vegas every few days to run updates on the server. It wouldn’t make financial sense to go out there every time the server needed to be rebooted!

Those are all situations where you can use SSH. It’s available in pretty much every default repository out there. I’m surprised more people don’t use it. To get started, you just open your terminal (press CTRL + ALT + T on your keyboard) and enter the following:

If you’re using a distro with apt:

If you’re using a distro with yum:

Simply adjust that for your distro. For example, in OpenSUSE you may have installed it during the OS installation process. If it wasn’t installed during the initial OS installation then it’s just called ‘openssh’ – if you want to install a few of the applications surrounding openssh. You can also do a ‘sudo zypper install openssh-server’ like the rest of us.

Anyhow, once you’ve installed it, you may not even need to start it. If you install it on Ubuntu, you can go right ahead and test it immediately. If your distro requires that you start it manually, you should do that.

Once you’re done, you can test it easily enough. Try this:

If that works, you’ve properly installed openssh-server and can now make use of SSH. You may also need to enable it in  your firewall. Chances are that your firewall knows what SSH is.

To connect to your device from a remote computer, you’d do:

You can use a specific username in that command, like demonstrated in the testing command just above this command. It’s not mandatory, but doing so will skip a step.

Closure:

You can expect a couple more SSH articles, as this is woefully incomplete. A lot more can be done with SSH, plus SSH should be properly secured. For most of you, behind a NATed router, you don’t really have to worry too much unless you enable port forwarding. If you’re making the port available to the world-wide-web, you’re definitely going to need to add some security. Otherwise, there are a few nifty things you can do once SSH is enabled. We’ll cover those in future articles.

You can also connect with your hostname – probably. In many instances, you’d do this (distro-dependent):

For example, to connect to my testing laptop, I use the following command:

Go ahead and play around with it. There’s a number of ways to help secure SSH and we’ll go over some of that in a future article. I’ve been maintaining the ‘article every two days’ thing for a while now. I see no reason to expect that to not continue.

Y’all have been chewing through bandwidth, so if you’d like to donate that’d be awesome. There are also ads that you can unblock. It’s very much against Google’s rules to ask people to click on them, but I can ask you to unblock them!

You can also register to help, write an article of your own, leave comments, vote on articles, sign up for the newsletter below, or even help support the site by buying inexpensive hosting. Equally important, please share these articles on social media! The more traffic, the happier I am – even if I’ve gotta pay for it myself! Until next time…

Subscribe To Our Newsletter
Get notified when new articles are published! It's free and I won't send you any spam.
Linux Tips
Creative Commons License
This work is licensed under a Creative Commons Attribution 4.0 International License.