Monitor Bandwidth In Real Time

Today we’re going to have a fun article, an easy enough article, where we simply talk about one way to monitor bandwidth in real time. This is not something you’re normally going to do unless you’re in an unusual situation. It’s still something fun and easy, so why not cover it?

This might be useful if you want to monitor bandwidth at an edge system. Let’s say you have a public-facing server and you’re not behind a router that gives you this information in a fancy widget or whatnot and you want to monitor the bandwidth in real time. Well, you can do that. In fact, there are all sorts of tools that will let you do this. Heck, I think I may have even shared some of this type of stuff in the past.

Maybe take a gander at some of the following articles:

Monitor Bandwidth With nload
‘vnStat’ A Tool For Monitoring Your Bandwidth Usage
Visualize Your Network Traffic With ‘darkstat’

(There are more, just search the site for ‘bandwidth’ – which is how I came up with those links. I wasn’t picky, I just picked the first few that looked like they might interest people and be similar to this one.)

As I mentioned, it’s easy to monitor your bandwidth. It’s easy to monitor your bandwidth in real time. There are countless options and applications for this, so today we’re just going to cover one more option from the myriad options available to you as a Linux user.

Today’s article will be about ‘cbm’… Trust me, it’s easy. It’s very easy!

What Is This cbm?

Well, cbm stands for Color Bandwidth Monitor and it’s not a new application. In fact, the GitHub page indicates that it hasn’t been updated in a while. That’s not necessarily a bad thing, as it could mean that it’s just feature complete and in need of nothing.

I’ve only checked on Ubuntu (technically Lubuntu) and Mint, but cbm is in the default repositories. I’m a bit of a slacker, so I haven’t checked elsewhere, but it’s probably in their default repositories too. It’s just a tiny application with a very specific purpose. Those are the kinds of apps that make it into default repositories.

If you check the man page, you’ll see that cbm defines itself simply as:

cbm – display in real time the network traffic speed

Supposing you’re using Ubuntu (or Debian, or Mint, or any other distro with those repositories and using the apt package manager) it’d be easy enough to install.

You’d simply install cbm with the following command:

So, let’s pretend you’ve already got that cbm application installed…

Monitor Bandwidth In Real Time:

So, we’ll assume you’ve already installed cbm but you’re still going to need an open terminal to use cbm. Funny how that works! You know what, I’m just going to assume you’ve opened a terminal to install the application and skip that whole cookie-cutter silliness.

Well, now that you have cbm installed and you’ve run cbm in the terminal (which is your only option – I did mention this was absurdly simple), you’ll see an output similar to this:
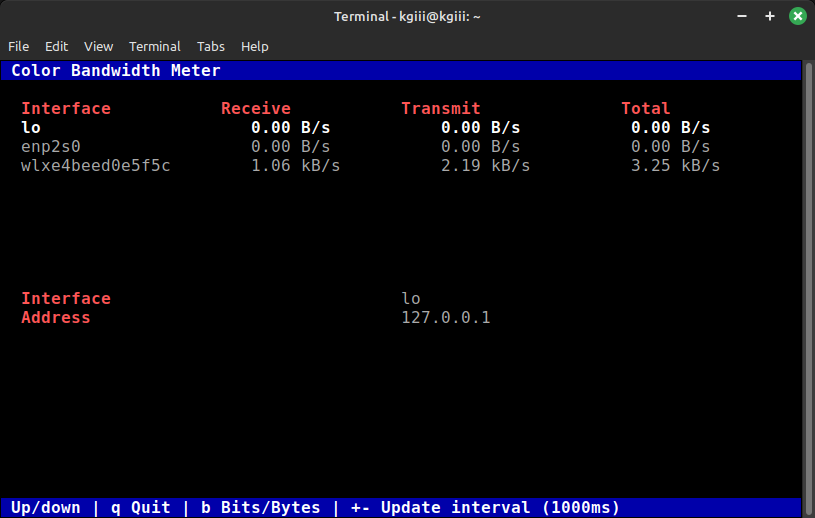
cbm letting you monitor bandwidth in real time
It’s not polite to laugh at another man’s paltry bandwidth! Be polite!

Yes, yes I work just fine within these bandwidth constraints… Mostly…

As you can see, it shows each network interface.

How To: Show Your Network Interfaces

You can see that it shows how much data you receive, how much data you transmit, and the total. I did not let it run all that long for the screenshot, as that’s not necessary.

That’s pretty much it. There are few options and that’s a good thing.

You can press the + or to change the refresh rate.

You can press B to change from bits to bytes.

When you’re done monitoring your bandwidth in real time, press Q to exit the application.

That’s it. That’s all you need to know. It’s a very purpose-built application. There aren’t a bunch of frills and options. This is one of those tools that does exactly what it says on the tin and nothing else. If you want to monitor bandwidth in real time, this is one way to do so.

Closure:

See? I told you this would be a nice and simple article. It’s easy to follow and easy to learn. There isn’t a whole lot to it. You can monitor bandwidth in real time with all sorts of tools, but this might be one of the easiest. The program doesn’t need to be updated. It doesn’t need additional bells and whistles.

Sorry for not checking on alternative distros. That takes a while and I have limited time to write these things. If you use other distros, you can help by leaving a comment to indicate if it is in your default repos or not. You can even go so far as showing how to install cbm. It won’t hurt and you don’t even have to use real information!

Thanks for reading! If you want to help, or if the site has helped you, you can donate, register to help, write an article, or buy inexpensive hosting to start your site. If you scroll down, you can sign up for the newsletter, vote for the article, and comment.

Let’s Make The rm Command Even Safer

Today’s article is one I don’t expect most folks to follow, but it’ll be a fun way to make the rm command even safer. If this article sounds familiar, then you remember a recent article. Well, this article takes it a step further and we’re making the rm command even safer!

See, in the last article you learned how to:

Let’s Make The rm Command A Little Safer

Despite the naysayers not seeing the value, that article will help you make the rm command a little safer. It adds a sanity check. If you followed the directions, you’d get the chance to tell the rm command to ‘never mind’ and to ignore your command prompt. This can stop you from removing files accidentally.

While I wrote that article, I already had this one planned, but didn’t want to publish the two back-to-back. I try to mix things up a little.

NOTE: If you followed the directions in the first article and decide you’d rather go this route, you’ll have to undo the actions you took. These two things can not work together at the same time. It’s a one or the other kind of thing.

What will we be doing in this article?

Well, simply put, we’re going to use an alias like we did in the previous article about making the rm command safer – except we’re also going to define a function and alias the rm command to that function instead.

What will that function do? Well, in short, it will take the results of the rm command and stick the files in your trash (recycle) bin. It makes the rm command work similarly to your regular delete (depending on the distro). Instead of deleting files, it happily sends them to the trash bin instead. So, if you screw up you can restore the files nice and easily with your GUI (by going into the trash bin and restoring the files, of course).

This is a bit more complicated. That’s why I went with the previous rm command modifications earlier. This still isn’t all that complicated. I realize this is something new to most of my readers, so I’ll make it as clear as humanly possible. (Wish me luck!)

In the previous article, we made the rm command a little safer. This time around, we’re going to try to …

Make The rm Command Even Safer:

Yes, you’ll need an open terminal. You can likely press CTRL + ALT + T and your default terminal should open. Otherwise, open it from your application menu.

These directions will assume you’re using Nano. If you are not using Nano, please adjust the directions to suit your text editor of choice.

With your terminal open, I want you to enter the following command:

Then, and this may be confusing, I want you to copy and paste all of the following text at the very bottom of that file:

Next, you need to save the file. As we’re using Nano, you save the file by pressing CTRL + X, then Y, and then ENTER.

Next, you need to tell your system to reload the ~/.bashrc file. You can log out and back in, you can close all the terminals and open a new one, or you can simply type the following:

NOTE: In the second code block you’ll see ~/.local/share/Trash/files. This should be the correct path to your trash bin. You should verify this and change the path accordingly. This directory ONLY exists if you’ve previously moved something to the trash. You’ll need to create a file and move it to the trash or you’ll have to make the directory manually.

Testing This New rm Command:

Leave your terminal open and open your GUI file editor. With your GUI file editor open, navigate to ~/.local/share/Trash/files.  You may not see it by default, so change your GUI file manager’s options to show hidden files and directories. (You can often use CTRL + H to show hidden files.)

Now that you’ve navigated to the directory with your GUI file manager, return to your terminal emulator. Once there, type the following:

You can then run ls to ensure the file foo.txt exists. Next, you’re going to delete it with the rm command:

Again, you can then run ls to ensure the foo.txt file has disappeared. It should certainly be gone from the directory you were in and removed by the rm command.

Except, it wasn’t!

Go back to your GUI file manager and (you might need to refresh it, depending on the file manager) check the list of files. Sure enough, you should see a foo.txt in the trash bin. It’ll remain there until you restore it or until you empty the trash.

Pretty neat, huh? 

Closure:

The first article made the rm command safer. This article will help you make the rm command even safer! You can’t do both (easily), but you can do one or the other. I mean, I’m sure it’s possible but I’ve never thought of a way to do so. I haven’t tried to think of a way to do so. So, there’s that…

If you follow this article, your rm command will send the files deleted by rm to the trash bin. If you follow the first article, you get the chance to view your command’s outcome and decide to back out of the file removal process. You can pick whichever one works best for you.

You can also completely ignore these things and just keep on doing what you have been doing. This being Linux, you can make all sorts of choices – including this one. Though, I think it was Rush who said, “If you choose not to decide you still have made a choice.”

Thanks for reading! If you want to help, or if the site has helped you, you can donate, register to help, write an article, or buy inexpensive hosting to start your site. If you scroll down, you can sign up for the newsletter, vote for the article, and comment.

A Couple More Ways To Find Your File System Type

Today we’re going to revisit a previous subject and share a couple more ways to find your file system type. I’ve covered this subject before, but I only shared a couple of ways. This being Linux, there are multiple file system types and multiple ways to find the details. So, let’s cover it again but with different options.

If you did your installation manually, you probably already know this information. You probably know the file system types you chose to use during the installation process. On the other hand, if you did your installation by just letting the installer use the defaults, you might not know this information. This may also be something like an unknown computer you’re tasked with fixing. So, there are real-world reasons why you might want to know the file system types in use.

If you want to visit the previous article, you can find that here:

How To: Find The File System Type

You could easily have multiple file system types in use right now. This is quite likely if you’re dual-booting with Windows or you’re using EFI as your boot method. You could even have external disks formatted in all sorts of file types.

All of these various file types may need specific commands to repair them and maintain them. You don’t want to go using the wrong tool for the wrong file type. That’d likely make your problems even worse. So, this is good information to have and this article will show you how to find your file system type.

Find Your File System Type:

This requires an open terminal. Like many of these articles, we’ll be using a terminal. It’s painless and it’s a good idea to know some of these commands. The terminal is fairly universal, so you can open your terminal (usually) by pressing CTRL + ALT + T.

In the previous article, we used lsblk and we also used df. Those are both excellent tools and excellent ways to get this information. They’re simple and easily memorized. The two commands we’ll use today will be similar in those regards. This truly is not a complicated task, it’s just fun to cover the different methods that one could use.

Using The mount Command:

The first command we’re going to learn about is the mount command. Don’t worry, this is part of your standard installation and you won’t need to do anything extra to use it. You can check the man page with man mount if you’d like. If you did do so, you’d find that the mount application is described as:

mount – mount a filesystem

No, we won’t be mounting and unmounting anything. We’ll just be using the command to find your file system types. That command’s syntax would look like this:

That’s the command that will show you all of your drives and all of the drive’s file system types in one go. I plugged a couple of external drives in so that I could run the command and show you the expected output:

using the mount command to find the file system type
You can see that there are vfat and ext4 file systems in use. That’s normal. It’s all good!

There’s nothing too eccentric in that output. Those are fairly normal file systems as far as Linux systems go. There are more. There are many more. You can check a list of file system types on Wikipedia.

Using The fsck Command:

Yes, you can even use the fsck command to find the file system types. You’re telling the command to not actually run and just spit out some information, so there’s nothing laborious or complicated with this command. You will need to know the path to the disk in question. I’m sure you know how to do that. Heck, the first command in this article will do that for you.

When you do this with the fsck command, you’re doing so on a disk-by-disk method. If you’re unfamiliar with the fsck command, you can check the man page with man fsck. Once again, you won’t have to install anything. The fsck command is a part of the standard base, files you’ll find on pretty much every distro by default. Anyhow, the man page describes fsck as:

fsck – check and repair a Linux filesystem

We will not be repairing a Linux filesystem (I’ve intentionally stylized this as ‘file system’ as it appears both spellings are in common usage) but we will sort of be checking them. We won’t be checking them for errors because that’d take too long and isn’t a part of this article. If you do want to check your file systems for errors with fsck, you should read this article:

How To: Check A Disk For Errors

Or maybe this article:

Repair Your Linux Filesystem With a Live USB or DVD

Anyhow, if you want to find your file system type with fsck, the syntax is simile and is as follows:

This is usually going to start with a /dev and then the drives populate  (enumerate?) as is logical. You would have drive sda, then partitions on that drive might be sda1, sda2, etc… So, an example command might be:

An example output is as follows:

you can use the fsck command to find the file system type for a specific drive
This only really works on one drive/partition at a time. That’s plenty useful.

See? Pretty useful if you need to know a file system type before working on it.

Closure:

So, we’ve covered a couple of new ways for you to find your file system type. This time around, we’ve used fsck and mount and both of them are perfectly useful for this application. If you work on multiple computers, if you work on someone else’s computers, if you work on remote computers, etc. then these commands may come in useful. 

Plus, this seemed like a fun article to write. There are all sorts of older articles that could have more information added to them. Some of the older articles contain errors that should be fixed. Some could use being written again but with a more suitable format.

A couple of the articles are just plain garbage and should have been deleted. They weren’t… They should have been, but they weren’t. I should probably go back and write those over again in their entirety. I’ve completely blown it a few times. I do like to point out that I probably learn more than you do by writing these articles and (importantly) getting feedback on them. I do love some feedback, though it’d be cool if it was left here when it adds something to the article.

Thanks for reading! If you want to help, or if the site has helped you, you can donate, register to help, write an article, or buy inexpensive hosting to start your site. If you scroll down, you can sign up for the newsletter, vote for the article, and comment.

Let’s Make The rm Command A Little Safer

In today’s article, we will discuss a simple trick that will help you make the rm command a little safer. This isn’t something everyone will do, but it might be something a cautious user might do. It might also be something a new user might want to consider doing. After all, you can’t be too safe!

Now, when I say safe, I mean preventing you from accidentally removing files you don’t want to delete. I do not mean safe as in security. I mean safe as in preserving data that is important to you. This isn’t a foolproof method, but it gives you a chance to rethink things.

Obviously, we’ll be using the rm command. Don’t worry, that’s not something you’re going to need to install. It’ll be there with your distro as a part of the standard tools, probably from the nice GNU folks.

For those that don’t know, the rm command is a terminal-based command used to remove files and directories. It does exactly what you tell it to do and sometimes you may tell it to do things you don’t want it to do. Either way, the man page (man rm) describes the rm command succinctly:

rm – remove files or directories

See? Nice and simple.

We’ll also be adding an alias. I intend to write a good article about aliasing things, but this is not that article. Don’t worry, you won’t need to know a whole lot about aliases in order to follow along with this article. I’ll make it nice and simple.

Make The rm Command A Little Safer:

As mentioned in the preamble, the rm command is used in the terminal. So, of course, you’ll need an open terminal for this one. It won’t be too complicated, so press CTRL + ALT + T and your default terminal should open. If it doesn’t, find it in your software menu and open it that way.

NOTE: This article relates to the removal of files over which you the user have control, eg ~/home/<your-username>. If you’re removing files with sudo, root, or as another user, the rm command will function as normal.

Alright, so what’s an alias? An alias is a substitution. You can create an alias that inputs ‘foo’ even though you typed ‘bar’, and that’s the trick we’ll be using to make the rm command a little safer for you. If you don’t do this and you remove important files, all I can say is I told you so! 

I’m going to assume that you have Nano installed. If you do not have Nano installed, you can use a different text editor. For simplicity’s sake, we’ll just go over doing this with Nano.

Let’s Install Nano (With Some Bonus Information)

With Nano installed, your first command is going to be opening up your ~/.bashrc file for editing. You do that with this command:

Yes, the . means that it is a hidden file, but Nano finds it just fine.

Now, you want to use the arrow keys to scroll to the absolute bottom of that file and add the following line:

Next, you’ll save the edited .bashrc file by pressing CTRL + X, then Y, and then ENTER.

With that done, you’ll need to tell the system to reload the .bashrc file. You do that with this command:

Now, when you use the rm command, it will add the -i flag. This will show you the files that the rm command is going to delete and give you a chance to back out of it.

Closure:

See that? You’ve now managed to make the rm command a little safer and you’ve added an alias to the rm command. Pretty neat, I think. This means that you’ve got that second chance when you misfire an rm command. It also means you get to really think about it and that the process doesn’t run without your giving it confirmation to do so.

One of these days I’ll figure out how to write an article about aliases. They’re really handy things to have around and you can use them for all sorts of neat things. I suppose you could just search for that information. Other people have written articles on the subject, probably better than I will. So, there’s always that option… Which is nice…

Thanks for reading! If you want to help, or if the site has helped you, you can donate, register to help, write an article, or buy inexpensive hosting to start your site. If you scroll down, you can sign up for the newsletter, vote for the article, and comment.

Manage Files In A tar Archive

Today we’ll have a fairly simple article, albeit a bit archaic, as we learn how to manage files in a tar archive. We often work with modern compression methods but tar files still exist and are in wide use. If this is something you’re interested in, this is the article for you. If this isn’t something you need right now, remember this article and look it up later when you do need to manage files in a tar archive.

Sure, tar now often ends with .gz or .bz, but they still exist. You’ll still see them and you’ll still get regular questions about them. In fact, a lot of folks will ask questions like, “How do I install files from a .tar file?” Alas, that’s a pretty broad question and not something we’ll answer here. However, the answer is, “Manually.” That’s how you install files from a tar file, generally speaking.

What Are tar Files?

So, I’m pretty sure we’ve covered this before, but ‘tar’ stands for ‘tape archive’ and is a pretty old standard. Yes, I am well aware that tape archives still exist. There’s no reason to leave a comment telling me that. I know, but I suspect most tar files never see a tape throughout their entire lives. If you’re curious, the man page describes the tar application as this:

tar – an archiving utility

The format has been around since 1979, though it has undergone some changes along the way. If you’re interested, there’s an excellent Wikipedia article about tar files. It’s well worth skimming it, as I did when I wrote an earlier article.

Basically, tar is a way to organize multiple files into a single file. Tar files are not compressed in and of themselves. We more often see them compressed with .gz (or the like) but the format doesn’t include compression of any kind. It is also meant to work with any file system, as it contains no real file system in and of itself.

Well, eventually you may want to work with tar files. You may want to add, remove, or modify tar files. That’s all easily done within the Linux terminal and this article will show you how.

Manage Files In A tar Archive:

Obviously, you need a terminal for this application. By now, regular readers will know how to open a terminal. In most distros and desktops, you can just press CTRL + ALT + T and, with that, the default terminal will pop open.

With your terminal now open, let’s go ahead and create a new tar file to mess around with…

Now, we’re all set for this exercise…

Add Files To A tar File:

So, it’s easy enough to add files to a tar file. The syntax to do so is quite simple, though you do need a few flags.

Of course, you can add multiple files by just adding their file name. Using the files you created in the first step, you’d add files to a tar file like so:

To avoid any confusion later, we’re now going to clean up after ourselves, leaving just the foo.tar file.

Now, in your terminal you can type the following:

In the list of files, you should now only have the foo.tar file remaining. For neatness sake, this is an important step. You can list the files in a tar file with the following command:

The output should look like this:

See?

Remove A File From A tar File:

Now that you have created a tar file and added files to it, you next need to learn how to remove a file from a tar file. That’s actually a very simple process. The syntax is as follows:

So, using our current example file, we’d do something like this:

You can check again to see that the foo3 file no longer exists.

Still with me?

Well then, the next logical step in this process would be learning how to…

Change Files In A tar File:

If a file already exists in a tar file, you will first need to extract that file. You can do so easily. Use the tar -tvf <file_name>.tar to find the specific file’s name. With the name of that file, you can extract it with this command:

So, using the example file that we’ve worked through, we’d change the file called foo2 by first extracting it, like so:

That will extract the foo2 file from the archive. You can then edit that file, say with nano, to make it say what you want it to say. Feel free to do so, but you must remember to save the file after you’re done editing the file. (To save files in nano, press CTRL + X, then Y, and then ENTER.)

Now, you just replace the file with the file you’ve edited. In this case, it’d be foo2 that you’ve edited. The syntax is pretty easy:

So, in our case, you’d be replacing foo2 with the previous foo2 file. That’s a nice and simple command. To finish the exercise, you can run this command:

Be sure to check the man page to learn what the flags do and to see the many other options that come with your tar application. It should absolutely be installed by default, on even the most bare of distros.

Closure:

So, well, I figured this would be a fun article to write. I was not wrong. If you want, you can clean up after yourself with this command:

I figured it’d be a fun article for folks to follow and wrote it in a way that I hope facilitates that. There’s nothing all that complicated about it. If you want to manage files in a tar archive, this is a good way to do it. You could probably do it with a GUI, but this way is just as good – I think.

Also, this was the article I wanted to write last time. You got a meta article because of my poor internet connection. This was the article I’d hoped to write. It’s quite a bit different than most of my articles, but hopefully, it takes you clearly from the start to the finish – including cleaning up after yourself!

As always…

Thanks for reading! If you want to help, or if the site has helped you, you can donate, register to help, write an article, or buy inexpensive hosting to start your site. If you scroll down, you can sign up for the newsletter, vote for the article, and comment.

Linux Tips
Creative Commons License
This work is licensed under a Creative Commons Attribution 4.0 International License.