Use ‘apt-cache’ To Find An Application’s Homepage

It can come in pretty handy to know an application’s homepage. You can find an applications’s homepage with ‘apt-cache’. I’ll show you how. This is a pretty easy article to follow and just another tool to add to your toolbox.

NOTE: This is only valid for systems that use apt. As the title indicates, it requires ‘apt-cache’. Without apt-cache, this page will do you no good. None good! That’s how much it will do you. None!

Why would you want to know the homepage – and, more so, the preferred homepage? For starters, in the days of GitHub and everyone forking, and awkward application names that aren’t easily searched for, it’s hard to know which site is the correct one.

Maybe you want to report a bug? Maybe you want to request a feature? Perhaps you want to make a donation? Maybe you just want to thank the author for writing such awesome software? Maybe you want to know where the homepage is because you need support and you’re not sure where to turn to?

There are all sorts of reasons why you might want to know the homepage of a piece of software. It’s actually something that’s important. It’s also something your system already knows and will happily show you if you know the proper magical incantation.

Find Application’s Homepage: 

Like many other articles, you’re gonna want the terminal for this. Let’s go ahead and get that opened by using your keyboard and pressing CTRL + ALT + T

Got your terminal emulator open? Good! Let’s start with the command.

If you do not have ‘inxi’ installed, feel free to use a different application. Note that you do not need to use sudo for this. Not all apt commands require sudo. You only need sudo when you’re actually doing administrative tasks. See? I saved you some typing!

Anyhow, in the text output from the above command you’ll see a line that starts with “Homepage:”. If you hadn’t already guessed it, that’s the line that tells you the authors homepage. You’ll also sometimes find the URL where they want you to report bugs, but that’s a topic for another day.

So, let’s go ahead and make the command a little more precise. We’ll pipe the output through grep and get rid of the cruft we don’t actually need. In that same terminal, go ahead and enter:

NOTE: The command contains a capitalized letter H because Linux is often case-sensitive and is certainly case-sensitive in this case. If you don’t believe me, try it with a lowercase h!

But wait, there’s more!

Not only is there homepage information in there, there’s sometimes some useful nuggets of information in there. If you have LibreOffice installed, go ahead and check (skip the pipe and grepping) to see what the output is. Inside, it has a ton of additional information, including listing ways that you can extend LibreOffice by installing more software.

Closure:

And there you have it. You can now easily find the application’s homepage for the applications you have installed or want to install. Should you need to contact the author, check for information, or just see if they did anything else, you now know how to do that. It’s a little hidden nugget that most folks don’t seem to know. Well, now they do…

Yay! You made it all the way to the bottom. You deserve a treat. Seeing as you’ve already got the terminal open, and seeing as we’re dealing with apt-cache, let’s just get some pretty neat stats with:

A careful reader would remember that from a previous article, but no matter. Thanks for reading! If you want to help, or if the site has helped you, you can donate, register to help, write an article, or buy inexpensive hosting to start your own site. If you scroll down, you can sign up for the newsletter, vote for the article, and comment.
‘sudo apt remove’ vs ‘sudo apt purge’

Today’s article is going to cover ‘sudo apt remove’ vs ‘sudo apt purge’ and will be in a different format than some articles. It’s a brief article meant to answer a specific question. It’s nothing more, and nothing less.

The question would be, “What’s the difference between sudo apt remove and sudo apt purge?” It’s a perfectly fine question, thanks. This article will answer it.

It does open up an idea. If you have any questions, you can always just “Ask KGIII” a question. For example, the question prompting this article might be, “What’s the difference between sudo apt autoremove vs sudo apt purge?” It’s a legitimate question, and a good example, of the kinds of questions I’d welcome.

So, for fun, we can pretend someone asked this question! 

If you don’t ask me any questions, I may just have to pretend you did and write my questions and answers all by myself! However, this is the kind of question I’d be looking for. Leave a comment with a question, thanks!

If you lie about your email address to ask a question, that’s fine – just don’t also opt to subscribe to responses. It results in some ‘spammy’ domain behavior and I’d like to avoid that. Use  @example.com, if you want. It should work but there is no example.com of note so bouncing emails won’t be a problem. On the other hand, others can attest to the fact that I’ve sent zero spam messages.

‘sudo apt remove’ vs ‘sudo apt purge’:

In this case, both of these commands are used to remove software from your system. These commands are valid in distros like Debian or Ubuntu, systems that use APT as the package management system. If you want to remove software, the commands would look like one of the following:

With both of these commands, you’ll remove the software. It will not only remove the software, it’ll mark the software as uninstalled in your database of installed applications. This means you can opt to install the software again.

But, there is a difference. When you use, you just remove the software itself. When you use sudo apt purge <package_name>, it not only removes the package, it also removes the configuration files.

In theory, you can do ‘apt remove’ and then re-install the application at a later date while keeping the pre-existing, pre-removal configuration. The regular ‘apt remove’ doesn’t touch configuration files, it only removes those things that were listed as files in the packages manifest and created during the installation process.

So, when you run ‘apt remove’ you’re removing it from your system. When you run ‘apt purge’ you’re making sure (ideally) no traces of it remain. I say “ideally” because it’s not as cut and dry as one might think. Package management isn’t all that smart and things like MySQL will leave behind a user, and other package installs will do similar. 

As a bonus, if you’ve seriously messed up an application’s configuration then you can purge it and have a clean slate, with (ideally) no previous configuration files left over. Of course, if you just use ‘apt remove’ then your configuration files may still exist. If you want to maybe install the application again, and you were happy with the way it was configured, you should use ‘apt remove’. Otherwise, use ‘apt purge’.

If you, like me, are curious as to how the purge command works (it’s not all that intelligent) then click here to learn how the purge command works. The answer is well-written and, more importantly, is correct (inasmuch as I understand). It’s well worth reading, for a better understanding. As I mentioned elsewhere, the package manager isn’t all that intelligent – but it is what it is and it’s much easier than doing it all yourself!

Closure:

And there you have it. You have another article! This one is kinda like a pretend person asked a question and I answered the question in the form of an article. I’d like to do that sort of thing every couple of weeks, but it’d require someone to ask me questions.

I don’t mind if they’re questions I have to research. I think it’d be an interesting new aspect to the site. We can call it ‘Reader Questions’ and maybe give out a prize of some type if your question is chosen. I mean, you shouldn’t need a prize but it might motivate a few of you. Leave a ‘Reader Question’ as a comment on this post and we’ll see how it goes! If it looks like it might work, I’ll add it as a new category.

Thanks for reading! If you want to help, or if the site has helped you, you can donate, register to help, write an article, or buy inexpensive hosting to start your site. If you scroll down, you can sign up for the newsletter, vote for the article, and comment.

How To: Update OpenSUSE Tumbleweed From The Terminal

It’s time for an article that describes how to update openSUSE from the terminal. After all, I’ve done so for Ubuntu and Fedora. I might as well do one for openSUSE. It seems like a good thing to do.

While most of this site is aimed at bringing you up to speed, making Linux easier, it’s also biased towards desktop Linux users. Well, today’s distro isn’t really all that popular in the desktop sphere, it’s more a server distro. There is a desktop version, and it’s a pretty great distroy.

So, to avoid confusion, “SLES” stands for SUSE Linux Enterprise Server. It is a paid product with an excellent pedigree and a great reputation in the community. openSUSE is the community edition of that software. openSUSE is mostly used on the desktop, as a workstation distro.

Over the years, I’ve tried openSUSE here and there and found it to be functional, stable, and easy enough to figure out. There’s a lovely rolling-release version of openSUSE that’s called ‘Tumbleweed’. If you have a hankering to try openSUSE, go for it and give Tumbleweed a shot!

A shout-out to a Linux.org user: Gecko Linux is based on openSUSE.

Oddly, it’s often harder to write the intro than it is to write the meat of the article. It can even take more time to write the intro than it takes to write the rest of the article. This article is likely to be one of those. 

Ah well… On to the article!

Update openSUSE From The Terminal:

You’ll need an open terminal. If you don’t know how to open the terminal, you can do so with your keyboard – just press CTRL + ALT + T and your default terminal should open.

First, you need to refresh the database of what software you have vs what software is available. Obviously this means comparing version numbers. This is a necessary step, otherwise it’d be updating blindly and that’d make no sense! So, the command you’re looking for is:

That will run its course and take some time. On a rolling release, you can expect quite a lot of updates to be available. When it is finished, and you’re ready to do the updates, you can just enter:

That’s actually all there is to it, at the base level. There’s still more, as there always is. There’s always more! If you have run the refresh command and want to see what upgrades are available, you can do that with this command:

But, that’s about all you’re going to need to know. Like always, check the man page. It’s not terribly difficult to update openSUSE, anyhow. It’s straight forward in both the terminal and GUI. My personal preference is to use the terminal.

Closure:

Woohoo! There you have it! Here’s another article and this one is showing you how to update openSUSE in the terminal. It’s not terribly difficult, but it’s worth knowing. Not too many people use openSUSE and even the best of us might be unfamiliar and need a hint.

Thanks for reading! If you want to help, or if the site has helped you, you can donate, register to help, write an article, or buy inexpensive hosting to start your own site. If you scroll down, you can sign up for the newsletter, vote for the article, and comment.

Take, Edit, And Upload Screenshots With Shutter

For such a minimal thing, there are some strong opinions about Shutter. Me? I love Shutter. I love Shutter, warts and all. Some folks have some pretty strong opinions regarding how much they dislike Shutter. And, well, they’re not all wrong. Their complaints can be pretty legitimate.

Man, sometimes Shutter will freeze when you try to take a screenshot limited to just a specific section of the screen. Shutter went a very long time without getting any updates – so long that it has been booted from some of the repositories, as it relied on older libraries.

But, things have changed… Well, no… No, that bug is still there and I’ve been too lazy to report it. But, on a positive note, it’s actively being developed again. It is now ported to GTK3 and is slowly making its way back into the default repositories. The author is now fixing bugs again.

Because of this, I feel comfortable putting it out there. Yeah, once in a while it’ll freeze – and you have to use a TTY to stop the processes manually – but it’s worth it. That doesn’t happen all that often.

I not only use Shutter for screenshots, I use it to do quick edits to pictures I plan on uploading. You can even upload it to a few services from within the program itself – like Imgur and DropBox. The editing is a bit better than basic editing and more than enough to redact important information, crop, add text, add arrows etc…

Screenshots With Shutter:

I usually work with Lubuntu, and in the Ubuntu family. So, I’m just going to cover how to install it with Lubuntu, or any official Ubuntu flavor. For quite some time, you’ve had to add a PPA (repository) but there’s now a new ‘official’ PPA that you can use.

This step requires an open terminal, like many other articles on this site. If you don’t know how to open the terminal, you can do so with your keyboard – just press CTRL + ALT + T.

Once you have the terminal open, you can add the official PPA with the following:

If you’re using a modern release, it should then automatically update the database. If you’re using something older, go with this next:

Once that has finished, you just need to install it. That’s done with:

Let that finish and, once installed, you can open Shutter from the menu and immediately go to work taking screenshots. 

If you want to integrate it into your system the shortcuts would be:

shutter -f for a full screenshot
shutter -a for the active window
shutter -s to manually grab an area

So, swap those to fully integrate it into your system – if you want. 

Give it a shot. You might like it. It actually works these days without installing a bunch of old library packages. If you decide you don’t like it, you can always remove it. To remove it, you’d simple run these commands:

And remove the PPA with:

Tada! It’s all gone. Again, it’ll be a bit different if you’re not using Ubuntu or an official Ubuntu flavor. Any distro that also supports PPAs should handle this by default, so there’s that. There’s a way to install it on most distros, if you want to put the effort in.

Closure:

There you have it, another article – and this one is about Shutter – a tool to take screenshots. I find it easiest to just integrate it into the system and just have the application sitting in the tray. After all, I deal with a lot of images and a whole lot of screenshots. I’m not sure how I got there, but here I am. Man, I take a lot of screenshots.

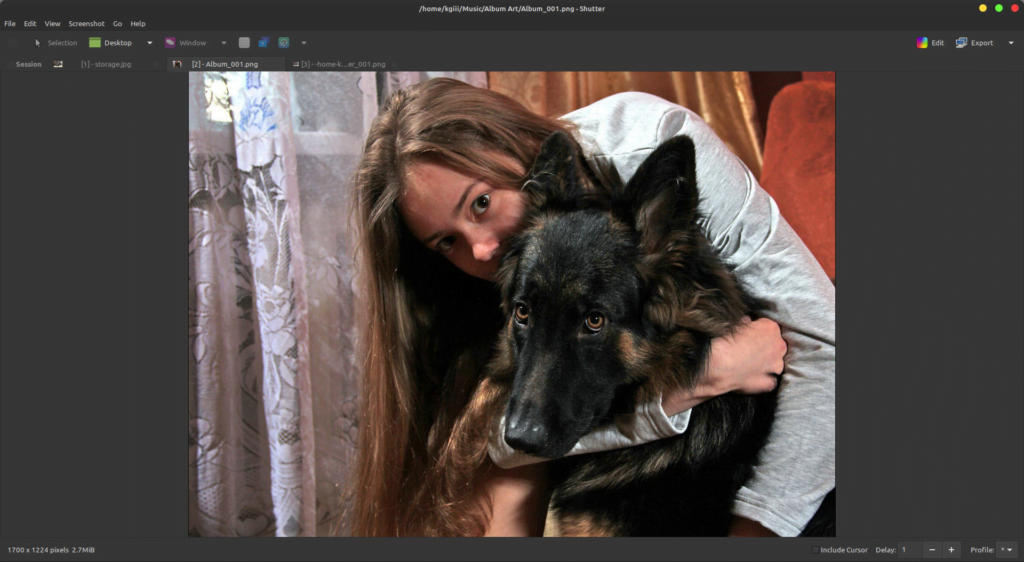
Like I said, you can use it to edit regular images too. Then, you just click the button to export them and you upload them to sites like Imgur. If you’re curious, it looks a bit like this:

shutter in action
Shutter can be used all sorts of ways – including editing pictures.

Anyhow, it’s worth looking at again. I’ve used it all along, but there are bug fixes and the whole porting to GTK3 thing. If you’ve shunned it, or overlooked it, it’s time to try it again – warts and all. Just try reporting bugs (me too) and we’ll see where it goes.

Thanks for reading! If you want to help, or if the site has helped you, you can donate, register to help, write an article, or buy inexpensive hosting to start your own site. If you scroll down, you can sign up for the newsletter, vote for the article, and comment.

Play H.264 Encoded Video On Ubuntu

If you want to play H.264 (also known as MPEG-4 AVC) video on Ubuntu you will need to go through a few steps. It’s possible, and I’ll show you how. It’s a little complex, but I’m sure you can handle it. In just a few terminal commands, you’ll be able to play H.264 encoded media.

If you don’t know, the H.264 encoding is a codec. Codecs enable playback and creation of media types. The H.264 codec is still pretty new and, more importantly, isn’t ‘free’. It isn’t truly open source, and it is patent encumbered software. As Linux doesn’t do the whole closed source thing, it can actually take some work to make H.264 encoded videos play in Ubuntu.

The phrase H.264 covers a fairly broad video encoding and transportation of compressed video. In the uncompressed format, it’s not of much use to the viewer. To be able to use/view the media you’ll need the codecs and some additional software.

This article is going to tell you how to install everything you need in order to play high-def, H-264 encoded video. It’s not all that complicated and you can mostly just follow the directions one-by-one and call it good.

Play H.264 Encoded Video:

First, open up a terminal by pressing CTRL + ALT + T and enter the following command:

Now, with that entered, you should get some interactive screens. Agree to everything on offer by using the arrow button to navigate between choices and pressing the ENTER to confirm your selections.

Next, you’ll reconfigure some options by entering the following:

Again, make sure to agree in the same way you did with the above command.

Following that, you’ll need to enable a repository. It’s the multiverse repository, and you could do it with a GUI, or you can just enter the following:

Which would be followed with this:

That will, of course, require some interaction (like accepting the EULA). That interaction is the same as the above – navigate with arrow keys and confirm your selection with the ENTER button.

And that’s it. You may want to reboot to ensure everything has restarted and working. You can do that with:

Like I said, it’s not all that difficult. You can basically follow the commands and not know exactly what they’re doing. Like always, it’s best to know what the commands will do – but the ones in this article are pretty self-explanatory.

Closure:

Yup… Another article, and this one wasn’t too terribly complicated. It’s something you should know – if you want to play patent encumbered videos on your devices. Sadly, as it stands today, we have to jump through these hoops to get compatibility. As long as this sort of stuff is proprietary, it’s going to be a problem (for many distros) for the foreseeable future.

Thanks for reading! If you want to help, or if the site has helped you, you can donate, register to help, write an article, or buy inexpensive hosting to start your own site. If you scroll down, you can sign up for the newsletter, vote for the article, and comment.

Linux Tips
Creative Commons License
This work is licensed under a Creative Commons Attribution 4.0 International License.