In today’s article, we’re going to explore one way that you can show your hard drive hard drive specifications in the terminal. There’s nothing too challenging in this article, so even new people can follow along.
To be clear, I’m using the phrase ‘hard drive’. In this instance, I’m speaking both of mechanical hard drives (HDD) and solid state drives (SSD). I could probably come up with something better, but we’ll just stick with ‘hard drive’.
You may want to know your hard drive specifications to ensure you got what you paid for. You might also want to know what features it supports – and how long at least one of those features is expected to take. For instance, there’s a secure erase feature on many drives and this takes time. The command we’ll be using may tell you how much time it will take to securely erase the disk.
We’ll be showing the hard drive specifications in the terminal and the biggest tool we’ll be using is ‘hdparm’. It does what it says on the tin and describes itself like:
hdparm – get/set SATA/IDE device parameters
You should find hdparm installed and shouldn’t need to install anything. If you want confirmation that hdparm is installed, run:
1 | hdparm -V |
You’ll find that there’s a lot to learn about hdparm, but don’t worry about that. You can check the manual if you want:
1 | man hdparm |
See also:
Check Disk Speed In The Terminal
So then, let’s just jump into the article…
Show Your Hard Drive Specifications:
As the title suggests, we’ll be using the terminal for this exercise. Open you terminal now. If you don’t know how to open the terminal, you can do so with your keyboard – just press
With your terminal now open, let’s find your disk drives with the following command.
1 | lsblk |
Your drive should look something like this:
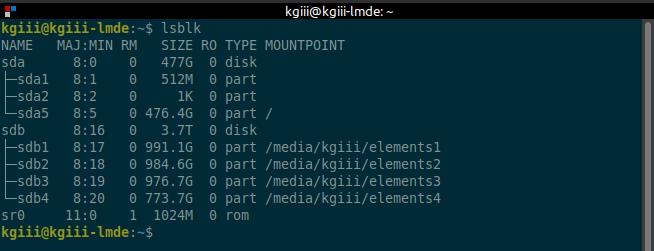
At this point, you want to note the base – the parent disk drive. In the above image, you see two of them. You see both ‘sda’ and ‘sdb’. Your results can be wildly different, but that’s the information you need.
Now it’s time to show the hard drive specifications. To do that, you’ll want to use a command that looks a lot like this:
1 | sudo hdparm -I /dev/<drive_designation> |
An example of that command would look like:
1 | sudo hdparm -I /dev/sda |
The output is pretty verbose and you can learn a great deal about your hard drive specifications by using the hdparm command. As suggested above, don’t be afraid to run man hdparm to learn more because hdparm is a rather robust application..
Closure:
There you have it, you have another article! This time, you’ll have learned a bit about one way to show your hard drive specifications in the Linux terminal. Pretty sweet! So far we’ve been able to maintain that ‘every other day’ schedule.
Anyhow, please don’t frivolously click ads on the site. Google’s just taking the clicks away and is probably taking away some legitimate clicks while doing so. That’s not helpful! I appreciate it, I appreciate that you’ve whitelisted the site, but Google’s convinced I have invalid traffic and there’s not much I can do about it.
Thanks for reading! If you want to help, or if the site has helped you, you can donate, register to help, write an article, or buy inexpensive hosting to start your own site. If you scroll down, you can sign up for the newsletter, vote for the article, and comment.