‘sudo apt remove’ vs ‘sudo apt purge’

Today’s article is going to cover ‘sudo apt remove’ vs ‘sudo apt purge’ and will be in a different format than some articles. It’s a brief article meant to answer a specific question. It’s nothing more, and nothing less.

The question would be, “What’s the difference between sudo apt remove and sudo apt purge?” It’s a perfectly fine question, thanks. This article will answer it.

It does open up an idea. If you have any questions, you can always just “Ask KGIII” a question. For example, the question prompting this article might be, “What’s the difference between sudo apt autoremove vs sudo apt purge?” It’s a legitimate question, and a good example, of the kinds of questions I’d welcome.

So, for fun, we can pretend someone asked this question! 

If you don’t ask me any questions, I may just have to pretend you did and write my questions and answers all by myself! However, this is the kind of question I’d be looking for. Leave a comment with a question, thanks!

If you lie about your email address to ask a question, that’s fine – just don’t also opt to subscribe to responses. It results in some ‘spammy’ domain behavior and I’d like to avoid that. Use  @example.com, if you want. It should work but there is no example.com of note so bouncing emails won’t be a problem. On the other hand, others can attest to the fact that I’ve sent zero spam messages.

‘sudo apt remove’ vs ‘sudo apt purge’:

In this case, both of these commands are used to remove software from your system. These commands are valid in distros like Debian or Ubuntu, systems that use APT as the package management system. If you want to remove software, the commands would look like one of the following:

With both of these commands, you’ll remove the software. It will not only remove the software, it’ll mark the software as uninstalled in your database of installed applications. This means you can opt to install the software again.

But, there is a difference. When you use, you just remove the software itself. When you use sudo apt purge <package_name>, it not only removes the package, it also removes the configuration files.

In theory, you can do ‘apt remove’ and then re-install the application at a later date while keeping the pre-existing, pre-removal configuration. The regular ‘apt remove’ doesn’t touch configuration files, it only removes those things that were listed as files in the packages manifest and created during the installation process.

So, when you run ‘apt remove’ you’re removing it from your system. When you run ‘apt purge’ you’re making sure (ideally) no traces of it remain. I say “ideally” because it’s not as cut and dry as one might think. Package management isn’t all that smart and things like MySQL will leave behind a user, and other package installs will do similar. 

As a bonus, if you’ve seriously messed up an application’s configuration then you can purge it and have a clean slate, with (ideally) no previous configuration files left over. Of course, if you just use ‘apt remove’ then your configuration files may still exist. If you want to maybe install the application again, and you were happy with the way it was configured, you should use ‘apt remove’. Otherwise, use ‘apt purge’.

If you, like me, are curious as to how the purge command works (it’s not all that intelligent) then click here to learn how the purge command works. The answer is well-written and, more importantly, is correct (inasmuch as I understand). It’s well worth reading, for a better understanding. As I mentioned elsewhere, the package manager isn’t all that intelligent – but it is what it is and it’s much easier than doing it all yourself!

Closure:

And there you have it. You have another article! This one is kinda like a pretend person asked a question and I answered the question in the form of an article. I’d like to do that sort of thing every couple of weeks, but it’d require someone to ask me questions.

I don’t mind if they’re questions I have to research. I think it’d be an interesting new aspect to the site. We can call it ‘Reader Questions’ and maybe give out a prize of some type if your question is chosen. I mean, you shouldn’t need a prize but it might motivate a few of you. Leave a ‘Reader Question’ as a comment on this post and we’ll see how it goes! If it looks like it might work, I’ll add it as a new category.

Thanks for reading! If you want to help, or if the site has helped you, you can donate, register to help, write an article, or buy inexpensive hosting to start your site. If you scroll down, you can sign up for the newsletter, vote for the article, and comment.

How To: Update OpenSUSE Tumbleweed From The Terminal

It’s time for an article that describes how to update openSUSE from the terminal. After all, I’ve done so for Ubuntu and Fedora. I might as well do one for openSUSE. It seems like a good thing to do.

While most of this site is aimed at bringing you up to speed, making Linux easier, it’s also biased towards desktop Linux users. Well, today’s distro isn’t really all that popular in the desktop sphere, it’s more a server distro. There is a desktop version, and it’s a pretty great distroy.

So, to avoid confusion, “SLES” stands for SUSE Linux Enterprise Server. It is a paid product with an excellent pedigree and a great reputation in the community. openSUSE is the community edition of that software. openSUSE is mostly used on the desktop, as a workstation distro.

Over the years, I’ve tried openSUSE here and there and found it to be functional, stable, and easy enough to figure out. There’s a lovely rolling-release version of openSUSE that’s called ‘Tumbleweed’. If you have a hankering to try openSUSE, go for it and give Tumbleweed a shot!

A shout-out to a Linux.org user: Gecko Linux is based on openSUSE.

Oddly, it’s often harder to write the intro than it is to write the meat of the article. It can even take more time to write the intro than it takes to write the rest of the article. This article is likely to be one of those. 

Ah well… On to the article!

Update openSUSE From The Terminal:

You’ll need an open terminal. If you don’t know how to open the terminal, you can do so with your keyboard – just press CTRL + ALT + T and your default terminal should open.

First, you need to refresh the database of what software you have vs what software is available. Obviously this means comparing version numbers. This is a necessary step, otherwise it’d be updating blindly and that’d make no sense! So, the command you’re looking for is:

That will run its course and take some time. On a rolling release, you can expect quite a lot of updates to be available. When it is finished, and you’re ready to do the updates, you can just enter:

That’s actually all there is to it, at the base level. There’s still more, as there always is. There’s always more! If you have run the refresh command and want to see what upgrades are available, you can do that with this command:

But, that’s about all you’re going to need to know. Like always, check the man page. It’s not terribly difficult to update openSUSE, anyhow. It’s straight forward in both the terminal and GUI. My personal preference is to use the terminal.

Closure:

Woohoo! There you have it! Here’s another article and this one is showing you how to update openSUSE in the terminal. It’s not terribly difficult, but it’s worth knowing. Not too many people use openSUSE and even the best of us might be unfamiliar and need a hint.

Thanks for reading! If you want to help, or if the site has helped you, you can donate, register to help, write an article, or buy inexpensive hosting to start your own site. If you scroll down, you can sign up for the newsletter, vote for the article, and comment.

How To: Determine Your Desktop Environment

Today’s article will help you determine your desktop environment. Often abbreviated as “DE”, your desktop can be any number of choices – including none at all. This should be a relatively short and easy article. If you don’t know, the desktop environment is a bunch of software that provides the GUI system you use to navigate, load files, and manage your computer.

Once in a while, an article should get back to the basics. This is one of those articles. When someone poses a question and you need to know their desktop environment, you can just tell them that you need that information and link to an article like this one.

As such, it’s not exhaustive nor is it expected to be all that deep. There are a number of ways to get your desktop information. For a more universal approach, these ways will all be through the terminal. In most other situations, you can use the GUI and figure it out. For example, you might use HardInfo and get the data that way. Not everyone will have that installed, so we can just do it though the terminal.

Determine Your Desktop Environment:

This article requires an open terminal, like many other articles on this site. If you don’t know how to open the terminal, you can do so with your keyboard – just press CTRL + ALT + T and your default terminal should open.

Now that you have your terminal open, you can try either ‘neofetch‘ or ‘screenfetch‘. Both of them will happily spit out the information you need. The screenfetch may be better here, as it also gives the version of your desktop environment – from what I can tell. Both are easy to install and may already be installed.

Here’s an example of the relevant output from running screenfetch in the terminal:

screenfetch displaying desktop environment information
See? It’s right there! Easy enough!

You can also do the same thing with running neofetch in your terminal. Once again, it looks something like this:

neofetch showing desktop environment
Once again, it’s nice and easy! Tada!

Now, there’s some chance you just want to determine your desktop environment and don’t need or want any additional information. You can do that. It’s not hard, it’s not hard at all. In fact, both are environment variables that you can easily get to echo as stdout.

You can also use:

Both of those will tell you the desktop environment that you’re using. See:

using echo to view the desktop environment
See? You can use either one effectively and efficiently.

As suggested by @wizardfromoz, of Linux.org fame, I completely forgot to include my beloved inxi. The inxi system information tool is increasingly installed by default, but the link will show you how to install it. It’s a great tool, providing a ton of information, that’s used frequently for support questions.

To use inxi to determine your desktop environment, you can just run:

That’s an uppercase S and it’ll look something like this:

inxi showing the desktop environment
See? It’s even included in the inxi output! inxi does it all!

And there you have it, a few different ways to determine your desktop environment from the terminal. You should probably just know this information, but newer users may not know and may need help in finding this information. 

Closure:

So, there’s another one… Yet another article, said and done. This one is pretty easy and aimed at rank beginners, but it’s not without use. It may even save some time as people might actually search before asking questions! Well, they could… 

Thanks for reading! If you want to help, or if the site has helped you, you can donate, register to help, write an article, or buy inexpensive hosting to start your own site. If you scroll down, you can sign up for the newsletter, vote for the article, and comment.

Today, We Have Fun In The Linux Terminal

Today, we will learn nothing of value – except how to have fun in the Linux terminal. You know what they say, all work and no play makes Jack a dull boy. So, today we’ll be doing some playing.

Why? Well, because it’s fun. There are a number of fun things you can do in the Linux terminal, but this article is only going to cover a few of them. All of these are harmless, some perhaps even fun to share with a co-worker (perhaps even mischievously) and some just to make you smile.

For the sake of brevity, I’m just going to write this from the perspective of an Ubuntu user. You should be able to find equivalents for most every major distro, but that’s up to you. I mean, it’ll work in Debian and Mint etc, but you’ll have to hunt for yourself to find them in Arch, Fedora, or Gentoo!

So, without further ado…

Fun In The Linux Terminal:

This article requires an open terminal, like many other articles on this site. If you don’t know how to open the terminal, you can do so with your keyboard – just press CTRL + ALT + T and your default terminal should open.

Once you have your terminal open, let’s visit the Matrix!

cmatrix:

Start this off by installing ‘cmatrix’ with this command:

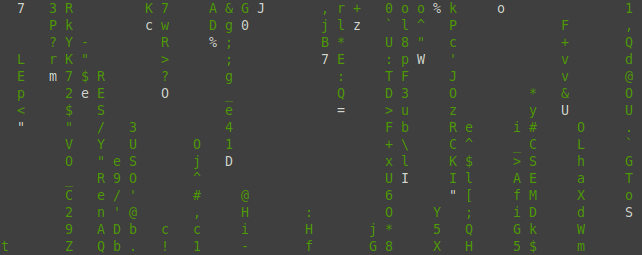
Next, in your terminal, type ‘cmatrix‘ and watch the screen. It’ll look something like this as the text flows by:

cmatrix in action
With the new Matrix coming out… Feel free to run this when nosy people look over your shoulder!

See the man page for more detailed usage. Or not… It’s just for fun!

sl (Steam Locomotive):

This one is for those times when you fat-finger ‘ls’ and type ‘sl’ by mistake. My screenshot abilities were lacking with this one. So, you’ll have to make do. 

To install ‘sl’, just do this:

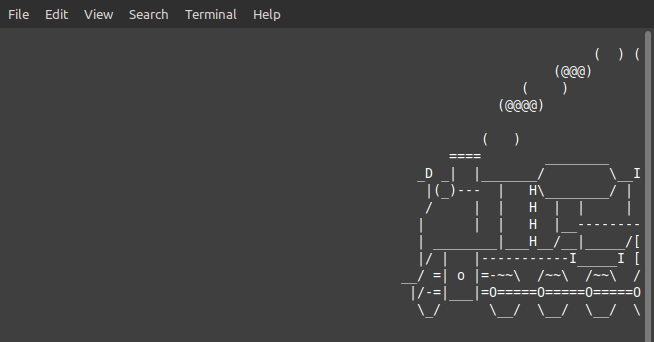
The next time you mistype ‘ls’ you’ll see what it does. Of course you can just type ‘sl’ and not wait for it. If you do so, be prepared for a steam locomotive that looks a little like this:

sl in action
Choo choo!!! It makes a more complete train, I just suck with graphics.

That’s sure to brighten a day such as the one where you’d be mistyping ‘ls’. Who doesn’t like trains?!? Sad people. Sad people don’t like trains.

Toilet:

You’ll find that toilet is a free version of figlet, a tool for making text larger for things like banner printing. I don’t think too many people have printed banners since the end of the dot matrix era, but it’s fun to play around with in the terminal.

To install toilet, and its wonderfully juvenile name, you just use:

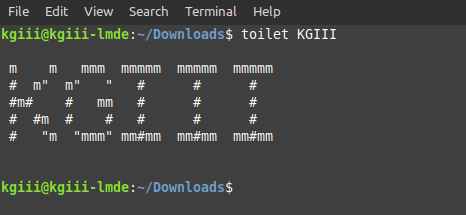
There are a number of advanced features, but you can just type ‘toilet <text>’ and press the enter button. For example, there’s this output:

toilet in action - showing large text
There you have it, a giant KGIII! Just what you wanted for your birthday!

Again, go through the man page for more options – like the ability to choose a font and size. Have fun with it!

Closure:

See? Just like I promised, you’ve learned nothing of value. You can use ‘sl’ on a co-worker, frighten people on a train with cmatrix, or make large ASCII text in the terminal to amuse yourself. Yup, nothing of value! You’re welcome!

Thanks for reading! If you want to help, or if the site has helped you, you can donate, register to help, write an article, or buy inexpensive hosting to start your own site. If you scroll down, you can sign up for the newsletter, vote for the article, and comment.
How To: Find Your Present Working Directory

There are times when you need to know your present working directory. You may need to know because the terminal doesn’t output that data, you may need to know for scripting, you may need to know for a variety of reasons.

So, what is the present working directory? Well, it’s simply a fancier name for the directory you happen to be working in – usually in the terminal. If you open your terminal and type something like cd Downloads, then your present working directory is going to be something like /home/<user>/Downloads. It’s pretty simple and this is going to be a pretty basic article. It’ll be a nice and easy exercise, even for a newbie.

There are a couple of ways to determine your present working directory and we’ll share them with you today. It’s really not a very complicated article, and not all articles need to be complicated. Sometimes, you just need new information that will help get you up to speed with your Linux understanding. After all, that’s the stated goal of the site.

Your Present Working Directory:

This article requires an open terminal, like many other articles on this site. If you don’t know how to open the terminal, you can do so with your keyboard – just press CTRL + ALT + T and your default terminal should open.

As I said above, there are a couple of ways to do this. With your terminal open, why don’t you type something like cd Downloads just to have a different directory than your default directory.

When that’s done, just enter the following command:

The output should look a little something like this:

present working directory
See? It’s all pretty basic information that you’ll need to know.

But wait, there’s more! There’s also an environment variable that will show you your present working directory. It’s pretty simple and you can use it like this (among other ways):

Be sure to make note of the dollar sign and the all caps. You’ll need to include those if you want it to work. Depending on what you’re doing, you may want to use the environment variable (as I understand, it’s better to do this when  you’re scripting).

You can see an example of $PWD usage here.

Closure:

There you have it, another article. This one shows you how to determine you present working directory. As far as articles go, this one is pretty short and easy, aimed at newer Linux users.

Thanks for reading! If you want to help, or if the site has helped you, you can donate, register to help, write an article, or buy inexpensive hosting to start your own site. If you scroll down, you can sign up for the newsletter, vote for the article, and comment.
Linux Tips
Creative Commons License
This work is licensed under a Creative Commons Attribution 4.0 International License.