Extract Multi-Part rar Files In Ubuntu

Today’s article is limited to just a subset of users as there aren’t that many people who want to extract multi-part rar files in Ubuntu. This isn’t something you’re going to face often (unless you’re still pirating stuff from Usenet) but it’s something some folks will face. So, this article is for all of those people, all three of you!

I suppose we first need to talk about WinRAR. For those that do not know, WinRAR is a proprietary company that uses a proprietary compression method. Even though it’s proprietary, it has some pretty great features. You have to give credit where credit is due. There are multiple versions of compression used over the years but they all share the same .rar file extension and are all reasonably compatible with one another.

The GUI version of WinRAR is a Windows-only trialware application but there’s a command-line version that can be installed in most distros. While this article is Ubuntu-specific, it’s sure to work with other distros though the installation method may be different. On top of that, many Linux tools (such as file-roller) are capable of extracting files compressed with WinRAR.

This isn’t going to be a very complicated article. It also shouldn’t be all that difficult. I figure folks can follow along if they need to when they need to. This isn’t something the average Linux user is going to face daily. After all, the majority of our software is free! There’s no reason to pirate it! (Seriously, I’m sure there are legitimate uses for multi-part rar files but I’ve only really seen them in frequent use with software piracy.)

Install unrar In Ubuntu:

To extract these multi-part rar files in Ubuntu, you’ll want to install the unrar application. That makes sense, after all. So, like so many things, we’re going to do this in the terminal. You can certainly install unrar with the GUI software installation tools, but we might as well do so in the terminal.

With that in mind, and with this unrar process also being in the terminal, we might as well go ahead and get unrar installed in Ubuntu. First, you can press CTRL + ALT + T to open your terminal. You should also be aware that this is going to pretty much work with any Debian (or Ubuntu) derivative out there. So, this works just as well with Mint, ElementaryOS, or the like…

I suppose we should update first, and you can do that easily enough:

If you trust your upgrades and don’t want to have to manually approve them, then you can just add the -y flag to the end of that, like so:

The next step is going to be installing unrar. You do so like this:

At this point, you can check the man page (man unrar) where you’ll learn that the unrar application describes itself like so:

unrar – extract files from rar archives

That’s a good description and, as you can see, is exactly the tool we want for this operation. If you’re going to extract multi-part rar files in Ubuntu, this is a good tool to do it with. (You can just as easily find a GUI application that will take care of this.)

Extract Multi-Part rar Files In Ubuntu:

I hope you left your terminal open after the installation phase. If not, you’re going to need to open it again. I envision people searching for this specific process and following along. I don’t envision people doing this just for the sake of following along. After all, it’s not like I made multiple-part rar files for you to test this with. You’ll want this article when you need this article.

Anyhow, the process is quite simple.

First, move all of the files into a single directory. This is going to make it much easier. In theory, you could specify the individual paths, but we’re not going to be doing that. No, move all the multiple parts to a single directory. Trust me on this one.

The syntax you’re going to use will be as follows:

No,  you do not include all the other parts. You only need to unrar the first file and the unrar tool will realize that it’s multiple parts and extract them sequentially. It will even tell you that it’s doing so, as it writes that data to the standard output.

This is why you move all the files to their own directory. Again, you only need to tell unrar to extract the very first of the files. It’ll happily find and extract the rest. Of course, you need ownership of the files or you’ll need elevated permissions (such as sudo) to extract the files.

Closure:

So, if you ever need to extract multi-part rar files in Ubuntu, you now know there’s an article that covers this. I don’t expect all that many people to need this information. I do anticipate those who need this information will be able to find this site (or another, I suppose) through a search engine. This isn’t something you’re likely to need every day, even though it’s relatively simple.

Thanks for reading! If you want to help, or if the site has helped you, you can donate, register to help, write an article, or buy inexpensive hosting to start your site. If you scroll down, you can sign up for the newsletter, vote for the article, and comment.
How To: Show Disk Information With hwinfo

Today we’re going to be having some fun with hwinfo, available everywhere and used (in this case) to show disk information with hwinfo. This isn’t going to be the most complicated of articles, so it’s safe to assume you can follow along – even if you’re a beginner. You just need to follow the directions.

The tool we’ll be using to show disk information will be hwinfo. This probably isn’t installed by default, but is a very useful tool. We’ll just explore one aspect of hwinfo but there’s a lot more to the application. There may be other articles on this hwinfo application.

Anyhow, if you’d already installed hwinfo and checked the man page, you’d learn that the application defines itself accurately, specifically as:

hwinfo – probe for hardware

That’s a pretty good description and might also be a bit of a clue about hwinfo’s features and goals. In this case, we’re simply examining one particular feature and that is how to show disk information with hwinfo.

I suppose that it’s a bit archaic calling it ‘disks’, but there are plenty of people with spinning platters. It could also be ‘drives’, to ensure we also cover solid-state drives. But, for this article, we’ll use the words interchangeably. After all, you know what I mean.

The hwinfo application is a great application, with a ton of options. It’d be far too much to cover in a single article. There’s enough fodder here for multiple applications, which is nice.

Install hwinfo:

As hwinfo is a terminal-based application, you’re going to need a terminal. You could trivially install this via a GUI application, but I needn’t explain that. I will show you how to install hwinfo with the terminal. It’s available for most distros by default. Just press CTRL + ALT + T to open your terminal, or open it manually from your application menu.

Once you have your terminal open, you’re ready to install hwinfo. You can pick from the following, as it’s a fairly universal application. Try one of the following to do so:

Debian/Ubuntu/etc:

SUSE/OpenSUSE/etc:

RHEL/Rocky/etc:

Arch/Manjaro/etc:

Gentoo/Calculate/etc:

See? You’ll find that hwinfo is an option in pretty much all the default reports. You can get a head start, and learn a lot, by checking the man page (with man hwinfo) if you’d like.

Show Disk Information With hwinfo:

Don’t close your terminal after installing hwinfo. You’re still going to need an open terminal to use hwinfo to show disk information. Fortunately, the commands are a bit unusual but not taxing. As we’re just covering how to show disk information, that will make it easier.

NOTE: To get complete information, you will need elevated permissions. In our case, we’ll be using sudo. If your distro doesn’t support sudo, you’ll need to gain elevated permissions in the manner your distro has designed.

So, with your still open terminal, you can try the first command, which is simply:

That will spit out a lot of information about the various disks you have in your system. It’s a lot of information, perhaps more than you need. If you want to show a nice summary, you’d want this command:

If you want to see a nice summary of block devices, you can just use the following command to show said block devices:

Most folks are either going to want the full information for troubleshooting or one of the latter two choices for basic information. But, you can use any of them that you want to show disk information. It’s a pretty easy process and hwinfo is a very useful application. Perhaps we’ll explore its uses soon.

Closure:

Well, today we have had a “Nor’easter” and the remains of Hurricane Lee. I was expecting it to be much more mild, but we have trees down and power outages all over the place. In fact, one outage has started a fire. 

However, that didn’t stop me! Nope! I have still not missed a single publication date. I’ve published an article every other day for a long time. So far, so good.

This time around, you got an article about how you can show disk information with hwinfo. That seemed like a fine article to write. It’s not all that long, nor is it all that complicated. If you follow the directions, you should be all set.

As such, I assume a beginner will be able to follow along and able to learn something in the process. I sometimes get feedback about using the terminal in so many articles, but it is a fairly universal tool. There’s no reason to be afraid of the terminal. Instead, embrace it and learn to use it. Once you do, you’ll understand why I write about it so frequently.

Thanks for reading! If you want to help, or if the site has helped you, you can donate, register to help, write an article, or buy inexpensive hosting to start your site. If you scroll down, you can sign up for the newsletter, vote for the article, and comment.

Monitor Bandwidth In Real Time

Today we’re going to have a fun article, an easy enough article, where we simply talk about one way to monitor bandwidth in real time. This is not something you’re normally going to do unless you’re in an unusual situation. It’s still something fun and easy, so why not cover it?

This might be useful if you want to monitor bandwidth at an edge system. Let’s say you have a public-facing server and you’re not behind a router that gives you this information in a fancy widget or whatnot and you want to monitor the bandwidth in real time. Well, you can do that. In fact, there are all sorts of tools that will let you do this. Heck, I think I may have even shared some of this type of stuff in the past.

Maybe take a gander at some of the following articles:

Monitor Bandwidth With nload
‘vnStat’ A Tool For Monitoring Your Bandwidth Usage
Visualize Your Network Traffic With ‘darkstat’

(There are more, just search the site for ‘bandwidth’ – which is how I came up with those links. I wasn’t picky, I just picked the first few that looked like they might interest people and be similar to this one.)

As I mentioned, it’s easy to monitor your bandwidth. It’s easy to monitor your bandwidth in real time. There are countless options and applications for this, so today we’re just going to cover one more option from the myriad options available to you as a Linux user.

Today’s article will be about ‘cbm’… Trust me, it’s easy. It’s very easy!

What Is This cbm?

Well, cbm stands for Color Bandwidth Monitor and it’s not a new application. In fact, the GitHub page indicates that it hasn’t been updated in a while. That’s not necessarily a bad thing, as it could mean that it’s just feature complete and in need of nothing.

I’ve only checked on Ubuntu (technically Lubuntu) and Mint, but cbm is in the default repositories. I’m a bit of a slacker, so I haven’t checked elsewhere, but it’s probably in their default repositories too. It’s just a tiny application with a very specific purpose. Those are the kinds of apps that make it into default repositories.

If you check the man page, you’ll see that cbm defines itself simply as:

cbm – display in real time the network traffic speed

Supposing you’re using Ubuntu (or Debian, or Mint, or any other distro with those repositories and using the apt package manager) it’d be easy enough to install.

You’d simply install cbm with the following command:

So, let’s pretend you’ve already got that cbm application installed…

Monitor Bandwidth In Real Time:

So, we’ll assume you’ve already installed cbm but you’re still going to need an open terminal to use cbm. Funny how that works! You know what, I’m just going to assume you’ve opened a terminal to install the application and skip that whole cookie-cutter silliness.

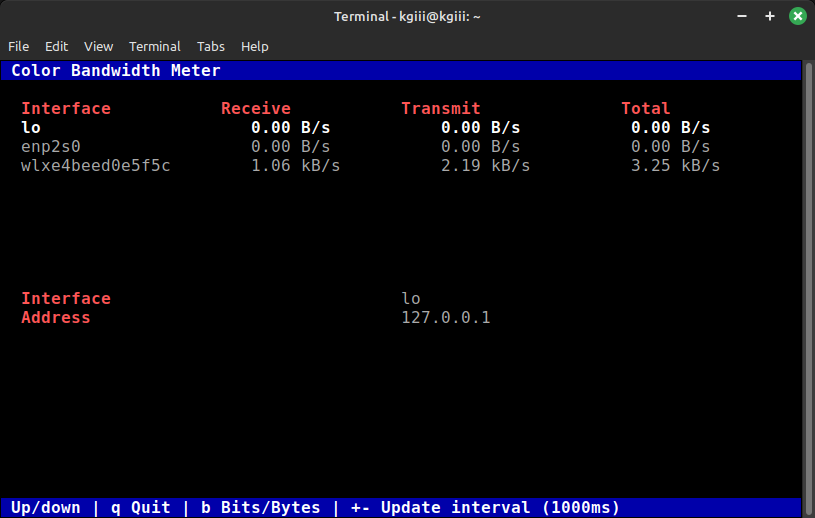
Well, now that you have cbm installed and you’ve run cbm in the terminal (which is your only option – I did mention this was absurdly simple), you’ll see an output similar to this:

cbm letting you monitor bandwidth in real time
It’s not polite to laugh at another man’s paltry bandwidth! Be polite!

Yes, yes I work just fine within these bandwidth constraints… Mostly…

As you can see, it shows each network interface.

How To: Show Your Network Interfaces

You can see that it shows how much data you receive, how much data you transmit, and the total. I did not let it run all that long for the screenshot, as that’s not necessary.

That’s pretty much it. There are few options and that’s a good thing.

You can press the + or to change the refresh rate.

You can press B to change from bits to bytes.

When you’re done monitoring your bandwidth in real time, press Q to exit the application.

That’s it. That’s all you need to know. It’s a very purpose-built application. There aren’t a bunch of frills and options. This is one of those tools that does exactly what it says on the tin and nothing else. If you want to monitor bandwidth in real time, this is one way to do so.

Closure:

See? I told you this would be a nice and simple article. It’s easy to follow and easy to learn. There isn’t a whole lot to it. You can monitor bandwidth in real time with all sorts of tools, but this might be one of the easiest. The program doesn’t need to be updated. It doesn’t need additional bells and whistles.

Sorry for not checking on alternative distros. That takes a while and I have limited time to write these things. If you use other distros, you can help by leaving a comment to indicate if it is in your default repos or not. You can even go so far as showing how to install cbm. It won’t hurt and you don’t even have to use real information!

Thanks for reading! If you want to help, or if the site has helped you, you can donate, register to help, write an article, or buy inexpensive hosting to start your site. If you scroll down, you can sign up for the newsletter, vote for the article, and comment.

Let’s Make The rm Command Even Safer

Today’s article is one I don’t expect most folks to follow, but it’ll be a fun way to make the rm command even safer. If this article sounds familiar, then you remember a recent article. Well, this article takes it a step further and we’re making the rm command even safer!

See, in the last article you learned how to:

Let’s Make The rm Command A Little Safer

Despite the naysayers not seeing the value, that article will help you make the rm command a little safer. It adds a sanity check. If you followed the directions, you’d get the chance to tell the rm command to ‘never mind’ and to ignore your command prompt. This can stop you from removing files accidentally.

While I wrote that article, I already had this one planned, but didn’t want to publish the two back-to-back. I try to mix things up a little.

NOTE: If you followed the directions in the first article and decide you’d rather go this route, you’ll have to undo the actions you took. These two things can not work together at the same time. It’s a one or the other kind of thing.

What will we be doing in this article?

Well, simply put, we’re going to use an alias like we did in the previous article about making the rm command safer – except we’re also going to define a function and alias the rm command to that function instead.

What will that function do? Well, in short, it will take the results of the rm command and stick the files in your trash (recycle) bin. It makes the rm command work similarly to your regular delete (depending on the distro). Instead of deleting files, it happily sends them to the trash bin instead. So, if you screw up you can restore the files nice and easily with your GUI (by going into the trash bin and restoring the files, of course).

This is a bit more complicated. That’s why I went with the previous rm command modifications earlier. This still isn’t all that complicated. I realize this is something new to most of my readers, so I’ll make it as clear as humanly possible. (Wish me luck!)

In the previous article, we made the rm command a little safer. This time around, we’re going to try to …

Make The rm Command Even Safer:

Yes, you’ll need an open terminal. You can likely press CTRL + ALT + T and your default terminal should open. Otherwise, open it from your application menu.

These directions will assume you’re using Nano. If you are not using Nano, please adjust the directions to suit your text editor of choice.

With your terminal open, I want you to enter the following command:

Then, and this may be confusing, I want you to copy and paste all of the following text at the very bottom of that file:

Next, you need to save the file. As we’re using Nano, you save the file by pressing CTRL + X, then Y, and then ENTER.

Next, you need to tell your system to reload the ~/.bashrc file. You can log out and back in, you can close all the terminals and open a new one, or you can simply type the following:

NOTE: In the second code block you’ll see ~/.local/share/Trash/files. This should be the correct path to your trash bin. You should verify this and change the path accordingly. This directory ONLY exists if you’ve previously moved something to the trash. You’ll need to create a file and move it to the trash or you’ll have to make the directory manually.

Testing This New rm Command:

Leave your terminal open and open your GUI file editor. With your GUI file editor open, navigate to ~/.local/share/Trash/files.  You may not see it by default, so change your GUI file manager’s options to show hidden files and directories. (You can often use CTRL + H to show hidden files.)

Now that you’ve navigated to the directory with your GUI file manager, return to your terminal emulator. Once there, type the following:

You can then run ls to ensure the file foo.txt exists. Next, you’re going to delete it with the rm command:

Again, you can then run ls to ensure the foo.txt file has disappeared. It should certainly be gone from the directory you were in and removed by the rm command.

Except, it wasn’t!

Go back to your GUI file manager and (you might need to refresh it, depending on the file manager) check the list of files. Sure enough, you should see a foo.txt in the trash bin. It’ll remain there until you restore it or until you empty the trash.

Pretty neat, huh? 

Closure:

The first article made the rm command safer. This article will help you make the rm command even safer! You can’t do both (easily), but you can do one or the other. I mean, I’m sure it’s possible but I’ve never thought of a way to do so. I haven’t tried to think of a way to do so. So, there’s that…

If you follow this article, your rm command will send the files deleted by rm to the trash bin. If you follow the first article, you get the chance to view your command’s outcome and decide to back out of the file removal process. You can pick whichever one works best for you.

You can also completely ignore these things and just keep on doing what you have been doing. This being Linux, you can make all sorts of choices – including this one. Though, I think it was Rush who said, “If you choose not to decide you still have made a choice.”

Thanks for reading! If you want to help, or if the site has helped you, you can donate, register to help, write an article, or buy inexpensive hosting to start your site. If you scroll down, you can sign up for the newsletter, vote for the article, and comment.

Let’s Talk About The Deep Web vs Dark Web

Today’s article is going to be quite different than a normal article, as I discuss the differences between the Deep Web vs Dark Web. The reason I wrote this article is because I was having an online conversation with someone and they didn’t know the difference. In fact, they weren’t familiar with either of the terms but used them both for the same thing.

So, sit back and relax. This article might be informative if you’re not already aware of these words and what they mean. If you’re already familiar with these words, you can skip this article – or scroll to the comment section to add your thoughts on the matter.

There’s a subset of people who would think these names are interchangeable. They share some similarities but they’re decidedly different. I’ll do my best to explain the difference between the deep web and the dark web. It sounds like a good article to write.

The Public Web:

Before we can talk about either of those two things, we should probably talk about the public web. That’s just the tip of the iceberg, but the public web is the sites you visit while you’re online. These are sites that are open to anyone. They’re sites you can find with your normal search engine.

For example, this site is a part of the public web. You can search for it and find results. It’s possible to visit the site directly. You can interact with the site, browsing around as you see fit.

Everyone’s familiar with the public web. This is all the major sites, the sites that get the vast majority of traffic. They’re the places we hang out, meet with friends and family, and exchange information. They’re just your typical websites.

All of these things have one thing in common. You connect to your ISP to access them – but they use vastly different technology underneath. The public web uses just plain web servers, a markup language, and is delivered via HTTP or HTTPS. You know, the sites you regularly visit.

The Deep Web:

The Deep Web is something we all encounter. Simply put, the Deep Web is stuff that doesn’t get indexed by public search engines. This is also true of the Dark Web, but we’ll discuss that in a minute.

For example, your banking is technically in the Deep Web. I mean, ideally, it is. It’s a site with data that’s not indexed by search engines. This is true for IRC (Internet Relay Chat), SMTP/POP3 (email), IMAP, (more email), and even the old gopher network that still exists.

This Deep Web also includes stuff behind a paywall. This could be a private stock exchange portal or it could be the archives at your favorite newspaper. This also includes things like private forums. If a public forum has a private section then that section would technically fall under the title of Deep Web.

There’s nothing wrong with the Deep Web. There’s nothing inherently wrong with any of these categories. They are what they are. I have a private forum and no you can’t join it. It’s for friends and family. As such, it’s a part of the Deep Web.

The Dark Web:

Now, the Dark Web is a whole different animal. The Dark Web requires different protocols and special software to access it. It will also include encryption and will (generally speaking) be poorly indexed (if at all) by public search engines.

The Dark Web includes various P2P connections. A few examples would be Tor, I2P, or even Freenet. While this data does transmit over the internet, it uses various protocols that are unlike those used for the public web. Encryption is enforced and a stated goal for many of these services is anonymity.

It is NOT illegal (at least not in my country) to access the Dark Web. In and of itself, accessing the Dark Web violates zero laws. Just like you can access IMAP for your email, you can access the Dark Web.

HOWEVER…

The Dark Web is where you’ll find a concentration of illegal activities, from drug sales to firearm sales to worse. Performing those illegal activities is still very much illegal. The level of security you’d have to maintain at all times is so burdensome that people are caught every day for performing illegal activities on the Dark Web.

Yes, you can find illegal activities on the public web. You’ll find a concentration of them on the Dark Web.

So, Deep Web vs Dark Web:

So, accessing the Deep Web is perfectly normal. That behavior doesn’t stand out at all. Just accessing your bank means you’re accessing the deep web – and that’s a good thing. You don’t want that banking information to be available with a simple Google search.

Accessing the Dark Web isn’t illegal, but that’s where a lot of illegal activities take place. You’re unlikely (I’m sure some jurisdictions make this illegal) to attract any attention unless you’re dumb enough to try using it for illegal activities. Before you think you’re smart and will keep your “OPSEC” squared away, every other person thought the same thing before the law was knocking on their door.

So, when it comes to Deep Web vs Dark Web, you might as well know the difference in terms and what those terms mean. 

Closure:

Yes, this could have been so much more technical. The idea for the article stemmed from a conversation and I don’t want to be all that technical. This is meant to be a light discussion about the Deep Web vs Dark Web. Nothing more. Nothing less…

Thanks for reading! If you want to help, or if the site has helped you, you can donate, register to help, write an article, or buy inexpensive hosting to start your site. If you scroll down, you can sign up for the newsletter, vote for the article, and comment.

Linux Tips
Creative Commons License
This work is licensed under a Creative Commons Attribution 4.0 International License.