The answer to the question, “What is my IP address?” can have different answers. In practice, you likely have more than one IP address. This article will explain how and will tell you how to use your terminal to find your IP address(es).
What is an IP address?
An IP address is a numerical designation given to computers on a network. This number is used to identify the computer. You can also identify a computer by their hostname, but the hostname is resolving to an IP address. Computers that are connected to a network will have an IP address.
There are two types of IP addresses to be curious about these days. There’s IPv4 and IPv6. IPv4 predates IPv6 and is still in use, but has run out of numbers. IPv6 solves that by enabling a whole lot more combinations. IPv6 has a potential of 340,282,366,920,938,463,463,374,607,431,768,211,456 addresses – which is a whole lot of ’em, especially when compared to IPv4’s paltry ~4.3 billion addresses.
IPv4 addresses have technically already been exhausted, and have been since early 2011. The addresses still exist, but they’re all assigned to various entities. The IPv6 roll-out has been slow. Odds are good that you’re using IPv4 right now, in fact I know you are – as this site has an IPv4 address. Still, your router is likely handing out IPv4 addresses and your ISP is likely still using IPv4 addresses.
Additionally, in most cases, you would be concerned with two IP addresses. You’re likely connected to a router/modem that’s connected to the internet. As such, you will have a private IP address and you’ll have a public IP address. The first is (usually) assigned to your computer by your router and the second is assigned to your router by your ISP. This article will explain a little about each and how to find both of them.
Find Your Private IP Address:
Your private IP address will be in a reserved section of the IP address space. It will probably be handed down by DHCP (Dynamic Host Configuration Protocol), but many routers will both let you pick your IP address (from the reserved space) or will just assign the same IP address to the same device based on the MAC address (Media Access Control).
The reasons you’d want to know it are your own, but it’s handy if you want to connect to a specific computer. As I know my laptop is 192.168.1.5, I can just SSH into it using that address. I know my media server is a different address, and I can connect to it with the IP address as well.
There are a number of ways to find your private IP address. I’ll share two of them that are quick and easy. For this, you’re going to want to open your terminal, which you can do by pressing
First try:
1 | ip addr |
You can also try:
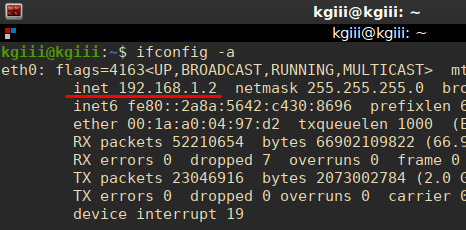
1 | ifconfig -a |
In both cases, you look for ‘inet’ AND your device. You’re not looking for ‘loopback’, as that will likely list your IP address as 127.0.0.1 – which isn’t the address you’re after for reasons beyond the scope of this article.
You’re looking for your device, maybe named ‘eth0’ or ‘wlo1’ or similar, and then you’re looking for ‘inet’. Your IP address is the next four sets of digits (or alphanumeric combinations in the case of IPv6). For example:
One or both of those methods should work for you with any major distribution. There are surely many other ways to find your IP address, so feel free to leave a comment indicating how you do it.
Find Your Public IP Address:
The next kind of address is your public IP address. This is the IP address your ISP assigns you. If you wanted to connect to your computer over the world-wide-web, you’d be able to do so (with obvious caveats and proper configuration) with your public IP address.
It’s also the address I see (unless you’re using a VPN) in my server logs when you visit my site. That’s perfectly normal – as my site needs to know where to send the return packets. If my site didn’t know an address to send data to, it simply wouldn’t work.
You can think of this as the IP address assigned to the public side of your router, and your router then passes that information along via the private IP address that originated the request. This lets you have multiple devices using the same public IP address. (Read about NAT here.)
My understanding is that some ISPs are NATing public IPv4 addresses so that multiple routers can actually have the same IP address (not necessarily a good thing). However, that too goes beyond the scope of this article and isn’t want this site is actually about.
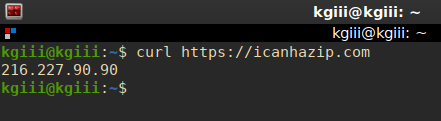
Anyhow, there are numerous public servers out there that you can ‘cURL‘ and those will give you your public IP address right there in the terminal. Just like above, you can open your terminal by using your keyboard and pressing
1 | curl https://icanhazip.com |
Or you can try:
1 | curl ifconfig.me |
It should look a little something like this:
![]()
Closure:
And, there you have it. You now know how to find your public IP address and how to find your private IP address from within the terminal. There are also many dozens of websites that will tell you your public IP address, but we might as well stick to the terminal for this one. Why not? You can do a lot in the terminal.
Once again, thanks for reading. Your comments and feedback help make the site better. As always, you can donate, write an article, sign up for the newsletter below, register, and vote to let me know which articles you prefer. If you sign up for the newsletter, you’ll get notifications when new articles are published. No spam, I promise!