This article is based on an AskUbuntu question I answered a while back. The user wanted to know how to use Wayland in a live instance of Ubuntu. They wanted to test some Wayland stuff and this was how they wanted to do it.
I personally would have gone a different route, but that’s fine. There are likely other people who have this same question, so it seems prudent to put the answer up here, as others will likely want to use Wayland in a live environment.
It actually turned out to be pretty easy, so this isn’t going to be a very long article. If you follow the directions carefully, you should be able to use Wayland while running Ubuntu live.
Use Wayland in Ubuntu Live:
The first thing you need to do is boot into the live instance of Ubuntu, and then you change the way you login. You don’t want to automatically login for this exercise.
Click in the bottom right and ‘Show Applications.’ Once there, you can enter the word ‘users’, click on the settings app offered, and then disable automatic login.
Next, you have change the password. You’re forced to deal with Ubuntu’s need for a complex password. The password you pick must be at least 12 characters long, not a dictionary word, and have a mix of numbers and letters.
Next, you want to edit “/etc/gdm3/custom.conf” and comment out the line that disables Wayland. To do this, we’ll open a terminal by pressing CTRL + ALT + T. That opens the terminal where you’ll enter:
1
sudo nano /etc/gdm3/custom.conf
Find the line:
1
WaylandEnable=false
Change it to (comment it out):
1
#WaylandEnable=false
Make sure to save it. Just press CTRL + X, then Y, and then ENTER and nano will save it.
Restart gdm3 with:
1
systemctl restart
If that doesn’t automatically log you out, log out manually.
Now start the process to log back in, but after you click the user, there’s an icon in the lower right. It’s a gear icon. Click that gear icon and choose “Ubuntu on Wayland”. Then enter your password and press ENTER.
If everything worked, you’re now logged in with Wayland.
Now, if you want to verify that you’re using Wayland…
Press CTRL + ALT + T to open the terminal and enter:
1
echo $XDG_SESSION_TYPE
If you have done everything correctly, it looks like this:
See? That’s how you use Wayland in a live Ubuntu instance. And now you know…
So, there you have it for those that want it. If you want to use Wayland then you can. You can do that in a live environment if you want. It’s Linux. You can do most anything, if you put enough work in.
Closure:
And there you have it. Another article is in the books. This one helps you use Wayland and helps you use it in a live Ubuntu instance. I suspect you could use this as a basis for other distros, but I’ve never actually tested that theory out. If you have tried it, let me know in a comment. Thanks!
Thanks for reading! If you want to help, or if the site has helped you, you can donate, register to help, write an article, or buy inexpensive hosting to start your own site. If you scroll down, you can sign up for the newsletter, vote for the article, and comment.
META: Over the past few days, the site has kinda blown up. The bandwidth allotment was shattered for the month of May – in just the last few days of the month, meaning I had to upgrade my hosting account.
Whichever of you visitors it is that has been sharing this site’s articles on Facebook and Twitter, I do appreciate it and I hope you continue doing so. The additional traffic is pretty awesome. Worst case scenario is that I’ll just keep buying more bandwidth. We’re doing okay with regards to disk space usage, but we go through bandwidth like a fat kid goes through cake!
Now on to your regularly scheduled article!
Linux Boot:
There are any number of reasons why Linux will refuse to boot property. In most instances, you can easily fix your boot with ‘boot-repair‘. The boot-repair application is a handy, mostly automated, method to get your Linux boot-up process squared away.
It may be that you installed Linux improperly, or an update has somehow broken your boot. You could have a complicated boot process that has multiple operating systems configured and that has broken. There could be all sorts of reasons why your Linux system isn’t booting properly.
It’s for this reason that ‘boot-repair’ was created. Not only does it have an automated repair process, it has an advanced process that will let you create a diagnostics report to share with your favorite support forum, where you can get help with manually repairing your system.
Because of the many variations that are involved in the manual repair process, this article is only going to cover the automated boot-repair process. There are simply too many variables and brevity is important.
With that in mind, please continue reading…
Getting ‘boot-repair’:
The first thing you’re going to need is a Linux USB or DVD. There are a couple of ways to do this, but you probably still have the media from which you installed Linux in the first place. If you do still have that, you can just boot to the live instance.
As boot-repair isn’t necessarily installed by default, you’ll need to install it. That’s going to vary and depend on your distro, but it’s easy if you have Ubuntu or an Ubuntu derivative. Just use your keyboard to open a terminal by pressing CTRL + ALT + T.
Once you’ve done that, you’ll need to add the ‘yannubuntu/boot-repair’ repository, like so:
If you’re using a modern version of Ubuntu, it will add the repository and then automatically update the database of available software. If you’re not, or if you want to be extra careful, you can simply update it yourself with:
1
sudo apt update
Next, you’ll install ‘boot-repair’. Seeing as you’re already there in the terminal, let’s go ahead and do it there:
1
sudo apt install boot-repair
Now that you have it installed, you can go ahead and open it from the menu.
Or Use the ‘Boot-Repair-Disk’:
If you don’t have any live Linux media kicking around, you can actually download a special distro that will get you sorted out. There’s a basic ‘boot-repair’ image that you can download from Sourceforge and you can use that instead.
If you’d like to download the ‘boot-repair-disk’, you can do so at this link. It’s a small distro that’s based on Lubuntu and has the tool you need for this. It also contains ‘OS-uninstaller‘ which, while interesting and handy, is beyond the scope of this article.
Once you’ve downloaded it and written it to USB or DVD (it’s just a whisker too large to fit on a CD as of the time of this writing), you can just boot to it and proceed from there. If you’re curious, it will look a little like this once you’ve booted and opened the ‘boot-repair’ application:
That’s boot-repair-disk in action. You can use this instead of your regular distro.
Repairing Your Boot:
At this point, you have booted into a live instance of Linux and you’re ready to repair your broken boot. You can just open ‘Boot Repair’ from the application menu.
Once you do that, it will take a moment to collect information about your system. This is important, as it will use that information to repair your boot. As I mentioned up above, there’s too many variables to cover with the advanced options and there’s already a solution in place for that.
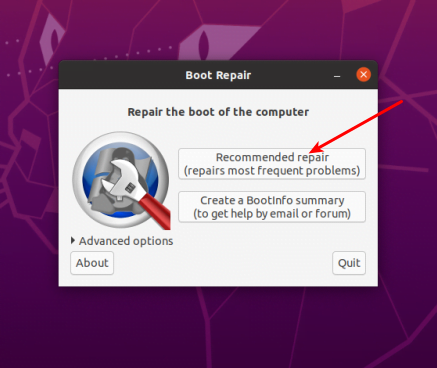
So, the simple thing you now do is use the automatic boot-repair and hope that it works. It usually does the trick and it’s pretty obvious how you do it. Still, have an image, just in case.
Just click the button! It should do the trick – most of the time.
All you need to do is push the button. Once you’ve done that, just go ahead and reboot. When you’re prompted, remove the installation media and let the reboot finish. The very next boot should be fine, as boot-repair will have done its job.
If it is not fixed, then you have a bigger problem than can be resolved automatically. In that case, click the bottom-most button and share the resulting report with your favorite support forum. Many Linux support forums have people who are used to seeing the output of boot-repair and they’ll get you sorted. If not, anyone at your favorite forum may still be able to read the information and help you get your Linux boot repaired properly.
Closure:
That’s it, really. This article only covers the automated repair. If it’s more complicated than that, it’s more complicated than a blog post and you’ll need assistance from someone who is familiar with how Linux boots.
As always, thanks for reading. Your readership and feedback make this task all the more enjoyable. If you feel like you can help, or that you want to help, just let me know and I’ll be able to find something for you to do.
Like normal, you can donate, sign up for the newsletter below, share the article on social media, leave a comment, register to help, or even write your own article. It’d also be pretty great if you unblocked the ads so that the site has a chance of making some revenue! If you have any questions, just contact me.
It’s possible for your filesystem to become so corrupted that you can’t repair it easily. In that case, you can repair your Linux filesystem with a live USB or DVD.
Your filesystem may become corrupted for any number of reasons. One of the most common reasons is an improper shutdown, where your filesystem doesn’t have time to properly write everything to disk because it wasn’t shut down properly. You might see that sort of thing when you suffer from a power outage.
There are any number of reasons why your filesystem will have become corrupted and, in most instances, your system will automatically repair your Linux filesystem when you boot your computer.
It’s also possible that a simple boot won’t repair your Linux filesystem. In that case, your OS probably has some sort of recovery mode and you can use that mode to repair your filesystem.
Once in a while, your filesystem may have become so corrupted that you can’t fix it in recovery mode because you can’t get to recovery mode to fix it. Not to worry. This is something you can easily do with a live USB or DVD.
This article assumes you already have a USB or DVD with an OS that runs live. I’ll use Ubuntu as the example OS, as it’s really common. Adjust for your distro and you’ll be okay.
NOTE: If you’re using Btrfs, you shouldn’t need to run fsck, it should heal itself. If not, here are Btrfs-specific commands that you should learn.
Repair Your Linux Filesystem:
The first thing you’re going to do is boot to the USB or DVD. You’ll need to be patient as the live instance loads into RAM. Once the OS has loaded to a GUI, you’ll want to select “Try Ubuntu”. (Remember to adjust that for your own distro, should you not be using Ubuntu.)
Again, this will take a minute – especially on older hardware. Eventually, the GUI will load and you’ll have a functional live instance running. If you needed to use nomodeset, acpi=off, or anything similar, you’ll probably also need to use those things to get the live instance of Linux running.
The tool we’re going to use is known as ‘fsck‘, which is a tool in and of itself and a front end for other tools. fsck interacts with more specific tools for your specific filesystem, but that’s not important right now.
If you’re curious, fsck stands for ‘file system consistency check‘ and the man page helpfully describes it as:
fsck – check and repair a Linux filesystem
Now that you have a functional live desktop, it’s time to repair your Linux filesystem. The first step is, as is often the case, opening up your terminal. You can use your keyboard to do this, just press CTRL + ALT + T and a terminal should pop right up.
At this point, you’ll want to identify the correct disk. To do that, you run:
1
sudo fdisk -l
You’ll want to identify the disk where you installed Linux. That’s the disk that has the corrupted filesystem that is preventing you from booting. It’s often something like ‘/dev/sda1’ or maybe even ‘/dev/nvme0n1p1’.
Once you have the disk identified, it’s time to repair your Linux filesystem. Enter this:
1
sudo fsck -y /dev/sda*
NOTE: Change the /dev/sda* to match the data from the fdisk command you ran earlier.
That ‘fsck’ command should find and fix any errors automatically. If you really know what you’re doing, you can run ‘fsck’ manually and maybe do a better job than the automatic method. Then again, if you know that much then I’d suspect you don’t actually need this article.
This shouldn’t take very long to run, unless there were a whole lot of errors. Next, all you need to do is reboot and you should find that you were able to successfully repair your Linux filesystem. To do that from the terminal, you can just type:
1
reboot
When prompted, remove the disk from the drive and press the ENTER button.
Closure:
There you have it, another way to run fsck and to repair your Linux filesystem when it is broken. This method works even when the recovery mode will have worked.
Thanks for reading! If you want to help, you can buy some cheap hosting, unblock ads, donate, sign up for the newsletter (below), write an article, leave a comment, register to help, or just vote for the article below and leave a comment!