Use A GUI To Manage Debian’s Software Repositories

You can manage Debian’s software repositories through the terminal, even by just editing some files. It’s not terribly hard, but there’s an “easier” way, and that’s to do so graphically. It may require some prep work, but it’s remarkably easy after you’ve taken care of that.

People sometimes ask if we prefer the GUI or a terminal, and that’s a complex answer. This is one of those times when it’s split up the middle, at least for me. For example, it’s absurdly easy to add repositories in the terminal, but it’s slightly more complex if you want to then remove those repositories. You need to remember things like the repo’s name – when you can just look in a GUI application and quickly see which repositories you want to remove.

If you’re new to Linux, Debian is a Linux-based operating system that is quite popular to build off. There are tons of derivatives, and even some derivatives of derivatives. Debian was released in 1993 and is the parent of popular distros like Ubuntu, and the grandparent of the many distros based on Ubuntu.

You know, I suspect more people use Debian derivatives than directly use Debian itself.

GUI Manage Debian’s Software Repositories:

I’m going to assume two things:

  1. You have a brand new copy of Debian freshly installed. 
  2. You only downloaded the first .iso and it is no longer mounted. 

Some folks can possibly skip ahead to Step 2.

Step 1: Remove CDROM from your sources

The first thing you’re going to need to do is get rid of the cdrom entries in your apt sources. If you try to install (or update) and have cdrom listed in your sources then you’ll bump into some errors. So, let’s take care of that.

Start your terminal with the trusty CTRL + ALT + T.

To fix that cdrom thing we’re going to need to edit your ‘sources.list’ file. To do that, we enter this in the terminal:

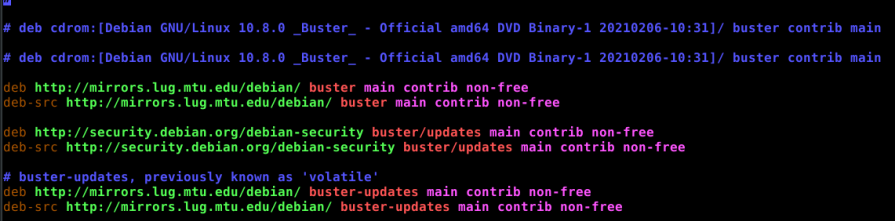
Find the line that starts with ‘cdrom’ and put a # in front of the line to comment it out. It should look a bit like this:

edit debian's sources list
That’s opened after editing. Your version may look different.

Next, save it. Seeing as we’re using nano, you do that pressing CTRL + X, then Y, and then ENTER.

At this point, we need to make sure the system knows we made that change. So, we’re going to update the lists of software available with this command:

That shouldn’t take all that long, especially if it’s a new installation. It takes even less time if you grabbed updates during the installation process. 

Step #2: Install software-properties-gtk

Seeing as you already have your terminal open, you needn’t open a new one. We can do the rest of this in just a single command. It’s actually really easy to do the rest, to set it up to graphically manage Debian’s repositories. Just enter the following command:

Press the ENTER key, type your password if asked, and press on the ENTER key again after entering the ‘y’ response if/when asked.

That’s it. You’re done. When you look in your menu, you should see a new entry called “Software & Updates”. Root around in the tabs and revel in your new tool to manage repos and a few other things.

Software & Updates on Debian
See? Mission accomplished and it wasn’t even all that painful! Congratulations!

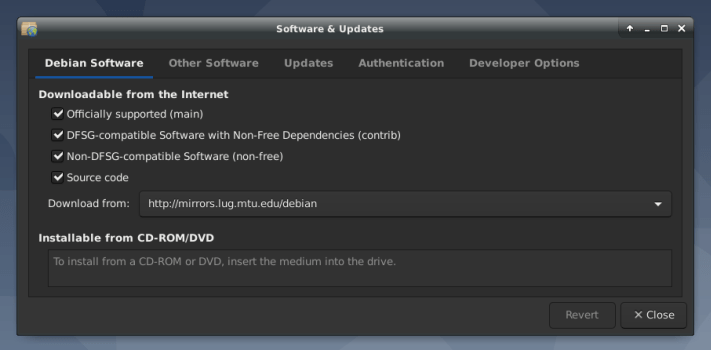
You manage the main repositories on the first tab and can manage other repositories with the second tab. You can graphically manage Debian’s repositories without a whole lot of extra work. The hardest part was in removing the cdrom from the software sources. There are some other tools included, but those are the two main tools – or the two main tools that this article focuses upon.

Closure:

And there you have it! You have a new article. This one told you how to graphically manage Debian’s repositories. All in all, I’d say it’s pretty easy and something a fairly new user should be able to do on their own. Good luck and ask questions if you get stuck.

Thanks for reading! If you want to help, or if the site has helped you, you can donate, register to help, write an article, or buy inexpensive hosting to start your own site. If you scroll down, you can sign up for the newsletter, vote for the article, and comment.

Graphically Examine Hardware Info With HardInfo

Sometimes old tools are the best, or at least adequate. In this case, we’re talking about HardInfo – a tool that hasn’t been updated in about 7 years, but still does a great job.

This is Linux. There are a ton of great applications to detect and list your hardware. Most of them are CLI. HardInfo is one application that lets you graphically detect and show your computer’s hardware. It’s rather out of date, but that doesn’t seem to hinder it any.

Welcome to HardInfo!

HardInfo used to be installed by default with Lubuntu. As near as I can tell, the last time it was included by default was in Bionic (18.04) and it has now been left aside as an old relic and with nothing replacing it.

You may remember it, but you may remember it with a different name. In your menu, it showed up as “System Profiler and Benchmark” and may well have been overlooked by many. Not me, I use it every time I get a new computer and want to check out the performance.

Allow me to explain…

See, it doesn’t just list the hardware that it finds, it also (as the menu entry implies) lets you run a bunch of pretty neat benchmarks. If your computer is fairly modern, then it will likely exceed all the default benchmarks listed in the program. It has been a long time since it has been updated, after all. Still, it’s great to see what your computer is capable of.

The great thing about it is that it’s simple and self-explanatory. I don’t really have to tell you how to use it. You can figure it out easily enough on your own. I only need to make you aware of it!

Installing it is easy enough. If you’re using a Debian/Ubuntu distro, or a derivative, you can install it right from your default repositories. This is true for most other distros, I suspect. I confess, I made absolutely no effort to look this up! Still, to install it in Ubuntu, you’d  start by opening your terminal. Use your keyboard to open your default terminal by pressing CTRL + ALT + T.

Then, just run the following command:

Then, just open it from your menu – somewhere under system tools and by the name mentioned above. It should look a little like this:

hardinfo in action
See? This is nice and easy. Anyone can figure it out!

Scroll down and you can run a bunch of different benchmarks! Once again, this is entirely self-explanatory. If you use a more modern device, you’ll shatter the records listed for other computers – which is a nice boost of endorphins – like so!

HardInfo doing a quick benchmark.
See? Even my older computers slaughter the competition!

And, there you have it. HardInfo is still a pretty wonderful tool. I like it for all the benchmarks it offers. They’re a great way to get a rough estimate of performance. It’d be great if that section was updated with more modern devices, but I am not a very good programmer. Maybe one of you will download the source, fork it, update it, and maintain it? It’d be a great asset to the community!

Bonus: CPU-X

If you want something more modern, that gives the same information but has fewer benchmark choices, then you can always take a look at CPU-X. CPU-X is from the folks at X0rg (not to be confused with X.org) and has been updated much more recently. It’s a great GUI way to check your hardware. Once again, you can install it from your default repositories. Once again, that looks like this for Debian/Ubuntu/apt using distros:

It too is fairly self-explanatory. If you need help using it, perhaps Linux is not the best choice for you! Ha! I kid… If you need help using it, just go ahead and ask. I’ll do my best to get you sorted.

If you want a more modern version, you can download it. It’s a little complex, but not very. First stop, visit the CPU-X GitHub page and click on the latest release – on the right.

Once you’re there, you can download the AppImage, which is probably easiest. If you want, you can grab the package for your OS, it’ll be in tar.gz format. Open it with your archive manager.

Inside that archive, you’ll find some .deb files. You know what to do with those. First, extract the CPU-X .deb and then extract the ‘libcpuid’ file – not the one with dev in the title.

Once you have them both extracted, you need to install the appropriate library file before you install the CPU-X .deb. The library is a required dependency and the one in the default repositories is not new enough to work with the newer CPU-X.

You’ll also possibly get a warning that says you have an older version available in the repositories and that you should install that version instead of the newest version. You can skip that warning and install the newer version just fine. It shouldn’t break anything!

When you start CPU-X, it will ask you to run as root. To get all the information, you will need to run it as root. So, go ahead and either select “Run as Root” in the menu or go ahead and choose to run it as root when prompted. It will, of course, ask you for your password. If you’ve done it correctly, it will look a little like this:

cpu-x up and running
See? It works and it too is easy to understand. Sweet!

If you use the right arrow near the top, you’ll see there are benchmarks available. They’re two simple benchmarks where your computer generates prime numbers. You can select the duration and the number of threads. Other than that, it’s not really all that complicated or informative. It’s there if you want to.

Anyhow, there you have it. You have a couple of ways to graphically check your hardware information. If you don’t want to use something like inxi, this is the next best thing. Thanks for reading and be sure to sign up for the newsletter. 

Subscribe To Our Newsletter
Get notified when new articles are published! It's free and I won't send you any spam.
Linux Tips
Creative Commons License
This work is licensed under a Creative Commons Attribution 4.0 International License.