Disable Bluetooth From Automatically Starting At Boot

In today’s article, we’re going to learn how to disable Bluetooth from automatically starting at boot. It’s a handy thing to know, if you’re like me and have no real use for the service.

I suppose it’d even speed your system’s boot time a trivial amount and reduce the number of running services. So, it’ll make your system a trivial amount more efficient. I just don’t care for Bluetooth so I have a way to prevent it from automatically starting in my notes. These articles are generally based on my notes, so now you’ll know.

NOTE: I should probably also mention that this is really only useful for those of you who use systemd. If you still haven’t moved to systemd, or refuse to move to systemd, then this article isn’t going to be of much use to you. You can still do this, but you’ll have to do so with your particular init system’s commands. These commands are not gonna work for you.

Even if you don’t want to disable Bluetooth from automatically starting at boot, you may want to learn how to disable other services. The process for other services is pretty much the same as it is for Bluetooth. So, you can learn something from this article if you’re new to this whole thing.

This is a nice and easy article, it shouldn’t take much time to read and understand. So then, let’s get on with it!

Disable Bluetooth From Automatically Starting At Boot:

Yeah, that’s longer than it should be. Oh well… Blame the need to optimize for keywords! I try to keep ’em shorter, but here we are…

This article requires an open terminal, like many other articles on this site. If you don’t know how to open the terminal, you can do so with your keyboard – just press CTRL + ALT + T and your default terminal should open.

With your terminal open, let’s first check the Bluetooth service status:

It may or may not be running. If it’s not running, odds are that Bluetooth isn’t set to automatically start at boot. You can ensure that it’s not set to automatically start with the following command:

Now, that’s the command you probably want. It’ll disable Bluetooth from automatically starting at boot – and it will still let the Bluetooth service start if you want it to later or if something else in the system calls for it to start. You can reboot and make sure the setting has changed, if you’d like.

On the other hand, if you ‘mask’ the service, like we did in the How To: Disable Sleep And Hibernation on Ubuntu Server article, you won’t be able to start the service at all. That’s the biggest difference between ‘disable’ and ‘mask’, in case you’re curious. Both of these options are better than manually deleting the services, ’cause you can undo the setting fairly easily. In fact, to do so with the Bluetooth service, you just:

After which, you should check the status again:

And all should be well. You can now reverse it after you’ve chosen to disable Bluetooth from automatically starting at boot. See? Pretty easy and handy information to have for other services. By the way, if you chose ‘mask’ then you’d ‘unmask’ the service, which seems like an obvious way to do it.

Closure:

See? I told you that this one would be pretty quick and easy. I’m kinda amazed that I haven’t run out of ideas for articles yet! I’m still chugging along, well after the initial year-long scope for the site. If I can do it, anyone can! I’m still very much open to guest articles, within reason.

Thanks for reading! If you want to help, or if the site has helped you, you can donate, register to help, write an article, or buy inexpensive hosting to start your own site. If you scroll down, you can sign up for the newsletter, vote for the article, and comment.

How To: Create Custom Welcome Message In Your Terminal

In today’s article, we’ll teach you how to create a custom welcome message in your terminal. This could be useful or playful. What you do with this power is entirely up to you. After all, that’s the whole point of ‘custom’!

It’s not terribly difficult and there’s some fun to be had with this exercise. Basically, we’ll be making it so that you get a custom message (including action) that is output whenever you open up a new terminal.

You can make the terminal do all sorts of things by editing your ~/.bashrc file. That’s how we’ll create a custom welcome message in your terminal. It’s not dreadfully difficult but it will help make your system feel like your own and, to some people, that’s one of the greatest things about Linux.

So, how about I show you how I customized my welcome message in the terminal? You can use my example as a brief template to use yourself, when you create your own custom welcome message. It’s something even a new Linux user can do!

Create Custom Welcome Message

The file we’re going to be using for this is .bashrc, located in your home directory. So, the path to that file will be ~/.bashrc. If you don’t know, dot files (those starting with a period) are considered hidden. Unless you’ve opted to do so, these files will not show up in your file manager. We can still access ’em just fine in the terminal, when we use their path.

The tool we’re going to use is ‘nano‘. It’s an acceptable tool for this, and many other things, but you could just as easily substitute a GUI text editor. In this case (so long as you can see the hidden files) you don’t need to edit in the terminal – and you don’t even need to use ‘sudo’ for anything, because the files you’re editing belong to you in the first place!

Let’s get to editing – as it’s easy and I need to show only a couple of commands in order to demonstrate the feature. We’ll do it in nano, of course. That requires an open terminal, so just press CTRL + ALT + T and your default terminal should open.

With your terminal open, enter the following command:

Once that’s open, add the following lines:

Then you’ll save that with nano – which is done by pressing CTRL + X, then Y, and then ENTER. That’ll save the file – but you still need to tell the system how to use it. You need to tell bash to look for the new source and that’s done with:

That reloads the changed file. Close your terminal and open it again to see the new custom welcome message. In this case, it’d look a bit like this:

custom welcome message
See? You now have a custom welcome message in the terminal! Tada!

Obviously, you can customize those two commands, add more commands, and generally craft the custom welcome message you want to see when you open the terminal.

Just remember… You have to save the changes and then you need to reload the changes with source ~/.bashrc in order to make sure they work. You have to save the changes and reload the source with every change. You’ll see the changes when you next open the terminal. The two commands I chose should be self-explanatory, you can use them as an example for the commands you want to use to make your custom welcome message.

Closure:

There you have it, another article said and done! This one shows you how to make a custom welcome message in your terminal. Is this a useful skill? Well, not necessarily – but it is a way to make Linux a little more your own. It’s an easy way to customize Linux. Enjoy!

Thanks for reading! If you want to help, or if the site has helped you, you can donate, register to help, write an article, or buy inexpensive hosting to start your own site. If you scroll down, you can sign up for the newsletter, vote for the article, and comment.
Disable Printing And CUPS.

I don’t print much of anything these days, and haven’t for a long time, and on older hardware I’d disable printing by disabling CUPS. I’ve also found printing enabled on server installs. That doesn’t seem like a good default to me, but I’m definitely not an expert. 

If you don’t need to print, you don’t need the CUPS services running. Today, we’ll discuss disabling it. We could mask the services, like we did in the article about disabling sleep/hibernation. Instead of doing that, we’ll use this as an opportunity to show how to disable a service. That seems like a reasonable choice.

If you don’t know, Linux printing is (usually) controlled by CUPS. CUPS is developed by our friends at Apple. CUPS has actually been around since the late 90s and has pretty much become the default printing system. If you check the man page, it defines itself like:

cups – a standards-based, open source printing system

And the description:

CUPS is the software you use to print from applications like word  processors, email readers, photo editors, and web browsers. It converts the page descriptions produced by your application (put a paragraph here, draw a line there, and so forth) into something your printer can understand and then sends the information to the printer for printing.

If you don’t print from your system, you don’t need the service running. Back when I cared about optimization, this would be something I’d disable. I’m not sure that it ever did much good at making things run faster, but it definitely made me feel like I was doing something!

Disable Printing/CUPS:

Like many other articles on this site, we need an open terminal. You can open a terminal with your keyboard – just press CTRL + ALT + T. That should do it!

Now, with your terminal open, we just need to enter a few commands. Just in case, we should first make sure to stop any of the printing services. To do that, you run the following:

If you did it right, you’ll get no feedback. We also need to stop ‘browsed’ (the daemon that broadcasts/receives broadcasts from remote printers) with:

Again, nothing should show up on your screen. You’re also done stopping any of the printing services and the next step will be to disable those services. It’s pretty easy – you just replace the stop with disable. It looks like this:

And again for the daemon:

That should do it, actually. You should now no longer be able to print from your device. This could even be an additional security setting for times when you don’t want basic users to be able to print sensitive information while still keeping a printer up on the network. If the system can’t print, you don’t have to worry about them acquiring the print credentials. For those who’ve covered the costs of a ‘print room’, you might even see some benefits on the bottom line!

Closure:

See? That was a nice and easy article. It’s not even all that long! Heck, the stuff around the commands is more complicated than the commands themselves! Now that I think about it, that kinda describes a bunch of these articles. I can’t write essays every day! Besides, who would read them?!?

Thanks for reading! If you want to help, or if the site has helped you, you can donate, register to help, write an article, or buy inexpensive hosting to start your own site. If you scroll down, you can sign up for the newsletter, vote for the article, and comment.

Let’s Install ‘gedit’ With All The Fixin’s In Ubuntu

This article is going to tell you how to install gedit along with a bunch of plugins. There are many text editors out there, but gedit is a popular choice. Many plugins exist to extend gedit, and this is an easy way to install a bunch at once.

Notes: This will only install the plugins in the default repositories. This article covers just Ubuntu, but will likely work with derivatives and even Debian.

gedit, the default editor for the Gnome desktop environment, is a part of the GNOME Core Applications and is available in almost every distro, at least every major distro. The gedit text editor doesn’t need a lot of additional dependencies, which helps make it useful on almost any desktop environment.

You can use gedit for anything – from programming, to writing markup for your website. You can use it just like you would any other plain text editor. There are many ways to extend it, to add functionality not included by default, and that is with plugins.

There are plugins to highlight syntax, to auto-complete words, to auto-close brackets, etc. You can make gedit do all sorts of things you’d not expect from a plain text editor. 

Disk space is absurdly cheap these days, so I don’t see any reason to not install as many plugins as I can, and no reason to not do it all at once. I may not use them all, but I’ll use many of them and I can just not enable those that I don’t want to use. I may have a reason to use them later on. You never know!

Well, this article will help you install gedit and all the plugins your system can find!

Install gedit With Plugins:

Like always, you need an open terminal and you can do that with your keyboard by pressing CTRL + ALT + T and enter the following:

What’s going on with that command? You can string together requests with apt, and this is installing gedit first, then a pack of common plugins, and then every other plugin that uses the ‘gedit-plugin-*’ format. It checks for all software with that naming pattern and installs them if they’re not already installed and have satisfied dependencies.

By the way, the asterisk is known as a wildcard. A wildcard basically means, “any character.” So, foo* is anything from fool to foolish, and foob* is anything from foobar to foob-gibberish or whatever. 

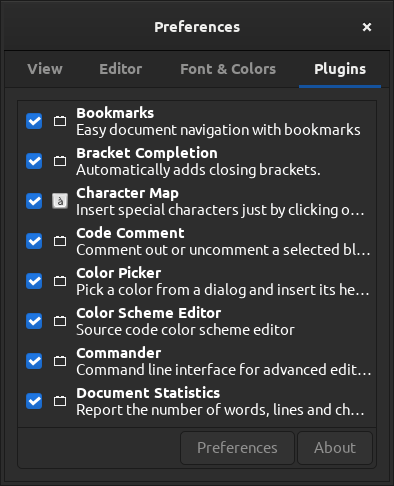
It should be noted that this only installs the plugins. You still can’t use them until after you enable them. To enable them, you need to open ‘gedit’ (which will almost certainly be called “Text Editor” in your menu) and click on preferences, where you can navigate to the right-most tab and enable them as needed. It looks like this:

gedit preferences
Select plugins ’til you’re satisfied!

Anyhow, if you did this properly,  you will now have a bunch of plugins enabled. Is this a bit of overkill? Perhaps, but disk space is cheap and the entire thing takes up less than 19 additional MB on my system. You might as well do it all at once. 

Closure:

And there you have it. You now have gedit installed along with a bunch of gedit plugins. It’s really not all that difficult and there’s no real huge hit on performance or resources. Heck, it doesn’t even take all that long!

Thanks for reading! If you want to help, or if the site has helped you, you can donate, register to help, write an article, or buy inexpensive hosting to start your own site. If you scroll down, you can sign up for the newsletter, vote for the article, and comment.

Customize Your GNOME Desktop With GNOME-Tweak-Tool In Ubuntu

The GNOME-tweak-tool is a valuable tool to modify and manage your GNOME desktop environment. The application is easily installed, easily used, and generally safe to use. This article will help you get the tweak tool installed and explain why you might want to do so.

If you know about it already, you may know it as ‘Tweaks‘, it’s current name. I’ve chosen to use the older name for search reasons. I want to cover the tool not just for new users, but also for older users who may need a reminder. Doing it this way should cover all the bases, though my SEO “skills” are still in the ‘wing it’ phase. Plus, see the installation command below.

I don’t cover GNOME very often. Truth be told, I’m not a huge fan. However, I’d be overlooking a large number of users if it wasn’t mentioned from time to time. GNOME originally stood for GNU Network Object Model Environment, though that was dropped when the focus of the project changed. It’s one of the more popular desktop environment options out there, and is a default for a number of distros – including Ubuntu. 

With GNOME comes a lot of support resources, as it is so widely used, and even has the ability to use extensions. It’s a weighty desktop with a number of great features that are beyond the scope of this article. People sometimes complain about how GNOME does things, and the lack of easy customization, but when you use GNOME you’re buying into the entire GNOME philosophy. “In for a penny, in for a pound.” 

But, we’re Linux users. If there’s one thing we have (just shy of universally) in common across the board, it is that we like to customize our experience. We like to tinker and to make things our own. Well, GNOME-tweak-tool will help you with that. It’ll help you make the GNOME desktop your own.

Install GNOME-tweak-tool:

The GNOME-tweak-tool should be available for any distro that’s using GNOME as its desktop environment. You don’t want to try using the tweak-tool while using a different desktop environment, even if that desktop environment is based on GNOME.

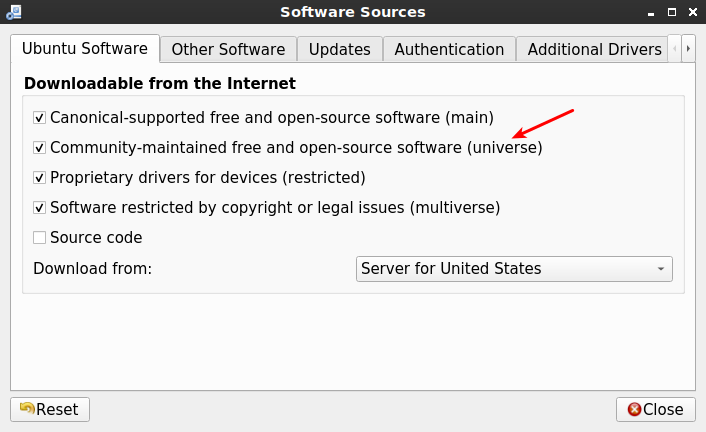
For the sake of this exercise, we’ll assume you’re using Ubuntu. With Ubuntu, you’ll need the Universe repository enabled. You may have that enabled already, but you can check under “Software Sources” easily enough. It’d look like this:

software sources, universe enabled
See? You can just click a button to do this! Nice and easy!

Once you have the correct software source (repository) enabled, you can go ahead and get the GNOME-tweak-tool installed easily enough. Crack open your terminal by pressing CTRL + ALT + T and then enter:

That should install the tool and make it available in your menu. To find it in your application menu, you can search visually or just type “tweak” and it will narrow the results down to show you just the application.

If you’re using a different distro, one not based on Ubuntu, you’ll need to adjust the installation command. If you use dnf or zypper, you’ll need to adjust the command to suit those package managers. While this article specifically covers Ubuntu, it should be easy to do this with other distros as well.

Why The GNOME-tweak-tool:

The GNOME-tweak-tool actually does a bunch of things and is full of options. I’ll go ahead and list some of the options and, seeing as I’m looking at an Ubuntu VM as I write this, I might as well go in order.

  • Change animations and suspend when closing your laptop’s lid.
  • Change application themes, background images, icons, etc.
  • Add/remove desktop items, app indicators, or a dock.
  • Adjust system-wide fonts.
  • Change keyboard and mouse settings, disable touchpad while typing.
  • Add/remove startup applications.
  • Change the top bar, maybe adding/removing battery monitor, etc.
  • Change titlebar actions and buttons.
  • Modify window behavior, including click and focus actions.
  •  Modify workspaces, adding and removing them.

As you can see, there are quite a few tweaks available and they’re all available in a single place. Some of those settings may be in other places, but this puts them all into one place.  The GNOME-tweak-tool is a pretty decent way to customize your GNOME desktop environment, an easy way to make it your own.

If you’re a GNOME user, this may well be just the tool you’re looking for. New users are often exposed to Linux with GNOME as their first desktop. If you’re one of those people, you’ll likely enjoy this chance to customize your experience.

Closure:

There you have it! It’s an article about GNOME-tweak-tools. As y’all know, and as mentioned above, I don’t particularly like GNOME. It’s just not my cup of tea and I don’t fit well in the whole ‘GNOME experience’. And, you know, that’s okay. We don’t all have to agree. If we did, there’d only be a single DE to pick from. We don’t want that.

Thanks for reading! If you want to help, or if the site has helped you, you can donate, register to help, write an article, or buy inexpensive hosting to start your own site. If you scroll down, you can sign up for the newsletter, vote for the article, and comment.

Linux Tips
Creative Commons License
This work is licensed under a Creative Commons Attribution 4.0 International License.