How To: Create Custom Welcome Message In Your Terminal

In today’s article, we’ll teach you how to create a custom welcome message in your terminal. This could be useful or playful. What you do with this power is entirely up to you. After all, that’s the whole point of ‘custom’!

It’s not terribly difficult and there’s some fun to be had with this exercise. Basically, we’ll be making it so that you get a custom message (including action) that is output whenever you open up a new terminal.

You can make the terminal do all sorts of things by editing your ~/.bashrc file. That’s how we’ll create a custom welcome message in your terminal. It’s not dreadfully difficult but it will help make your system feel like your own and, to some people, that’s one of the greatest things about Linux.

So, how about I show you how I customized my welcome message in the terminal? You can use my example as a brief template to use yourself, when you create your own custom welcome message. It’s something even a new Linux user can do!

Create Custom Welcome Message

The file we’re going to be using for this is .bashrc, located in your home directory. So, the path to that file will be ~/.bashrc. If you don’t know, dot files (those starting with a period) are considered hidden. Unless you’ve opted to do so, these files will not show up in your file manager. We can still access ’em just fine in the terminal, when we use their path.

The tool we’re going to use is ‘nano‘. It’s an acceptable tool for this, and many other things, but you could just as easily substitute a GUI text editor. In this case (so long as you can see the hidden files) you don’t need to edit in the terminal – and you don’t even need to use ‘sudo’ for anything, because the files you’re editing belong to you in the first place!

Let’s get to editing – as it’s easy and I need to show only a couple of commands in order to demonstrate the feature. We’ll do it in nano, of course. That requires an open terminal, so just press CTRL + ALT + T and your default terminal should open.

With your terminal open, enter the following command:

Once that’s open, add the following lines:

Then you’ll save that with nano – which is done by pressing CTRL + X, then Y, and then ENTER. That’ll save the file – but you still need to tell the system how to use it. You need to tell bash to look for the new source and that’s done with:

That reloads the changed file. Close your terminal and open it again to see the new custom welcome message. In this case, it’d look a bit like this:

custom welcome message
See? You now have a custom welcome message in the terminal! Tada!

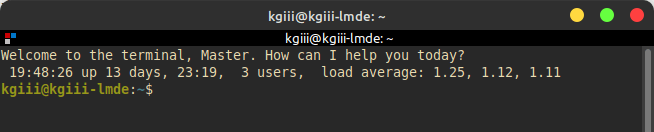
Obviously, you can customize those two commands, add more commands, and generally craft the custom welcome message you want to see when you open the terminal.

Just remember… You have to save the changes and then you need to reload the changes with source ~/.bashrc in order to make sure they work. You have to save the changes and reload the source with every change. You’ll see the changes when you next open the terminal. The two commands I chose should be self-explanatory, you can use them as an example for the commands you want to use to make your custom welcome message.

Closure:

There you have it, another article said and done! This one shows you how to make a custom welcome message in your terminal. Is this a useful skill? Well, not necessarily – but it is a way to make Linux a little more your own. It’s an easy way to customize Linux. Enjoy!

Thanks for reading! If you want to help, or if the site has helped you, you can donate, register to help, write an article, or buy inexpensive hosting to start your own site. If you scroll down, you can sign up for the newsletter, vote for the article, and comment.

Let’s Learn How To Change The Default Terminal

There are many reasons why you may want to change your default terminal emulator. It’s actually nice easy to change the default terminal. This article explains how and anyone should be able to do it, even a beginner!

First, it’s often called a terminal emulator because it allows you to emulate the terminal in a graphical environment. There are other ways to refer to it, but just calling it the terminal is usually enough for all but the most pedantic. We’ll mostly just call it the terminal from here on out.

The people who put your distro together also picked the default terminal. It’s usually a basic terminal, and often just a terminal that has been around for a long time. That’s not a bad thing, but there may be better terminals than the default. There are terminals with all sorts of features, from multi-window terminals to terminals that support drag-and-drop!

Perhaps you might like XFCE-terminal, or you may prefer Terminator? Maybe you’d like Guake or TildeThe choices for new terminals are vast, and Wikipedia has a ton of them listed.

You can find even more by using your favorite search engine and searching for Linux terminals. Someone is always writing a new terminal and you can pick a new one to be your default terminal any time you want. There’s bound to be one out there ticks all your boxes.

If you want to open your default terminal, you can usually use your keyboard. Just press CTRL + ALT + T and it should open your terminal. If you don’t like the default, you can make any other terminal your default.

Change the Default Terminal:

For the purpose of this exercise, we’ll start with assuming you’re using Ubuntu and that you want to install Terminator and then set Terminator as the new default. However, aside from the initial installation command, it should work for other distros just fine. In fact, the installation command will work for most any distro that uses the apt package manager.

So, seeing as you opened the terminal up above, we’ll just skip right ahead to installing our example, Terminator:

Go ahead and let it finish the installation after you enter your password and agree to install it. Terminator should be in your default repositories and easily installed. This is true even if you’re not using Ubuntu or an Ubuntu derivative.

Once you’ve done that, you will need to set Terminator as the new default. To do that, run this command:

That should bring up some information that looks a little like this:

change default terminal emulator

From there you just pick the number of the terminal emulator you’d like to be the new default and press enter. That’s it. That’s all you should need to do.

You can test this by simply using your keyboard to open the default terminal like you did in the first section of this article. Once you’ve made the change, it should take effect immediately and the new default terminal should open up when you next open the terminal with the keyboard. You’ll still have the old links to the original default, but you can move those around at your leisure.

Closure:

And there you have it. That’s how you change your default terminal emulator. It’s not terribly difficult but it’s a quick and easy step you can take to make your Linux a little more customized, a little more something of your own. If you have any ideas for articles, feel free to leave a comment suggesting them. We’ll see what we can do!

Thanks for reading! It’s truly appreciated and there have been a lot of readers lately. If you want to help, or if the site has helped you, you can donate, register to help, write an article, or buy inexpensive hosting to start your own site. If you scroll down, you can sign up for the newsletter, vote for the article, and comment.

How To: Rename Your Network Adapters in Ubuntu

For whimsy, or for whatever reasons you dream up, you may want to rename your network adapters in Linux. Well, you can. This article will explain how to rename your network adapters, from perhaps eth0 to whatever you want.

I can only be certain that this works in current Ubuntu LTS – 20.04, I didn’t test with any other distros. It’s pretty safe to assume that it will work with most distros out there.

Notably, I am just pulling this from my notes. I forgot why this is in my notes and I really can’t think of too many reasons why you’d need to rename your network adapters. Still, there’s at least one person who needed to know this information, else it’d probably have not been in my notes. It’ll almost certainly work with Debian, Mint, Pop!_OS, and others in that family of operating systems.

This article should be fairly short and will suggest the use of ‘inxi‘. As this article is based around Ubuntu, you can go ahead and install it with:

It’s a lightweight application that spits out a ton of information. I think it should be installed by default, but not all distros do. If you’re trying this with a non-Ubuntu distro, and one without apt, just adjust the installation method for your package management system. It’s almost certainly in your default repositories.

Rename Your Network Adapters:

The first thing you’re going to need to do is open your terminal. If you just installed inxi, you may well have your terminal already open. If not, you can open it with your keyboard. Just press CTRL + ALT + T and it should pop right open.

Once you have the terminal open, we’re going to use ‘inxi’ to get some information. The command you’re looking for is:

Specifically, you’re looking for the networking section. It should look a little something like this picture:

network information
Note the arrows. You need those two pieces of information.

You’re looking for the name of the adapter and the MAC address. You’ll want both of those bits of information, so you might as well keep that terminal open and open up another one. That’ll be easiest, as you can then just copy and paste the data in the next step.

Now, you need to create and edit a file. We can more or less do this with a single step. In the 2nd terminal, use this command:

Once that is open, you want to add some text to it. This is the template:

Now, to use that template, you insert the MAC address that you got from the inxi command where you see <mac_address>.

The <device_name> is a bit more tricky. It’s usually the first three letters – and don’t forget to leave the asterisk there. So, if you use my image above, you’ll see it’s wlo1. To change it, you’d just use ‘wlo*’. If it’s ‘eth0’ for your network adapter then you’d change it to ‘eth*’ being careful in all instances to keep the asterisk.

The last field to change is the name. You can stick anything you want in that field. So, for me, the command will look like this:

Yes, yes I really did name it booger. I’m pretty much a giant five year old.

When you’re done, save it. Just press CTRL + X, then Y, and then ENTER to save it with nano. As it’s creating a new file, it may ask if you want to create said file and you should (of course) say yes.

That’s it! Just reboot and you should see that you managed to successfully rename your network adapter. If it doesn’t work, double-check to make sure you got the device name and MAC address correct and reboot again. Done successfully, it looks like this:

renamed network adapter
Yes, yes I really did name it ‘booger’ – but only in a virtual machine.

See? It works!

Closure:

Again, I’ve only tested it in Ubuntu – so it’ll likely work with any Ubuntu derivative, should work for Debian, and will probably work with any other mainstream distro. I forget why it was in my notes, but I’m sure it was useful for someone. Maybe they just needed a name they could recall a bit easier, perhaps for their wireless connection and they wanted to connect to it in the terminal instead of keeping it always connected? I dunno… It was in my notes, it’s now online.

Either way, there’s another article. Thanks for reading! If you want to help, you can donate, register, write an article, or buy cheap hosting. When you scroll down, you can comment, vote for the article, or sign up for the newsletter. Should you sign up for the newsletter, I won’t share your information with anyone else and I won’t send you any spam.

Subscribe To Our Newsletter
Get notified when new articles are published! It's free and I won't send you any spam.
Linux Tips
Creative Commons License
This work is licensed under a Creative Commons Attribution 4.0 International License.