How To: Show Your Network Interfaces

Today’s article will be fairly simple, where we learn a couple of ways how to show your network interfaces. It won’t be a very long article, nor will it be all that complicated. Like almost always, today’s article will involve the terminal. So, if you want to learn how to show your network interfaces, read on!

A network interface is what’s used to connect your computer to a network. Depending on your configuration, you may have both real and virtual network interfaces. The real network interfaces will be things like your ethernet (the wired connection to the network) and a wireless device (a radio-controlled network interface).

There are times when you’ll want to know your network interface, be it for debugging or monitoring. For example, you’ll probably want to know about your network interfaces if you’re playing around with VNStat.

We’ve probably touched on this subject in a few articles. However, we might as well have an article specifically answering the question of how to show your network interfaces. Well, then, that’s what this article will cover.

Show Your Network Interfaces:

As mentioned in the intro, we’re going to be using the terminal. If you’re a regular reader, you’re probably used to it and a little tired of the same old text. Not all my readers are going to be as proficient, so they should know that they can just press CTRL + ALT + T and your default terminal should open.

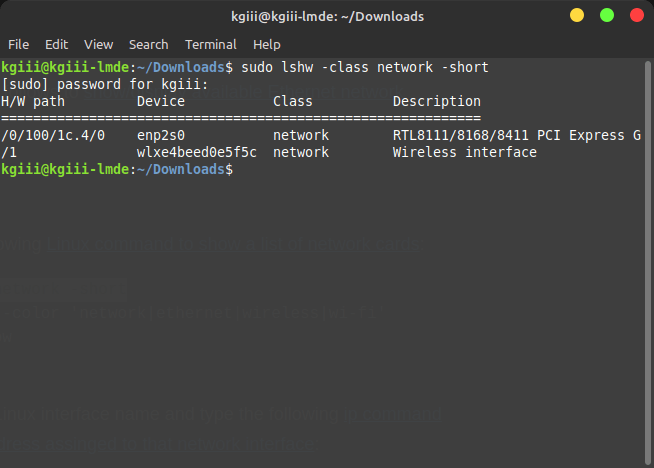
With your terminal now open, your next step mostly depends on your chosen distro and the age of the default installed tools. If you’re using an older distro, you can go with this command:

If you’re using a distro with more current tools, you will likely find that ‘ifconfig’ has been deprecated, that is no longer current and in use. For you folks, you’ll need a slightly longer command:
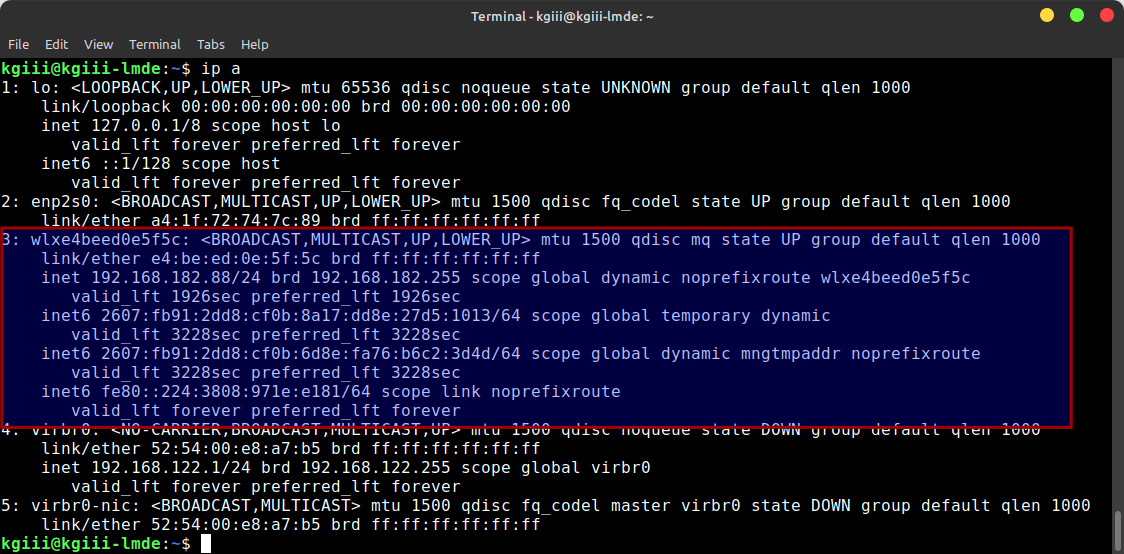
So, if you want to show your network interfaces, one of those two commands will likely get you there. You should check the information carefully, to make sure you’re using the correct information, such as when you want to use a network interface name for another command.

Closure:

There you have it… You have another article! This time, we’ve decided to spend some time learning how to show your network interfaces. It’s nothing complicated, but it’s still useful information. It is indeed a fairly short and simple article, but that means newer users can follow along – which is a good thing. I’m sure there are other ways to gather this information, but one of those two commands should do the trick!

Thanks for reading! If you want to help, or if the site has helped you, you can donate, register to help, write an article, or buy inexpensive hosting to start your own site. If you scroll down, you can sign up for the newsletter, vote for the article, and comment.

Bring Your Network Up Or Down (In The Terminal)

In today’s article, we’re going to learn how to bring your network up or down – in the terminal, of course. This will be an article that’s easy enough for a beginner to understand. It’s not very complicated, so it should also be fairly short. If you’re interested in bringing your network up or down in the terminal, read on!

There are times when you may want to bring your network down and then bring it back up. Odds are that you can do this with a GUI, often with a network manager right there in your system tray.

You can also do this in the terminal. This is especially handy if we’re unable to reach a graphical state and need a network connection for things like updating and troubleshooting. We will use the ‘ip’ command for this, which is a pretty robust command. The ‘ip’ command describes itself as:

ip – show / manipulate routing, network devices, interfaces and tunnels

That’s an accurate description and we will indeed be manipulating network interfaces in this article. We will also be showing network interfaces in this article.

If you’d like to get a head start, you can read the man page:

That command will show you all the available options for the ‘ip’ command. We’ll just be using a couple of the commands, so it won’t be all that complicated or stressful.

Bring Your Network Up Or Down:

As the title suggests, we’ll be managing our network interfaces from the terminal. This means you’ll need to open your favorite terminal emulator at this point. If you don’t know how to open the terminal, you can do so with your keyboard – just press CTRL + ALT + T and your default terminal should open.

With your terminal now open, you should identify your network interfaces. We can do this with the ‘ip’ command, like so:

Or just:

Hint: The connected device(s) will be those with the most information output. Like the wireless network interface in the following image:

output of the 'ip addr' command
As you can guess, that rectangle is a good indicator that it’s the ‘up’ network interface.

Now, if the network interface is down and you want to bring it up. The command is quite simple, it’s just:

So, in my case, the command would look like this:

If you wanted to bring it down, and mine is already up, the command would look like this:

With that, you can bring your network up or down as desired, and from the terminal. It’s not very difficult at all.

If you’re using an older distro, you might still be using ‘ifconfig’. If you are, the commands are a little different, and I include these only for completeness’ sake and would look like this:

And, of course, to bring the network interface down:

So, that’s not too dissimilar to the more modern ‘ip’ command and is still worth mentioning. For a while, as ‘ifconfig’ was sunsetted, you could use both commands with the Ubuntu flavors. In current versions of Ubuntu, you only have the ‘ip’ command available unless you install ‘net-tools’ for some reason.

Closure:

And there you have it! You can now bring your network up or down in the terminal, and it’s not even all that difficult. It’s yet another article and yet another skill you can add to your growing toolbox of commands. It’s just a subset of the things you can do with the ‘ip’ command, but it’s one of the more useful things you can do with it. So, there’s that…

Thanks for reading! If you want to help, or if the site has helped you, you can donate, register to help, write an article, or buy inexpensive hosting to start your own site. If you scroll down, you can sign up for the newsletter, vote for the article, and comment.

Find Your Network Interface Name

There are all sorts of reasons why you might want to know your network interface name. It comes in handy with things like ‘vnstat‘, for example. In fact, I wrote an article about changing the network interface name. (There’s sometimes a reason why I write articles in the order I write ’em!)

Like I said, you may want to know this information for other purposes. In your general day-to-day computing, the network interface name is entirely unimportant. As you’ve seen from previous articles, it may come to pass that you need to know the name and this article will explain how to find that.

Anyhow, this one is quick and easy. I’m just going to show you some easy ways to find your network interface name. This should be pretty brief and simple enough.

Your Network Interface Name:

Like oh so many articles, this too requires an open terminal. Sure, there are GUI methods to find your network interface name, but we might as well do it in the terminal. So, use your keyboard and press CTRL + ALT + T. With your terminal open, you can start with:

With any luck, this should be enough. You’ll get something that looks like this:

network interface name
See the handy arrow? That’ll help! That’s the network interface that’s up and connected.

As you can see by the arrow, that’ll clue you into which connection is in use at the time. If that doesn’t work, you can also try this command:

The output from this will look similar to this:

lshw showing network interface names
A keen eye will note that there are multiple devices listed!

As you can see, that’s from a different device with a different operating system. It also relies on ‘lshw’ which you may or may not have access to.

You can also try:

Some of those commands will show the ‘lo’ connection, which is just a loopback connection and immaterial for this purpose. You can safely ignore that.

Anyhow, those will show you your network interface names. If you have more than one, it’ll happily show them all – and give you a clue as to which one is up. If you have both connected, say wireless and wired, then it will say both are up. This information isn’t very useful by itself, but it is useful for other purposes.

There are other ways, so feel free to leave a comment showing how you find your network interface name.

Closure:

See? I told you this one would be quick and easy. There’s not much to it, but it’s a useful bit of information to know and now you know that this is how you find your network interface name. It’s not much of an article, but it’s yet another in what’s hopefully a long list of ’em! They can’t all be huge pieces!

Thanks for reading! If you want to help, or if the site has helped you, you can donate, register to help, write an article, or buy inexpensive hosting to start your own site. If you scroll down, you can sign up for the newsletter, vote for the article, and comment.

How To: Rename Your Network Adapters in Ubuntu

For whimsy, or for whatever reasons you dream up, you may want to rename your network adapters in Linux. Well, you can. This article will explain how to rename your network adapters, from perhaps eth0 to whatever you want.

I can only be certain that this works in current Ubuntu LTS – 20.04, I didn’t test with any other distros. It’s pretty safe to assume that it will work with most distros out there.

Notably, I am just pulling this from my notes. I forgot why this is in my notes and I really can’t think of too many reasons why you’d need to rename your network adapters. Still, there’s at least one person who needed to know this information, else it’d probably have not been in my notes. It’ll almost certainly work with Debian, Mint, Pop!_OS, and others in that family of operating systems.

This article should be fairly short and will suggest the use of ‘inxi‘. As this article is based around Ubuntu, you can go ahead and install it with:

It’s a lightweight application that spits out a ton of information. I think it should be installed by default, but not all distros do. If you’re trying this with a non-Ubuntu distro, and one without apt, just adjust the installation method for your package management system. It’s almost certainly in your default repositories.

Rename Your Network Adapters:

The first thing you’re going to need to do is open your terminal. If you just installed inxi, you may well have your terminal already open. If not, you can open it with your keyboard. Just press CTRL + ALT + T and it should pop right open.

Once you have the terminal open, we’re going to use ‘inxi’ to get some information. The command you’re looking for is:

Specifically, you’re looking for the networking section. It should look a little something like this picture:

network information
Note the arrows. You need those two pieces of information.

You’re looking for the name of the adapter and the MAC address. You’ll want both of those bits of information, so you might as well keep that terminal open and open up another one. That’ll be easiest, as you can then just copy and paste the data in the next step.

Now, you need to create and edit a file. We can more or less do this with a single step. In the 2nd terminal, use this command:

Once that is open, you want to add some text to it. This is the template:

Now, to use that template, you insert the MAC address that you got from the inxi command where you see <mac_address>.

The <device_name> is a bit more tricky. It’s usually the first three letters – and don’t forget to leave the asterisk there. So, if you use my image above, you’ll see it’s wlo1. To change it, you’d just use ‘wlo*’. If it’s ‘eth0’ for your network adapter then you’d change it to ‘eth*’ being careful in all instances to keep the asterisk.

The last field to change is the name. You can stick anything you want in that field. So, for me, the command will look like this:

Yes, yes I really did name it booger. I’m pretty much a giant five year old.

When you’re done, save it. Just press CTRL + X, then Y, and then ENTER to save it with nano. As it’s creating a new file, it may ask if you want to create said file and you should (of course) say yes.

That’s it! Just reboot and you should see that you managed to successfully rename your network adapter. If it doesn’t work, double-check to make sure you got the device name and MAC address correct and reboot again. Done successfully, it looks like this:

renamed network adapter
Yes, yes I really did name it ‘booger’ – but only in a virtual machine.

See? It works!

Closure:

Again, I’ve only tested it in Ubuntu – so it’ll likely work with any Ubuntu derivative, should work for Debian, and will probably work with any other mainstream distro. I forget why it was in my notes, but I’m sure it was useful for someone. Maybe they just needed a name they could recall a bit easier, perhaps for their wireless connection and they wanted to connect to it in the terminal instead of keeping it always connected? I dunno… It was in my notes, it’s now online.

Either way, there’s another article. Thanks for reading! If you want to help, you can donate, register, write an article, or buy cheap hosting. When you scroll down, you can comment, vote for the article, or sign up for the newsletter. Should you sign up for the newsletter, I won’t share your information with anyone else and I won’t send you any spam.

Subscribe To Our Newsletter
Get notified when new articles are published! It's free and I won't send you any spam.
Linux Tips
Creative Commons License
This work is licensed under a Creative Commons Attribution 4.0 International License.