When you’re moving a lot of files around you might want to know the progress, so here’s how you monitor progress with rsync. This will likely be an intentionally short article, an easy article, as it’s another weekend article – this time about rsync and how you can monitor the progress.
The rsync application is a tool for transferring and synchronizing files between two places. It’s a very handy application and rsync has a whole lot of features. It’s possible to write a half-dozen rsync articles and not even scratch the surface. We’ve had rsync available since the mid-90s and you can visit the rsync project page.
You’ll almost certainly not need to install anything to use rsync. It’s pretty much available with every distro though I’ll mention ahead of time that this is a terminal-based application. By the way, if you’re not happy with your terminal, you can change to a new default terminal easily enough.
There are frontends for rsync, such as luckyBackup, but we’ll just be using a plain old terminal for this article. If you play with luckyBackup, you’ll discover that you can use it to spit out the actual rsync command you’ve configured and use it in the terminal without any additional overhead.
RSYNC:
If it’s not obvious, the tool we’ll be using is rsync. Specifically, we’re going to monitor the progress as rsync synchronizes your data from one place to another. It’s going to be a very easy article, I promise. Well, I think it’s easy. I suppose I could be wrong and you find it more difficult.
You shouldn’t need to install anything to follow along. You can first verify that you have rsync installed and available. Use this command:
1 | rsync --version |
If you don’t have rsync available immediately, I’m sure you can install it from one of your default repositories. If it’s not installed by default, let me know. I’m curious…
Anyhow, you can check the man page (with man rsync) to learn more about this application. It’s a rather long and complicated man page, but rsync is described as:
rsync – a fast, versatile, remote (and local) file-copying tool
And that’s what we want to do. We want to monitor the progress of file transfers. So, that’s what we’re going to do.
Except, I’m also going to show you how to make a simple backup of your data as a bit of bonus information. Let’s get on with it!
Monitor Progress With RSYNC:
Now, I did tell you that you’ll need an open terminal for this. That’s easily done. More often than not, you can open your default terminal by pressing
With your terminal now open, your standard command would be something like this following rsync command:
1 | rsync <file_location> <new_location> |
To monitor progress with rsync, you’d add the --progress flag, like so:
1 | rsync --progress <file_location> <new_location> |
That’s all well and good, but let’s pretend you want to make a backup of your home directory with rsync and that you want to monitor the progress. Well, you can happily use rsync with directories. This is going to be pretty easy!
1 | rsync -r --progress <home_directory> <new_location> |
The -r flag means ‘recursive’. That means it will include the files in the directory you specified, find the additional directories within that directory, and include those files. It will keep digging until there are no more directories unless you decide to specify a maximum depth.
Let’s further assume you have a USB device plugged in and you want to store your home directory on that USB. Let’s also assume that the USB’s called ‘backup’. The command for that would just be something very close to this command:
1 | rsync -r --progress ~/ /media/<username>/backup |
That might look something like this:
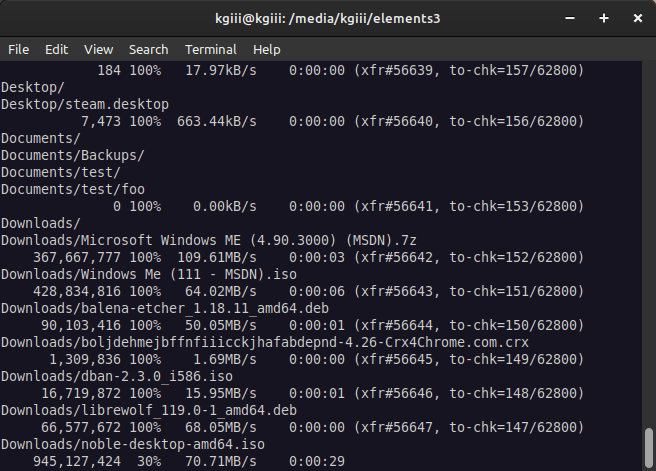
That command will move all the files from your home directory (as we know that ~/ is a short way to say your /home/user directory) to your USB device. You’ll have then backed up your personal data. The second time you run it, it will sync those files – only replacing those files that have changed since the last time you ran the command.
You can easily use that command (modified for your needs, of course) to make a backup of your home directory. This is the most important data on your system. The rest is just system files and those are easily restored with a fresh installation.
While it would be possible to use rsync to backup the entire drive, it’d try to do stupid things like backup the /media directory. You’d need an advanced command for that and that’s beyond the scope of this article.
As it stands, the backup bit is extra. This article is just about how you can monitor the progress with rsync. It’s a pretty trivial thing, but something you can learn about quickly.
Closure:
Yeah, it’s a pretty short and easy article. At least I hope it’s easy. I did make a promise, after all! This one should be easy enough for anyone because it’s not all that hard to learn how to monitor progress with rsync. Also, with a reasonably large file, you can do things like check transfer rates, be it over a network or from one drive to another. There’s all sorts of fun!
Thanks for reading! If you want to help, or if the site has helped you, you can donate, register to help, write an article, or buy inexpensive hosting to start your site. If you scroll down, you can sign up for the newsletter, vote for the article, and comment.