Today is another easy day, but one that should be productive, where we’ll learn how to return to the previous working directory. It will be a short article, but you might find it useful. If nothing else, we’re making the more terminal accessible to new users.
These Linux tips needed to be shared some time, so it might as well be now. I don’t wish to air my medical issues, but my ailment has gone on long enough and I went to a medical professional this morning. I’m sure I’ll be fine. They say only the good die young, so I’m probably gonna live forever!
Anyhow, to learn how to return to the previous working directory (in the terminal, of course), read on! I promise, it’s easy. It’s one simple command and that’s all there is to it.
Return To The Previous Working Directory:
This article requires an open terminal, like many other articles on this site. If you don’t know how to open the terminal, you can do so with your keyboard – just press CTRL + ALT + T and your default terminal should open.
This is probably more useful for very-nested directories with long names, but it won’t take that to demonstrate today’s subject. It’s not terribly complicated.
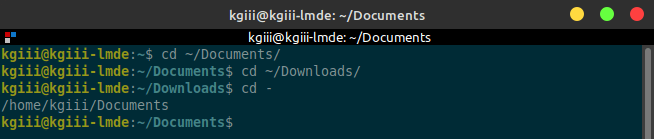
Let’s say that you’ve navigated to ~/foo and performed some functions there. Next, you’ve navigated to ~/bar and performed some functions there. Now, if you want to return to the ~/foo directory you can do so with just a simple – added to your cd command, like so:
1
cd -
If that’s confusing, I’ve made an image that explains it better than I can…
It’s a simple concept. It’s a simple article about how to return to the previous working directory.
See? It’s nice and simple! If you were in one directory and left to go to a new directory, then it’s trivial to return to the previous working directory. The image should help make it clear if my description is lacking.
(There are a whole lot of articles with the word ‘directory’ in them!)
Closure:
I know… I know… This is a lot of short articles in a row. I’ll feel better. I’m sure of it! Amusingly, I was asked if I had any stress in my life and it was comforting to answer that I do not. My life is pretty drama free, but I do need to get an article out every other day! This time, I’ve shown you a quick and easy way to return to the previous working directory. It’s quick, easy, and effective!
Thanks for reading! If you want to help, or if the site has helped you, you can donate, register to help, write an article, or buy inexpensive hosting to start your own site. If you scroll down, you can sign up for the newsletter, vote for the article, and comment.
Today is going to be another simple article, where you learn to navigate to the start or end of the line – in the terminal, of course. I’ve had some abdominal issues, so it seems like a good day for yet another accessible article.
Even though it’s an easy article, there will be many Linux users who don’t know this information. I’m not even sure how to describe it, thus the unwieldy article headline. So, if you want to navigate to the start or end of the line in the terminal, I’ll show you how.
This being Linux, there are so many ways to do this sort of stuff…
Imagine this:
You’re using Ubuntu and you want to update from within the terminal. So, you’ve typed the following:
1
sudo apt update && sudo apt upgrade -y
Well, as you can see, the first instance of ‘sudo’ was spelled wrong – it’s missing a letter. You can reach over there and find the arrow buttons, navigate back to the start of the line, and fix it. Or, you can do the following:
Navigate To The Start Or End Of The Line:
As the title indicates, this is in the terminal. As such, you’ll need an open terminal to try this out. Just press CTRL + ALT + T and your default terminal should open.
With your terminal now open, why don’t we just use that line from above:
1
sudo apt update && sudo apt upgrade -y
Of course, you could just look at your keyboard and (probably) use the HOME button to navigate to the start of the line. Of course, you could then use the END button to navigate to the end of the line. If you’re on a laptop, those keys can be placed most anywhere, though it’s far more standardized with a regular keyboard.
But, you don’t have to reach for those lines. Nope. That is not necessary. You can keep your eyes right on the screen. How so?
Well, it’s this easy:
To navigate to the start of the line, press CTRL + A.
To navigate to the end of the line, press CTRL + E.
Tada! You don’t have to root around for the home or end buttons. You don’t have to fuss with the arrow buttons. You can quickly and easily navigate to the start and end of the line with just those two keyboard shortcuts. I told you that it’d be quick and easy!
Closure:
There you have it, you have another article. This one is pretty simple but that’s okay. So long as it’s sharing some knowledge and I managed to get an article out on schedule, it’s all good by me. This time, you’ve learned how to navigate to the start of end of the line – in the terminal and without taking your eyes off the screen.
You might as well memorize the shortcuts as they appear to be pretty universal from my testing. They’ll likely be faster for you than any of the other methods, so they’re worth learning and adding to your growing toolbox of Linux tools. Ideally, my ailments will go away soon… I’m hopeful…
Thanks for reading! If you want to help, or if the site has helped you, you can donate, register to help, write an article, or buy inexpensive hosting to start your own site. If you scroll down, you can sign up for the newsletter, vote for the article, and comment.
Today’s article will be a nice and easy article, where we learn how to clear the terminal. That is, we will clear any typed text and returned information from the terminal. This will be a nice and quick article.
I am feeling like garbage today and I still need to edit the last article. Ugh… But, the show must go on!
This is what I get for not having scheduled a few articles ahead. Fortunately, I have short articles in mind. Today is a good day for just that.
It should be noted that clearing the screen doesn’t delete your scrollback history. Someone could come along and use the up arrow to see your previously typed commands. If you’re at your workstation then I guess you could consider this a privacy measure – but it certainly shouldn’t be considered much of a security measure.
So, as I said, it’ll be a short article. Let’s just jump into it…
Clear The Terminal:
This article requires an open terminal, like many other articles on this site. If you don’t know how to open the terminal, you can do so with your keyboard – just press CTRL + ALT + T and your default terminal should open.
Now, let’s generate some content… Run the following:
1
ls && uptime
That should fill up your terminal with stuff. Now, let’s clear the terminal. Type the following command:
1
clear
Tada!
But wait, there’s more!
Run those commands again. This time, and this appears to be pretty universal, just use your keyboard and press CTRL + L.
See? It does the same thing as you get when you type clear. Those are two ways for you to use when you want to clear the terminal.
Closure:
Yup… You’ve learned how to clear the terminal. I told you that it’d be a short article. It’s even an easy article. Now I’m going to lie down and hope for a nap.
Thanks for reading! If you want to help, or if the site has helped you, you can donate, register to help, write an article, or buy inexpensive hosting to start your own site. If you scroll down, you can sign up for the newsletter, vote for the article, and comment.
In today’s article, we’re going to learn how to disable specific terminal commands. It’ll be an interesting article because we get to explore some different tools. It might get a bit verbose, but I’ll do my best! It’s going to be a long article, but I’ll try to keep it at under 1500 words.
It should be noted that this is for people using the bash shell. As I don’t sway too far in that direction, I can’t vouch for it working with something like ZSH or similar. I simply haven’t tested. Feel free to try. I know some of the shell alternatives are compatible so you can check.
Read on to learn how to disable specific terminal commands!
Let’s say you don’t want your computer users (or you yourself) to run a command in the terminal. Well, you can stop that command from being run easily enough. To do this, we’ll explore some new concepts and tools. One of those topics is ‘aliases’. Let’s just start there…
About Bash Aliases:
In short, bash aliases are alternate ways to enter in a terminal command. You type one thing and the system interprets it as an alias for another command. Let me explain this bit further.
Let’s say you want to run the following command:
1
sudo apt update && sudo apt upgrade
Well, if you wanted to, you could assign an alias for those commands. If you wanted, you could even change your aliases so that all you had to type is:
1
update
You’ll run the full command when you’ve entered the alias. Aliases are basically little shortcuts to other commands, often used when you want to enter the command quickly and it’s a longer command. You can more or less alias anything with anything if you put enough effort into it.
Getting Ready For Aliases
Still with me? Alright, now you need an open terminal. If you don’t know how to open the terminal, you can do so with your keyboard – just press CTRL + ALT + T and your default terminal should open.
With your terminal now open, let’s check to see if you already have the necessary file. I am aware that you can just add aliases to your ~/.bashrc file, but this way avoids clutter and is more easily portable.
So, we need to check to see if you have ~/.bash_aliases. You can run the following command (from your home directory) to see if you already have the file you need. Simply run:
1
ls -la
Now, scan the output from that command. Do you see a .bash_aliases? If so, skip ahead. If not, you will need to create the file yourself. One way to do so is by using the following command:
1
touch ~/.bash_aliases
That command will create a blank file (named .bash_aliases) in your ~/ directory. It is the only file we needed to create and will be the only file we need to edit. You’ll also use nano, which my readers should be familiar with already. Don’t close your terminal yet, we’re still going to need it in the following section.
With just a few tools, we’ll learn how to stop specific terminal commands.
So then…
Disable Specific Terminal Commands:
I had to write that giant intro just to get a newbie up to speed. I’ve been meaning to explain aliases for a while, but I suspect the topic will get its own dedicated article. It’s a pretty broad subject.
For this next session, we’ll use a harmless ‘uptime’ command. Let’s just run that in the terminal just once:
1
uptime
Now, for whatever reason, we will have to pretend that you have decided you want to disable specific terminal commands and uptime is one of those commands. To do that, you’ll start with the following, editing the file you just created:
1
nano ~/.bash_aliases
You will want to start a new line and the command is formatted like so:
1
alias <shortcut>="<command>"
For example, you can have an alias like this one:
1
alias myip="curl https://icanhazip.com"
Save the file with nano. It’s not too daunting a task to save the file. To save a file in nano, all you need to do is press CTRL + X, then Y, and then ENTER
In the above example, if you were to type ‘myip’ into the terminal and run it, it’d almost run the command you told it to run.
You’re almost there. There’d be just another step.
You’ll have to reload the aliases before the system recognizes it as such. I’ll explain how to do that in a second.
Now, if you want to disable specific terminal commands all you need to do is fill the <command> section with a blank space or two. As it is our example, we don’t want the user running this uptime command, it’d look like this:
1
alias uptime=" "
See? Not all that complicated and we’re almost reaching the end – just one step further and your new alias will work as you’d expect – or not work, as one would expect in this case.
Make Your Alias Permanent:
First, to make that alias stick around you need to have saved the updated ~/.bash_aliases file as was explained above. At this point, the alias will not work. The file you wrote isn’t loaded into memory. It takes a bit more than that.
From here, you could close all your open terminals, log out and back, or reboot – any of those will reload your bash aliases. Alternatively, you can run the following command, which will refresh your terminal’s list of aliases. Like so:
1
source ~/.bash_aliases
If you’ve done everything properly, you’ll find that this happens when you try to next run the uptime command:
That’ll teach ’em from trying to run that pesky uptime command! Catastrophe averted!
But…
If you want to disable specific terminal commands, you might be wanting to do so for security reasons. The ~/.bash_aliases file is owned by the user, so the user can just edit the .bash_aliases file to remove your edit.
So, what can you do? You can make it permanent for everyone. You can add it to /etc/.bashrc, and a user with limited rights won’t be able to edit the file. If they can’t edit the file, they won’t be able to remove the alias. They won’t be able to use the terminal command(s) you’ve aliased to nothing. If you were to simply edit the /etc/bash.bashrc you’d just start a new line at the bottom and then insert the aliases using the same format.
I haven’t tested it, but I’d wonder if /etc/.bash_aliases might also do the trick in preventing user edits to override your changes. Feel free to test and then let us know. It’d be interesting if you could do something with /etc/skel/ and changing the file permissions – effectively for new users created.
Closure:
There… I think I’ve covered everything. I’ve wanted to write about the bash aliases subject for a while, but it’s just a bit complicated to explain. So, I figured I’d write this article. It’s a long one, but there’s a whole lot to cover. This goes into it pretty heavily, but an aliases-specific article might be nice to have.
Either way, you can now disable specific terminal commands. You can probably temporarily lock yourself out of your own system, so be careful with what aliases you add as system-wide aliases.
If you do lock yourself out, you should be able to boot to a live Linux disk where you’ll mount the drive and just revert your changes. But, anyone with physical access to your computer owns your computer, which is worth keeping in mind.
Thanks for reading! If you want to help, or if the site has helped you, you can donate, register to help, write an article, or buy inexpensive hosting to start your own site. If you scroll down, you can sign up for the newsletter, vote for the article, and comment.
In today’s article, we’re going to explore one way to find files owned by a specific user. We’ll be using the ‘find’ command for this exercise, which means it’s probably an article more for an intermediate user than a Linux beginner.
NOTE: This article is mostly a duplicate of an earlier article. I didn’t realize that until after I was done and hit the preview button. So, I saved it as an unpublished article, with the goal of just hitting the publish button (scheduling it, really) when I had a day where I was just otherwise occupied. Today is that day. After all, the “Big Game” starts in about 30 minutes.
But… I’ll do my best to make it one small bite that’s useful for beginners, but there’s no guarantee. I’ll see what I can do! So, if you want to play around with the ‘find’ command, read on!
The ‘find’ command does pretty much what you’d expect it to do, given the name. It’s used to find things – so you don’t have to stretch your imagination any to figure this command out based on the name.
You’ll find that ‘find’ describes itself succinctly, as this:
find – search for files in a directory hierarchy
See? Pretty much exactly as you’d expect. As you can also see, you’re probably gonna be asked to specify a directory. We can do that! Even you new Linux users can do that. I have faith in you!
So then, with that information freshly reviewed, there’s no reason to make the intro any longer. Let’s just jump into the article…
Find Files Owned By A Specific User:
If you’re a regular reader, you know what’s coming…
This article requires an open terminal, like many other articles on this site. If you don’t know how to open the terminal, you can do so with your keyboard – just press CTRL + ALT + T and your default terminal should open.
Let’s start by finding files owned by you in the ‘Downloads’ directory. With the open terminal, enter the following:
1
2
cd ~/Downloads
find . -user <username>
Now, the ‘.’ is telling the ‘find’ command to search the current directory. You have to specify the username. For example, with me, it’d be:
1
find . -user kgiii
You can also specify another user. Want to see if ‘root’ owns any of the files in your ‘Downloads’ directory? You can do that. Just change the username, like so:
1
find . -user root
Want to find all the files owned by root on the whole system? Well, you can do that – but it’s gonna be a whole lot of files and is going to take a while to run. You just specify the root directory (not to be confused with the root user). You do that like so:
1
find / -user root
In that command, you’ll notice we switched the path. We changed it to ‘/’ which is the root of the file system. You can be even find out if root owns any files in your user directory. Try this:
1
find ~ -user root
In my case, I’ve done things like compile and install software from my ~/Downloads directory, so I actually have files in there that are owned by root. If you’re a new user, you quite likely won’t have anything like that going on.
Play around with the ‘find’ command a bit, and it’ll become a bit more clear. Don’t forget to run man find to learn more about the command. There’s a lot more to it and it can be a pretty useful command.
Closure:
Anyhow, that’s a small bite of the ‘find’ command – but it’s a useful bite. The goal is to take a small bite and do what I can to make it approachable by even a new Linux user. Hopefully, I’ve done just that. Give me a yell if you think it worked – or if you think it didn’t work.
Thanks for reading! If you want to help, or if the site has helped you, you can donate, register to help, write an article, or buy inexpensive hosting to start your own site. If you scroll down, you can sign up for the newsletter, vote for the article, and comment.