Using The SSH Verbose Mode

That’s right, today’s article is going to be yet another SSH related article, this time it’s about using the SSH verbose mode. It’s handy for debugging SSH connections, plus the information can help you understand more about how SSH works. This is a fine article even for those just starting out with SSH and Linux.

I know, I know… I do a lot of SSH articles. In my defense, they’re fun – and there’s just so much to SSH that many people don’t know. It’s a tool that I use all the time, so it’s only natural that I share articles on the SSH subject. I’m bound to run out of ideas for ’em eventually.

For those that don’t know, SSH stands for “Secure Shell”. It’s a way to remotely control computers within the terminal – though you can actually forward some graphics applications over SSH.

If you’re unfamiliar with SSH, you might try reading some of these articles:

Install SSH to Remotely Control Your Linux Computers
Prevent SSH Root Login
Check Your SSH Server Configuration

Alternatively, you can search for SSH articles and discover quite a few other articles on the subject of SSH. As mentioned in the preamble, and I have gotten pretty formulaic, there are quite a few SSH articles.

There are quite a few SSH articles because there’s a lot to learn. You don’t start off by running, you start by stumbling a few steps and working your way up.

So, with all that in mind, let’s have another SSH-related article…

Using The SSH Verbose Mode:

This article requires an open terminal, like many other articles on this site. If you don’t know how to open the terminal, you can do so with your keyboard – just press CTRL + ALT + T and your default terminal should open.

Of course, you need a computer you can connect to with SSH installed. If you don’t have a remote device, you can enable SSH on your local computer and then just connect to user@localhost and practice all these remote commands.

There are three different modes in SSH verbose mode. They’re indicated with a -v, a -vv, and -vvv. To use them, the command would look similar to the following commanda:

In the first mode, that is -v, you get details about the client-side activities.

In the second mode, that is -vv, you get details about both the client-side activities and the server-side activities.

With the third mode, that is -vvv, you get even more details, more verbosity, about both the client-side and server-side activities. 

For example, this is some of the text output from a -v SSH verbose mode:
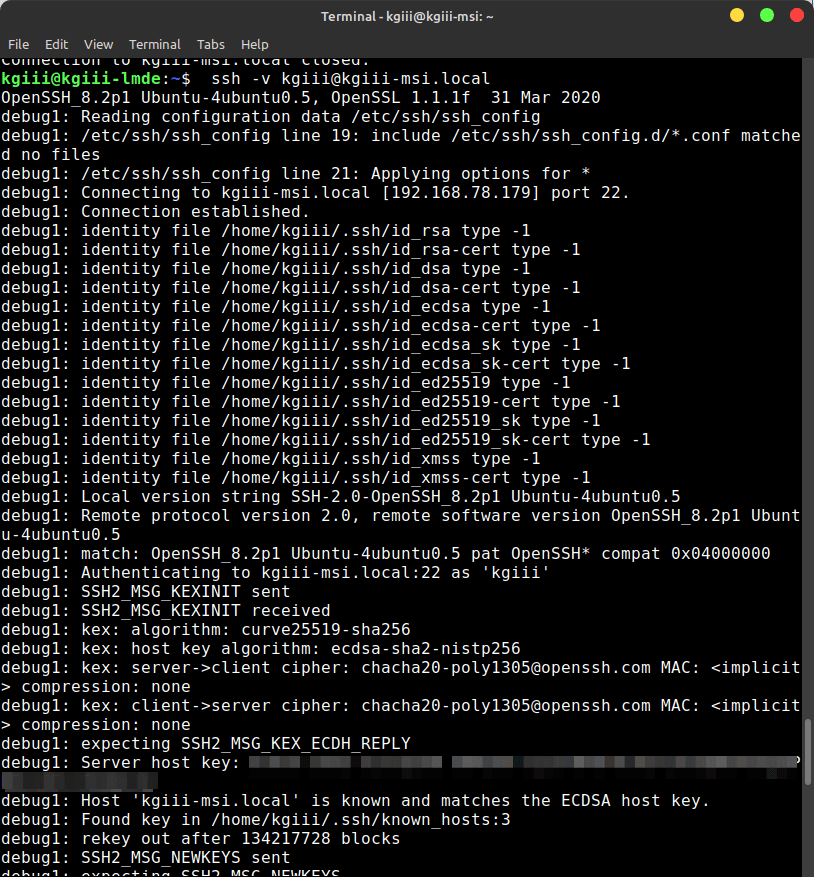
ssh verbose mode displayed
And that’s just some of the information you’ll see when you use the SSH verbose mode.

You’ll get even more verbosity as you go up through the levels of SSH verbose mode. This is useful for debugging your SSH connections – but it’s also useful for those who aren’t sure what’s going on behind the scene. When using SSH’s verbose mode, you can see what’s actually going on behind the curtain. That means you can learn more about what’s going on with your SSH connections.

Closure:

So, yeah… It’s another SSH article. I wrote this one ’cause I was thinking about it. I was thinking about it because I’d recently done another SSH-related article. So, I figured I might as well cover SSH verbose mode while thinking about it. Otherwise, I’d have made a note of it in my files and maybe never bothered with the article. Besides, if you want a different article, you’re always welcome to write it yourself and I’ll (quite likely) publish it.

Thanks for reading! If you want to help, or if the site has helped you, you can donate, register to help, write an article, or buy inexpensive hosting to start your own site. If you scroll down, you can sign up for the newsletter, vote for the article, and comment.
How To: Login To SSH To Run One Command

In today’s article, we’re going to learn how to login to SSH to run one command. Yes, it’s another SSH article! However, this one should be relatively short. I’ve covered SSH a great deal already. This is just one more SSH trick.

SSH stands for Secure Shell and is a way to remotely control other computers. As I said in the opening paragraph, I’ve already covered a lot of SSH articles, because SSH is a tool I use regularly and it’s a tool I really like.

SSH lets me manage computers on the other side of the country without even leaving my chair. I also use SSH to manage various computers around my house. If I need to do something on a computer in another room, I can just SSH into it and do what I needed to do. It’s great!

Well, today’s SSH article is a bit different. We’re going to login to SSH to run one command. That’s all we’re going to do. We’ll login, automatically run the command, and then automatically exit the SSH connection. This is useful if you want to run a script, update, etc…

There are some previous SSH articles that you might want to read:

Install SSH to Remotely Control Your Linux Computers
Prevent SSH Root Login
Show Failed SSH Login Attempts

Alternatively, you can click to search for SSH articles. I’ve covered quite a bit of SSH material, so you can learn quite a bit from those links – even if you’re already familiar with SSH.

Well then, let’s just jump into the article… It really shouldn’t take long.

Login To SSH To Run One Command:

Like oh so many articles, and this one involving SSH, you’re going to need to start off with a terminal. You’ll also need a device that has SSH properly setup and ready to run. You can actually set SSH up on the computer you’re using and just SSH into localhost to practice this.

And, of course, if you don’t know how to open your terminal, just press CTRL + ALT + T and your default terminal should open.

With your terminal now open, the format of the command is something like this:

For example, if I wanted to connect via SSH to run one command, and that command was to list the files in the home directory, the command would look like this:

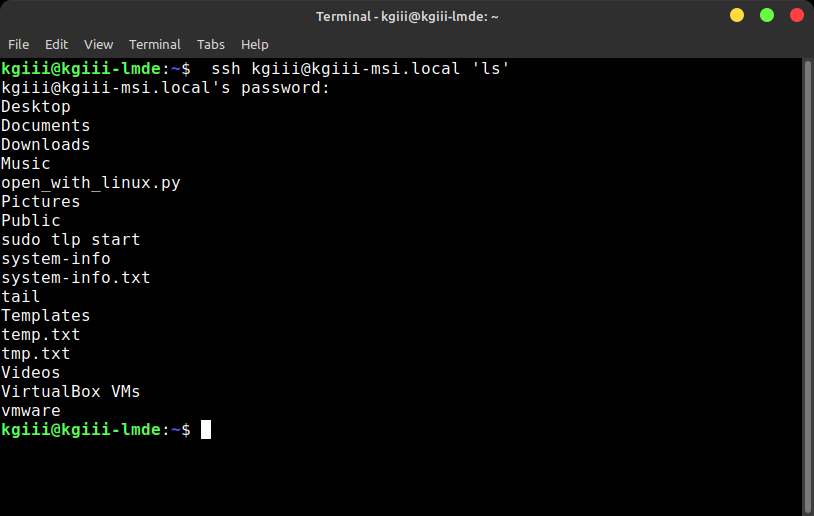
Note: That device doesn’t face the public internet, so I don’t have SSH keys enabled on the device. So, that means I have to enter my password in the image below. With that in mind, the output of that command would look like this:

login to ssh to run one command
See? It logs into the remote device, runs one command, and exits! Pretty neat, huh?

Of course, you can make it your own and there would be one less step if you had set up SSH keys. You can also make it more complicated if you want. You could try any one of the following commands, adjusting it for your needs:

Go ahead and play around with this. If you want to login to SSH to run one command, that’s how you do it. You can make the command as simple or as complicated as you want. So long as you string it together properly, the sky’s the limit!

Like I said above, you can just install SSH on your single device and practice what you read in these SSH articles. It’s not particularly taxing. There are plenty of articles to help you along the way.

Closure:

See? It’s really not all that hard to login to SSH to run one command and then exit automatically after that command has been run. It’s another handy SSH trick that you can add to your SSH toolbox. Also, the article is longer than I anticipated. Ah well…

What comes next? I have no idea. I try to not write too many consecutive articles on the same subject. Mixing them up seems the best way to go about it, as the site’s meant to be searched and not read like a blog. I do have a bunch of SSH content, but I’ve also covered a whole lot of it already.

Thanks for reading! If you want to help, or if the site has helped you, you can donate, register to help, write an article, or buy inexpensive hosting to start your own site. If you scroll down, you can sign up for the newsletter, vote for the article, and comment.

Fix Terminal Command Mistakes

In today’s article, we’re going to cover how to fix terminal command mistakes. While this may sound complicated, it’s actually very easy. As such, it should be a pretty short article. There’s not a lot to it, so it’s not hard to cover.

When you type a command in bash using systems, the command gets saved to the ~/.bash_history file. You can then use the up arrow and use that command again without having to type it again. We’ve also covered how to delete a ~/.bash_history entry. There have been a few articles on this subject.

So, with all that, this shouldn’t be a completely foreign article. It should be something that’s more or less familiar to new people and my regular readers. Because of this, it’s going to be a pretty short article.

Amusingly, it’s not that I want to write an easy/short article today, it’s just that this topic isn’t all that complicated. I was perfectly willing to write a longer article.

So then, let’s have a short article! Let’s learn how to…

Fix Terminal Command Mistakes:

This article requires an open terminal, like many other articles on this site. If you don’t know how to open the terminal, you can do so with your keyboard – just press CTRL + ALT + T and your default terminal should open.

With your terminal now open, type an incorrect command. For example, you could try entering the following command to change to the ~/Downloads directory:

As you can guess, that’s likely to throw some sort of error. The command you’re actually intending to type would have been cd ~/Downloads. Well, you can fix it and run it automatically. Try this:

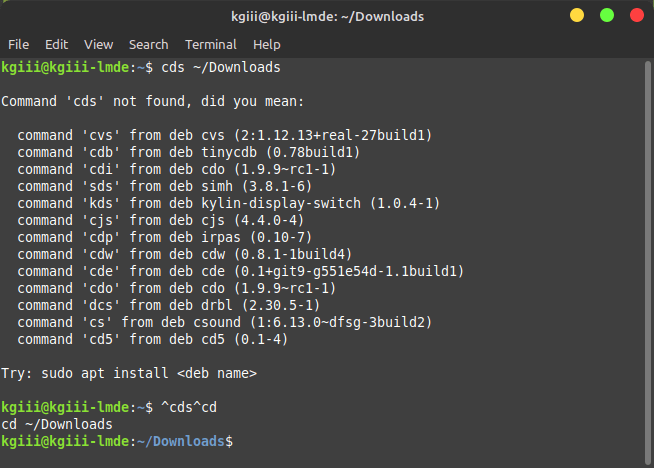
Tada! It should correct the previous command and then handily run the command on your behalf. To show you what I mean, here’s an image:

correcting an erroneous terminal command
See? It changes ‘cds’ to ‘cd’ and runs the command on your behalf. Pretty nifty, huh?!?

Yup, it just takes a couple of carets and spelling the proper command. It’s not all that hard to fix terminal mistakes. Just to be clear, bash will store both the original mistaken command and the properly fixed command in your ~/.bash_history. But, you can still use the arrow key to go back to either in the future. Of course, you can always delete the bash history entry if you want.

Closure:

See? It is indeed a short article after all. It’s not all that complicated to fix terminal command mistakes, so it’s easy to cover. It’s that how to fix terminal command mistakes is just not something that many Linux users, especially new users, know they can do. Well, you can – and it’s really simple.

Thanks for reading! If you want to help, or if the site has helped you, you can donate, register to help, write an article, or buy inexpensive hosting to start your own site. If you scroll down, you can sign up for the newsletter, vote for the article, and comment.

How To: Get CDROM/DVD Information From The Linux Terminal

In today’s article, we’re going to learn how to get CDROM/DVD information from the Linux terminal. What we’ll be doing is getting hardware information. It should be a brief article, as we’re just going to cover two commands.

I won’t even need to detail the various options, as we’re just after the hardware information. I’d say it’s going to be a short article, but that has a way of blowing up in my face and those articles sometimes end up longer than the “regular” articles! You get what you get. If  you don’t like it, write an article or two for me!

This particular article is actually based on one of my unix.stackexchange.com answers that didn’t get much notice, even though it was the accepted answer. Frankly, in modern days there’s not much need to know this information, as optical disks become a thing of the past. I decided to place the content here, hoping it’s easier for people using search engines. People still use optical media.

As you may know, most of my traffic comes from search engines. That’s the primary motivation for moving this answer here. I’m also motivated by laziness! I want a nice and easy day, for reasons I’ll probably detail in the next meta article. I also want it more easily indexed.

If you don’t know much about your CDROM/DVD player/recorder, then this would be a good article for you. In fact, even if you do know the basics, this is still probably a good article for you. You can learn a lot with a few simple commands. You’ll see…

So then, let’s learn how to get CDROM/DVD information from the Linux terminal. Sure, there’s probably a GUI way to do this, but let’s just stick to the terminal – after all, every Linux user has a terminal available. Plus, I don’t know a GUI method.

How To: Get CDROM/DVD Information:

In today’s article, we’re going to learn how to get CDROM/DVD information from the Linux terminal. What we’ll be doing is getting hardware information. This will require an open terminal. So, to open a terminal, just press CTRL + ALT + T and your default terminal should open.

With your terminal now open, you may need to install the first application we’ll be using. The first application we’ll be using is ‘wodim’, an application used to write data to an optical disk. If you’re using a major distro, it’s in your default repositories. If you’re using apt, then install it with:

Of course, adjust that command to suit the distro you’re using, be it yum or even zypper. Then, run the following command:

Consult the output. That’s it. It should be obvious. Also, if you get any errors from this command, along with the second command I’ll share, remove any disks from the drive. 

For the second command to find CDROM/DVD information, and cdrecord is more likely to be installed by default, you need only to use this command:

Note the similar flags. It’s pretty much the same as you’re going to get with wodim, except cdrecord has a chance of being installed already. I don’t think I’ve come across a distro with wodim installed by default, but I could be wrong. I have come across distros with cdrecord installed by default. So, there’s that.

If I’m wrong and a distro exists with wodim installed by default, be sure to yell at me in the comment section! I’ve been wrong before, so this won’t be a first. I’m a big boy, I can handle it! Also, I’m kinda curious, so please do let me know in a comment.

Anyhow, enjoy the output from either command. They’ll tell you a bunch of information about your optical drives. Both of the commands will help you get CDROM/DVD information. Pick the one you like best and run with it. It’s your computer, you do what you want!

Closure:

As you can see, it’s pretty easy to get CDROM/DVD information from the Linux terminal. As you can also see, you have yet another article! There sure have been a lot of ’em. Again, I reach out to see if you’d like to write an article. I sure could use a break! We’ll soon cross the 300 articles mark! I am very grateful to those who have already helped. 

Thanks for reading! If you want to help, or if the site has helped you, you can donate, register to help, write an article, or buy inexpensive hosting to start your own site. If you scroll down, you can sign up for the newsletter, vote for the article, and comment.

How To: Compress And Decompress .bz2 Files

In today’s article, we’re going to discuss how to compress and decompress .bz2 files. This is something you may eventually need to know, so I’ll cover it here. I’ll just cover the basics, as most folks won’t need to know anything more than the basics. This should actually be a fairly short and direct article. There’s not a whole lot to it.

If you don’t already know, .bz2 files are bzip2 files. You’ll find that bzip2 is an opensource compression program that gets some regular usage, and you’ll sometimes find downloaded files that are compressed with this format. You may also, for compatibility reasons, want to compress files with bzip2 to share with other users who are already set on using the .bz2 format.

For the curious, the bzip2 man pages define this particular application as (and, as always, I highly encourage folks to read the man pages themselves – this one being a bit more complicated than others):

bzip2, bunzip2 – a block-sorting file compressor

Again, we’re going to just cover how to compress and decompress .bz2 files in this article. That’s all we’re going to do. You don’t tend to come across too many files compressed with bzip2, but they do show up from time to time.

Because of that, we’re going to cover how to compress and decompress those files in this article. It’s gotta get covered eventually, so it might as well be now. Read on!

Compress And Decompress .bz2 Files:

This article requires an open terminal, like many other articles on this site. If you don’t know how to open the terminal, you can do so with your keyboard – just press CTRL + ALT + T and your default terminal should open.

You might actually not have bzip2 installed. It’s not always installed by default. Fortunately, as far as I can tell, it shares the same name in every major distro, that is ‘bzip2‘. So, just go ahead and install it like you’d install any other software. For example, if you’re using Fedora, your command would look similar to:

See? I didn’t use Ubuntu as the default example! We’re mixing everything up today! (Use apt if you’re using a distro with apt, like Debian or Ubuntu and derivatives.)

At this point, you should probably have a .bz2 file to work on for the sake of the article. Seeing as I have no idea what you’ve already downloaded, we should probably start with you making one – just so you can see how to decompress it. 

To compress a file with bzip2, the command looks like (See the detailed warning below this command, do not use this command without reading the warning!):

That will create a file with the same filename but make a .bz2 file. However, this is a destructive act. If you use the above command, the original file will be deleted! If you wish to keep the original file, you need the -k (keep) flag. That looks like:

That command will not remove the original file, as would be the default. Obviously, the -z flag means ‘zip’.

If you want to decompress a file with bzip2, the command looks like:

This will extract the file(s) into the current directory. Of course, the -d means ‘decompress’. This is not a destructive operation. The original and extracted files will remain on your file system.

As you can see, it’s not all that difficult to compress and decompress .bz2 files. You might go years not seeing any files in that format, but you’re eventually going to bump into one and now you know  how to deal with it in the terminal – and how to respond in kind.

Closure:

And there you have it. You have yet another article. We’re getting close to 300 articles at this point, so it has been a long journey. If you feel like writing an article, let me know! Anyhow, you can now compress and decompress .bz2 files easily enough, and that was the point of the article.

Thanks for reading! If you want to help, or if the site has helped you, you can donate, register to help, write an article, or buy inexpensive hosting to start your own site. If you scroll down, you can sign up for the newsletter, vote for the article, and comment.

Subscribe To Our Newsletter
Get notified when new articles are published! It's free and I won't send you any spam.
Linux Tips
Creative Commons License
This work is licensed under a Creative Commons Attribution 4.0 International License.