Today’s article probably will be more about amusement than it is about education, as we learn to geolocate a website. This will not have a lot of uses for many of you, and the uses I can think of are a bit contrived. So, stand back and watch as we do some science!
Wait, no… No, there will be no science.
What I should have done is write this article ahead of time. Instead, it’s the 4th of July, and will probably be just about the 5th of July before I finish this. Let’s just all agree that I’ve been celebrating.
Anyhow, have you ever wanted to know where a website is located? Have you ever wanted to know where an IP address is located? Well, that’s what geolocation does and let me tell you that it is not excellent. No, it is not.
First, the tool we’ll be using is only going to give you the country. It doesn’t narrow it down very far.
Second, in the world of CDNs (Content Delivery Networks), a server may appear closer to you (or in this case the geolocation server) than it is.
Relying on this data for anything important is just plain silly.
But, you could log in to a remote server by name, get the local IP address, and then check the IP address to see what country the server is in. Yeah, see? I told you that any usefulness would be contrived.
Anyhow, you can geolocate by domain name or by IP address. With any luck, you’ll be able to tell which country the server is in. The previously mentioned caveats should make sure you know to not use these results for anything useful.
Geolocate A Website:
You could almost certainly find an online tool that would do a much better job. Installing software for this is not necessary, but that’s exactly what we’re going to do. So, press
First, we need to install a piece of software called Geoip. It’s available for all the major distros and describes itself as:
geoiplookup – look up country using IP Address or hostname
To install the software, you’ll enter one of the following commands into your terminal of choice:
RHEL, CentOS, Fedora, etc:
1 | sudo dnf install geoip |
Arch, EndeavourOS, Manjaro, etc:
1 | sudo pacman -S geoip |
Debian, Ubuntu, Mint, etc:
1 | sudo apt install geoip-bin |
When you’re done with that, it’s pretty easy to use. If you want to geolocate a website, the format follows:
1 | geoiplookup <domain_name> |
And, if you want to geolocate an IP address, the syntax is similar:
1 | geoiplookup <ip_address> |
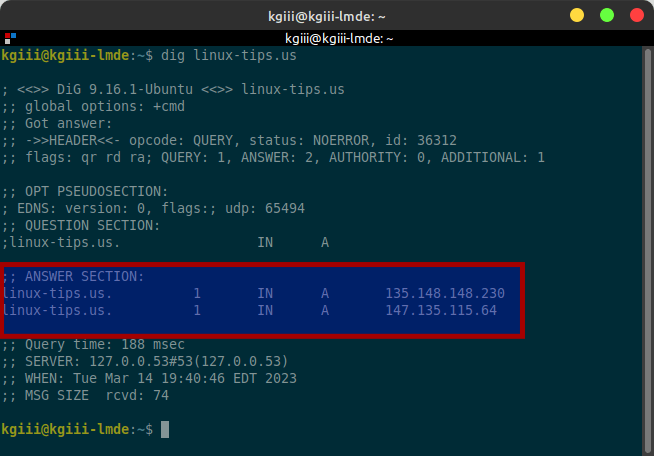
An example output follows:
1 2 | kgiii@kgiii-laptop:~$ geoiplookup linux-tips.us GeoIP Country Edition: US, United States |
Which, you know, isn’t all that helpful. You can check the man page, but that’s also not all that helpful. To do that, it’s just this command:
1 | man geoiplookup |
The data isn’t entirely useless, for example, you can try this command:
1 2 | kgiii@kgiii-laptop:~$ geoiplookup canada.ca GeoIP Country Edition: CA, Canada |
Which, as you can see, appears to accurately geolocate the domain name to Canada, which is where I’d expect the server to be.
Closure:
So, yeah… If you want to geolocate a website then you can more or less do so. You’ll not get a whole lot of useful information and there are better tools for this online, but it can be done. You can indeed geolocate a domain name or an IP address all from the comfort of your terminal.
Just, you know, don’t use this information for anything too important. I use MaxMind for this sort of stuff online. It’s useful for getting meaningful statistics regarding the site’s traffic and is much more accurate, but still not accurate enough to pinpoint a house or anything. It can usually narrow things down to the nearest city, which is more than enough for my needs.
Thanks for reading! If you want to help, or if the site has helped you, you can donate, register to help, write an article, or buy inexpensive hosting to start your site. If you scroll down, you can sign up for the newsletter, vote for the article, and comment.