How To: Create And Enable A Swapfile

Today’s article is about how you can create and enable a swapfile. It largely ignores the debate about whether a swapfile is needed or not, though I make it clear that this is something I prefer. I know that others will have different views, but I also make it clear why I enable it.

A swapfile, or swap partition, isn’t just where the OS crams stuff when it has run out of RAM. It’s more complicated than that. Sometimes, the OS knows where it wants to store cached items and prefers the swap partition or swap file.  The OS can put items in swap while freeing up RAM for other bits that need caching. 

To make it abundantly clear, you absolutely can use Linux without a swapfile. You can also use Linux with a swapfile. If you want to enable a swapfile, read on. I’ll touch on this a little bit later in the article.

Some Swapfile Background:

I have a modern, large SSD and more RAM than I’ll ever possibly use. I still want to use swap, in this case a swapfile. Imagine my dismay when I installed Lubuntu 20.04 and found there’s no swapfile available during the basic installation? (It’s there in 21.04 and proceeding versions.)
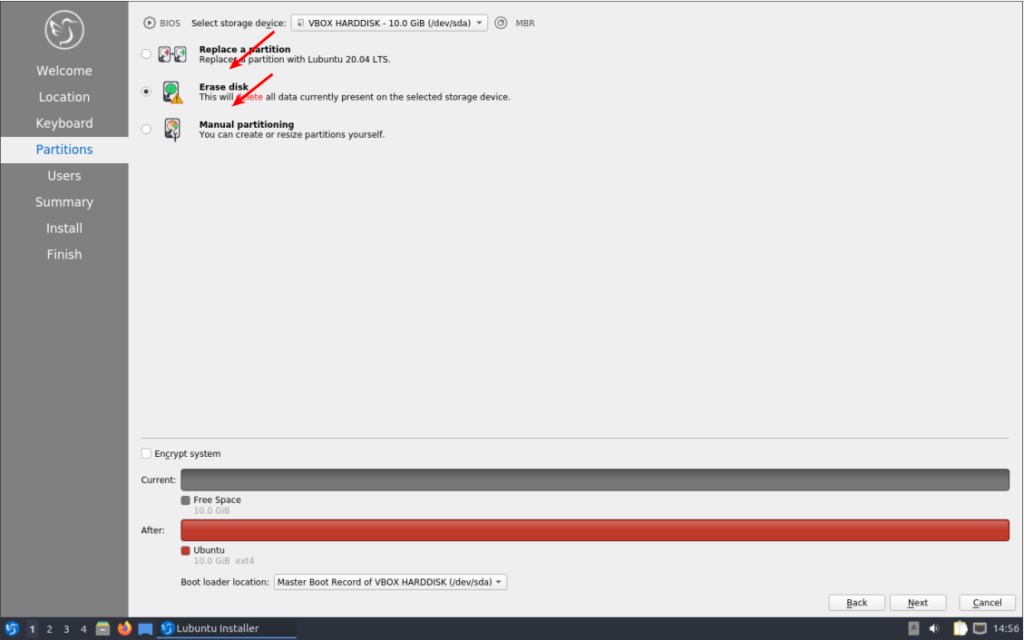
no swapfile
See? There’s nothing there!

I could have manually made a swap partition during installation, but that didn’t seem like something I wanted to do – and messing with manual partitioning can be tiresome and tedious. I knew I could enable a swapfile later, which is what I did.

Again, trying to avoid the debate – just sharing my reasoning; I have ample disk space and storage is cheap. If it has any chance of helping, it’s a small investment. I should also mention that swap is far more complicated than ‘a place where the kernel sticks stuff when there’s no more RAM left’. In fact, it’s a lot more complicated than that. It’s where the kernel pages content that’s seldom used, and it’ll happily use swap even when there’s plenty of RAM available.

Since the option to enable a swapfile isn’t there during the installation, we might as well learn how to add a swapfile to Ubuntu. It’s a pretty painless process. 

Is Swap Already Enabled?

You should first check to see if you already have swap enabled. The process is the same with both a swap partition and a swapfile. To check we first need to open your terminal emulator. You can do that by pressing CTRL + ALT + T.

Now, let’s check to see if you’ve already got some swap going on.

If the output of that command shows nothing but a new line, you have no swap. If it says anything else, you’ve got swap enabled already and this article is not one you need to read. As this article is only about a swapfile, it won’t be helpful for questions about a swap partition. This article also won’t tell you how to resize your swapfile, though you could put some pieces together and figure it out for yourself.

Let’s Make A Swapfile:

Seeing as you already have your terminal open from the previous step, you can just leave it open. That’ll make this easier. Start with this first command and work your way through the article – making sure to not skip any steps.

Why 8 gigabytes when I have ample RAM and an SSD? Because I don’t want to worry about it ever it again. I should be able to open up every app I have and leave them open for a month. You do you and decide how big you want it to be!

Now that we’ve allocated space for the swapfile, we need to set some permissions. We don’t want anyone and their kid brother writing to swap, we only want root writing to swap.

Next, we need to let the OS know that’s swap space, to be used as a swapfile.

Then you turn it on with:

And you now have swap in the form of a swapfile and it’s turned on.

Permanently Enable A Swapfile:

I suppose we should make this change permanent, as it’d be an unneeded step to have to do it every time the system reboots. To make this permanent, we need to edit fstab and nano is a good tool for this.

And add this at the bottom of that document:

Those are 0, the digit, in case the font here makes it confusing. And seeing as we’re using nano, you save your by pressing CTRL + X, then Y, and then ENTER

At the end of this exercise, you should have a swapfile that gets loaded on reboot.  You shouldn’t even have to reboot for it to effect, it should already be currently loaded and working. You can next edit the swappiness value, if that’s something you feel like you want to do – or have a reason to do. In Ubuntu, it is a default of 60. If you want to edit it, you’ll have to wait for another article.

Closure:

There you have it! We’re on the downhill side of this project and it’s an article about how you enable a swapfile. If you don’t use swap, that’s fine. This article is for those who do want to use swap.

Thanks for reading! If you want to help, or if the site has helped you, you can donate, register to help, write an article, or buy inexpensive hosting to start your own site. If you scroll down, you can sign up for the newsletter, vote for the article, and comment.
A Meta Post: The State Of Linux Tips

There was one site before this one and we’ll just ignore that in favor of the current site that contains various Linux tips, tweaks, and tutorials. This is an article about the state of this site, linux-tips.us, and is a measure of progress. This is an article about where we started, where we are now, and where we’ll be in the future. Something like that… I should also disclose that this post was authored under the influence of rum.

I think it’s important to first mention what the goal is. It’s not a lofty nor noble goal. I set out to get some of my Linux notes online. My plan has been to write an article for every other day. So far, so good. I’ve even had some help along the way, for which I am forever grateful.

(Don’t worry, we’ll cover some ways you personally can help elsewhere!)

When I think of about a summary of how the site is doing, it’s just “Holy crap!” I didn’t expect the site to do as well as it has. I really didn’t. For example, the site already has an Alexa ranking. Many sites never achieve that level of use. I get a ton of traffic (to me) from search engines, so the site is legitimately answering questions and helping people solve their Linux problems. To me, that’s pretty sweet!

Some Linux Tips metrics:

  • About 400 of my hours have been invested.
  • We chew through 4 to 5 GB of bandwidth per month.
  • We average about 120, and growing, unique visitors a day.
  • 93 articles have been published.
  • That’s about 75,000 words.
  • Which would take almost 5 hours to read.
  • Some 207 tags exist.
  • Only 44 people have commented so far.
  • The longest article is about should you use Linux.
  • The highest ranking article is Screenfetch vs Neofetch.

If you recall, one of the reasons from moving from the old site was that Google hated the .gq domain name (it’s a ‘free’ or paid domain) and those domains are so full of crap content that no reputable email provider would let the email notifications though its filters.

On this site, Google straight up loves us, as do email providers. The ads are doing better than I expected, but not great. Then again, I have no frame of reference, so maybe the ads are doing great. Speaking of which, maybe you could opt to show ads on this site. They’re just Google ads. They’re mostly harmless.

Beyond that, in the past few months Google has shown this site in the results (not very high) like 40,000 times. Only 600 have clicked through, but that’s actually a pretty respectable click-through-rate. 

Bing, of course, is the exact opposite. They mostly refuse to index the site, regardless of what changes I make. I have no idea what I’m missing. To make it even more confusing, Bing kinda liked the previous site.

Linux Tips’ Future:

We’ve come a long ways since the first article six months ago. People keep participating, signing up for the newsletter, registering for the site, and writing articles.

When I started this, I said I’d keep it up for a year. At this point, I can say that’s pretty likely. In fact, if I were to speculate, I’d be inclined to say I’ll keep going even after the year is over.

As far as my notes go, we’ve just barely scratched the surface. Beyond that, there’s always new stuff to learn and share. So, it seems pretty likely that I’ll keep going. After the year is up, I may change the publication schedule a bit. 

I won’t make any commitments until I get there, but I’m enjoying the project and having fun with the hobby. The every other day publishing thing is a bit much, but it hasn’t made me burn out yet. I think a part of that is the lovely feedback that I get.

You can help:

How can  you help? Above every article are some links where you can easily share the articles on your favorite social media platform. It’s nice and easy. You can do that without investing much effort, just share with your friends and groups who are also tech-minded.

There is the donations thing, but I don’t really need donations. The site’s going to stay online regardless. Still, it’s there if you want. If you do donate, I’d consider it more a motivator than a source of income. Who knows, maybe I’ll save all the donations and we can decide on something fun to do with them?

You too can participate. Go ahead, register. It won’t hurt. Leave a comment now and again. A small number of you are coming in from Linux.org, but you can still comment here. You can even write an article. It’s not that hard. If I can do it, you can figure it out. Heck, you don’t even have to register to write an article. I’ll even do the proofreading, formatting, and scheduling.

Most of those ways mentioned above are things that motivate me, things that make me more inclined to keep going. If nothing else, I’ll certainly finish the year – but it’d be nice to be motivated the whole way. It’d be nice to keep going and stay motivated even after the year has ended. For whatever reason, the interactions and climbing metrics make me enjoy it more.

As I mentioned above, you can still do that whole whitelisting this site in your ad blocking extension. 😉

Closure:

Yup. It has really been a full fix months already. It has probably been a full year if you count the previous site. I’ve invested a ton of hours into this hobby. It is pretty fun, as well. I encourage you to hop in and get involved. If you don’t want to do so here, start your own site with Linux tips. The more the merrier. 

Thanks for reading! If you want to help, or if the site has helped you, you can donate, register to help, write an article, or buy inexpensive hosting to start your own site. If you scroll down, you can sign up for the newsletter, vote for the article, and comment.

How To: Find Out Which Kernel Version You’re Using

The Linux kernel‘s progress is marked by versioning, and this article tells you how to find out which kernel version you’re using. There are all sorts of ways to do this, but this article is going to just cover a few of them.

You might want to know which kernel version you’re using for when you ask for support. It may be that your hardware is best (or only) supported after or before a certain kernel. It may be that you want to know which kernel you’re using because you want to upgrade or downgrade the kernel.

For example, I recently didn’t want to switch to the new kernel. I saw that there was a kernel update, learned which kernel version I was now using, and promptly decided to return to an older LTS kernel. Yes, different kernel versions will have different support lengths. I opted for a more stable and consistent kernel as none of my hardware required a newer kernel.

There are any number of reasons why you’d want to know which kernel version you’re using. And, as stated, there are any number of ways to get that information. This article only covers some of them.

Find Out Which Kernel Version You’re Using:

This article will only show you how to determine which kernel version you’re using with the terminal. Of course, this means you need an open terminal. You can do so with your keyboard – just press CTRL + ALT + T and your default terminal should open.

With your terminal open, you can try:

The information is also contained in the output of ‘hostnamectl’, so working with grep you’d have this command:

You can also use cat on/proc/version in a command that looks like:

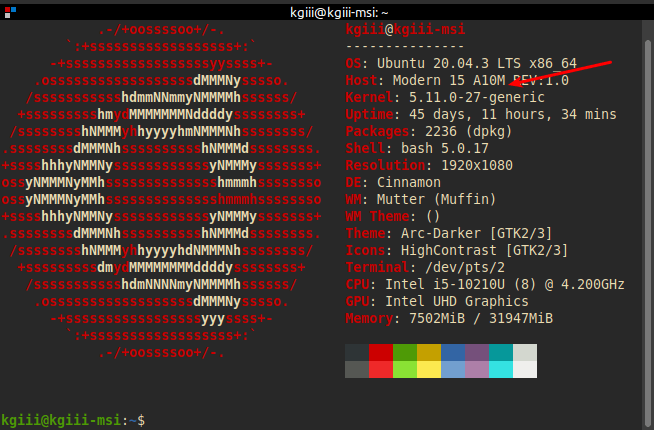
If you have screenfetch or neofetch installed, the output contains the kernel version that you’re using. An output from those would look kinda like this:

neofetch in action
Neofetch in action, showing the kernel version number. See? It’s all over the place!

So, there are any number of ways to find which kernel version you’re using. There are surely other ways to find the kernel version, so feel free to leave a comment letting us know how you find your kernel version.

By the way, if you’re having problem with your current kernel, your distro probably has at least the previous kernel installed and you can use that as a fallback. Even if it automatically deletes old kernels, it usually leaves at least one older kernel as a way to recover should the proverbial poop hit the aerator.

Closure:

See? That wasn’t so painful! It’s another article that’s said and done. We’re getting closer to the halfway point, but I’m legitimately having fun getting my notes online. I admit, I pretty gleefully monitor the increasing (or sometimes consistent) traffic. It makes me happy to know my notes are helping.

Thanks for reading! If you want to help, or if the site has helped you, you can donate, register to help, write an article, or buy inexpensive hosting to start your own site. If you scroll down, you can sign up for the newsletter, vote for the article, and comment.

Get Hardware Info With ‘dmidecode’

Today’s article will explain how to use dmidecode to get information about your hardware. The command is a little different than most, as it actually checks your system’s BIOS and reports that information.

Yes, you read that correctly. This dmidecode command checks the BIOS and reports that information. There are times when the BIOS reports different hardware than other tools, so it’s a good idea to have some knowledge about your hardware to begin with.

Anyhow, I could sit here and try to explain dmidecode, or I could just use their description – which is better than I could do.

dmidecode is a tool for dumping a computer’s DMI (some say SMBIOS ) table contents in a human-readable format. This table contains a description of the system’s hardware components, as well as other useful pieces of information such as serial numbers and BIOS revision. Thanks to this table, you can retrieve this information without having to probe for the actual hardware. While this is a good point in terms of report speed and safeness, this also makes the presented information possibly unreliable.

As you can see, it’s a pretty interesting tool. It’s almost certainly installed for you by default. If it isn’t and you’re using a major distribution, check your system’s repos and it’ll be in there. It’s a pretty neat tool and one that you can use regularly, even though there are other tools that tell you about your hardware.

Using dmidecode:

This article requires an open terminal. Open one with your keyboard by pressing CTRL + ALT + T and your default terminal should open.

Many distros have dmidecode installed by default. If not, you’ll need to install it with your systems software installer. It’s bound to be available for any major distro. Now…

There’s a whole lot to this dmidecode thing, so we’re going to rely on the man page quite a bit. You’re encouraged to crack open a second terminal in which to run man dmidecode. That’ll help!

The first way to run dmidecode is with the -s flag, where you’ll use a name. In your first terminal, type the following to get the BIOS vendor’s name:

That’s the first (and pretty handy) way to run this command. Some of these commands will even give you information that helps you not have to open the case. That one helps you find the BIOS vendor’s name without having to reboot and check the BIOS yourself.

There are quite a number of options (names) that follow the -s flag, such as baseboard-serial-number, processor-family, or even chassis-serial-number. There’s a ton of them – so switch to the terminal with the open man page and check the text next to the -s flag for more information.

The other way to run dmidecode is with the -t flag. In this usage, you’ll need to know the corresponding number to the information you want. That’s okay, you don’t need to memorize them, as I explain below. The basic command is:

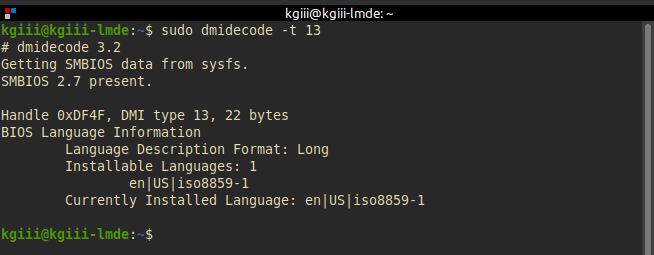
The number should correspond to the information you want. In the terminal with the open man page, you can scroll down to see your options. You’ll see that #13 is about the BIOS language, so command would look like:

The output would look similar to this:

dmidecode showing bios language
There’s some cruft in the output, but it is indeed the BIOS language.

You can refer to the above-mentioned man page, memorize them, or use a cheat sheet (if you plan on running the command frequently). I assume the project keeps things updated, so checking the man page at their GitHub would be the most correct source.

Either way, you will see that you will need to know both ways of running dmidecode in order to make the most out of dmidecode. You’ll need to be both fluent with the keywords and with the DMI Types, should you want to make the most out of this application – but you don’t have to memorize the entire man page.

Closure:

There you have it, another article is in the books! This time, it’s about dmidecode – a valuable tool to add to your growing arsenal of tools. It’ll save some time if you end up needing it, so you might as well learn about it before you need it.

Thanks for reading! If you want to help, or if the site has helped you, you can donate, register to help, write an article, or buy inexpensive hosting to start your own site. If you scroll down, you can sign up for the newsletter, vote for the article, and comment.

Delete Directories From The Terminal In Linux

In your Linux journey, you’ll eventually want to delete directories as you do some housecleaning. Keeping your computer tidy makes you more efficient. Deleting directories you no longer need helps keep your system tidy. 

It’s easy enough to manage and remove directories while you’re in your graphic file manager. Though sometimes, if you’re managing files in the terminal, you might just as well learn to manage directories while you’re in there. It’s not too terribly difficult.

As an example of why this is worth knowing, you may be working with a headless system, something without a GUI desktop environment. In that case, you will have no choice but to delete directories from the terminal. It’s just something you’ll come up against as you learn file management.

Either way, being able to delete directories from the terminal is a skill that comes in handy, a skill that you should know. And so it should be something you have in your toolbox.

The tools we’ll be using for this article are rmdir and rm. They’re both basic commands that have existed since the earliest of Unix days, and they’re both useful commands today.

The rmdir command describes itself as:

rmdir – remove empty directories

And rm describes itself as:

rm – remove files or directories

So, with that in mind, let’s jump into the exercise.

Delete Directories From The Terminal:

Deleting directories from the terminal obviously requires said open terminal. If you don’t know how to open the terminal, you can do so with your keyboard – just press CTRL + ALT + T and your default terminal should open.

The first command is really simple. If it’s an empty directory that you want to delete, you can use the rmdir command. As you read in the intro, the directory MUST be empty for this command to work. It’s also really simple to run:

So long as the directory is empty, you should be all set to go. If the directory you want to delete is not empty, you have to use the rm command. It’d look like this:

If you’re curious, the -r flag means recursive – it’ll even delete directories (and the files within them) within the directory. The -f flag means force – it should delete all files and directories no matter what and without any confirmation.

If you’re curious about either of those two commands, and there should someday be an article about ‘rm’, and for now you can just check the manual. You’d use either man rmdir or man rm. There’s not much to the first, and the latter is complex enough to warrant its own eventual article.

Closure:

Whoop! There it is! It’s another article in what’s turning into quite a long list of articles. If I’m going to keep this up for a full year, I might just as well have fun with it – and this was a nice, easy, and fun article. It’s mostly aimed at new users, as long-term users would hopefully already know how to delete directories from the terminal.

Thanks for reading! If you want to help, or if the site has helped you, you can donate, register to help, write an article, or buy inexpensive hosting to start your own site. If you scroll down, you can sign up for the newsletter, vote for the article, and comment.

Subscribe To Our Newsletter
Get notified when new articles are published! It's free and I won't send you any spam.
Linux Tips
Creative Commons License
This work is licensed under a Creative Commons Attribution 4.0 International License.