How To: Tell If You Are You Using UEFI or BIOS

Today’s article will be another short-form article, where we quickly learn how to tell if you’re using UEFI or BIOS with your Linux computer. Making a few short-form articles seems like a fun idea, so why not? There’s room for all sorts of stuff and now that I’ve done this for a couple of years.

In short, when you boot your computer there’s a bunch of stuff you don’t see, but the hardware needs to interact with the software. We used BIOS for many years, but the new and improved method is UEFI (which stands for Unified Extensible Firmware Interface). 

UEFI is meant to improve on some BIOS limitations and to help increase your security. If you have a modern computer, it’s capable of UEFI but might have BIOS available. If BIOS is available, it may be referred to as ‘Legacy’ if you want to go mucking about to change it.

Linux supports both UEFI and BIOS booting. If you installed Linux yourself, you may already know if you’re using UEFI or legacy booting. However, if your Linux installer notices that it is in either mode, it will default to installing in that mode. So, I suppose it’s possible for some folks to not actually know if they’re using UEFI or BIOS.

This leads me to today’s article…

Are You Using UEFI or BIOS:

This article requires an open terminal, like many other articles on this site. If you don’t know how to open the terminal, you can do so with your keyboard – just press CTRL + ALT + T and your default terminal should open.

With your new terminal open, type the following command (or cut and paste the command, if that’s easier):

If it lists an output, you’re using UEFI. You’re using BIOS if you get an output that’s something similar to:

It really is that simple. 

Closure:

Well, this is the shortest article I’ve written. At least I’m pretty sure that it’s the shortest article I’ve ever shared. Brevity is not my strong point, but at least now you know how to tell if you’re using UEFI or BIOS. So, you didn’t come away empty-handed – unless, of course, you already knew that.

Thanks for reading! If you want to help, or if the site has helped you, you can donate, register to help, write an article, or buy inexpensive hosting to start your own site. If you scroll down, you can sign up for the newsletter, vote for the article, and comment.
Get Hardware Info With ‘dmidecode’

Today’s article will explain how to use dmidecode to get information about your hardware. The command is a little different than most, as it actually checks your system’s BIOS and reports that information.

Yes, you read that correctly. This dmidecode command checks the BIOS and reports that information. There are times when the BIOS reports different hardware than other tools, so it’s a good idea to have some knowledge about your hardware to begin with.

Anyhow, I could sit here and try to explain dmidecode, or I could just use their description – which is better than I could do.

dmidecode is a tool for dumping a computer’s DMI (some say SMBIOS ) table contents in a human-readable format. This table contains a description of the system’s hardware components, as well as other useful pieces of information such as serial numbers and BIOS revision. Thanks to this table, you can retrieve this information without having to probe for the actual hardware. While this is a good point in terms of report speed and safeness, this also makes the presented information possibly unreliable.

As you can see, it’s a pretty interesting tool. It’s almost certainly installed for you by default. If it isn’t and you’re using a major distribution, check your system’s repos and it’ll be in there. It’s a pretty neat tool and one that you can use regularly, even though there are other tools that tell you about your hardware.

Using dmidecode:

This article requires an open terminal. Open one with your keyboard by pressing CTRL + ALT + T and your default terminal should open.

Many distros have dmidecode installed by default. If not, you’ll need to install it with your systems software installer. It’s bound to be available for any major distro. Now…

There’s a whole lot to this dmidecode thing, so we’re going to rely on the man page quite a bit. You’re encouraged to crack open a second terminal in which to run man dmidecode. That’ll help!

The first way to run dmidecode is with the -s flag, where you’ll use a name. In your first terminal, type the following to get the BIOS vendor’s name:

That’s the first (and pretty handy) way to run this command. Some of these commands will even give you information that helps you not have to open the case. That one helps you find the BIOS vendor’s name without having to reboot and check the BIOS yourself.

There are quite a number of options (names) that follow the -s flag, such as baseboard-serial-number, processor-family, or even chassis-serial-number. There’s a ton of them – so switch to the terminal with the open man page and check the text next to the -s flag for more information.

The other way to run dmidecode is with the -t flag. In this usage, you’ll need to know the corresponding number to the information you want. That’s okay, you don’t need to memorize them, as I explain below. The basic command is:

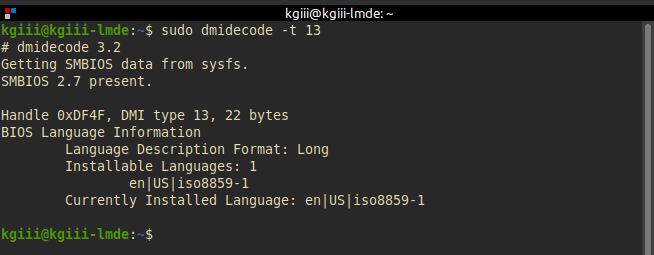
The number should correspond to the information you want. In the terminal with the open man page, you can scroll down to see your options. You’ll see that #13 is about the BIOS language, so command would look like:

The output would look similar to this:

dmidecode showing bios language
There’s some cruft in the output, but it is indeed the BIOS language.

You can refer to the above-mentioned man page, memorize them, or use a cheat sheet (if you plan on running the command frequently). I assume the project keeps things updated, so checking the man page at their GitHub would be the most correct source.

Either way, you will see that you will need to know both ways of running dmidecode in order to make the most out of dmidecode. You’ll need to be both fluent with the keywords and with the DMI Types, should you want to make the most out of this application – but you don’t have to memorize the entire man page.

Closure:

There you have it, another article is in the books! This time, it’s about dmidecode – a valuable tool to add to your growing arsenal of tools. It’ll save some time if you end up needing it, so you might as well learn about it before you need it.

Thanks for reading! If you want to help, or if the site has helped you, you can donate, register to help, write an article, or buy inexpensive hosting to start your own site. If you scroll down, you can sign up for the newsletter, vote for the article, and comment.

Linux Tips
Creative Commons License
This work is licensed under a Creative Commons Attribution 4.0 International License.