It’s a weekend so today’s article will be short and easy, an article for when you want to find your last boot time in Linux. If you want to know when you last booted your computer, there are many ways to get that information. We’ll just cover one way…
We’ve covered a couple of ways to do this in the past. If you want, you can read the following article:
I wrote that article more than two years ago. It was one of my earliest articles. In that article, I covered a couple of different ways that you can find out when you last rebooted your Linux computer.
In that article, we covered commands like:
1
last reboot
There are some advanced commands you can use, so do read the previous article to learn more about how you can find your last reboot time.
In that article, I also mentioned that you could see how long your computer has been on since the last reboot with the uptime command. That’s simply done:
Those articles might be of interest. This is a simple article, but it does allow you to read quite a bit more related content.
Find Your Last Boot Time In Linux:
You guessed it. We’ll be doing this in the terminal. That means you’ll need an open terminal. If you’re not sure how to do that, look in your application menu or press CTRL + ALT + T and your default terminal should open.
For this article, we’ll be using the
who command. You can check the man page with
man who to learn more about the command. If you do that, you’ll learn that the who command is described as:
who – show who is logged on
That may not be as descriptive as it could be. If you just run the following command, you’ll be able to see everyone who is currently logged into your system. That’s just this command:
1
who
That simply tells you who is logged in. Your output might look a little like this:
1
2
3
kgiii@kgiii:~$ who
kgiii tty7 2023-09-29 14:53 (:0)
kgiii tty3 2023-10-04 18:46
As you can see, I am logged in both on tty7 (the desktop) and tty3.
If you did check the man page, you’d have possibly seen the
-b flag. That flag is described accurately:
-b, –boot time of last system boot
See? Now it should be obvious why I’ve chosen to write this article about how you can find your last boot time with the who command. The command is simply:
1
who -b
Which will output something similar to this:
1
2
kgiii@kgiii:~$ who -b
system boot 2023-09-29 14:52
See? That’s all you need to know if you want to find your last boot time! It’s not all that difficult to get started with the Linux terminal. This is a command any Linux user can learn. It’s also a pretty easy man page to decipher. So, that’d be good for new users as well!
Closure:
It’s a weekend and I’m lazy today. So, you have an easy article. It doesn’t have to be all that easy. I gave you plenty of links that you can (re)visit. Visiting those links will also show you how much the site has changed – specifically with how I write the articles. This particular article is a lot like how I wrote many of the articles, but I’ve been mixing it up quite a bit. I was just really in the mood for an easy article today, so you got this one about using the who command to show when you last rebooted your system.
Thanks for reading! If you want to help, or if the site has helped you, you can donate, register to help, write an article, or buy inexpensive hosting to start your site. If you scroll down, you can sign up for the newsletter, vote for the article, and comment.
Today’s article will be a quick and easy article, so easy that a newbie can follow it, and will cover how to boot to text mode in Linux. Booting to text mode is something you might want to do for troubleshooting or repair. It might look hard, and require some good timing, but it’s not all that challenging.
What do I mean?
Well, when you boot your personal computer with Linux on it the system boots into a graphical environment, a GUI. If you boot to text mode, there’s no GUI being loaded. It’s just like you were working in the terminal, but there was no GUI to fall back on.
For most people using Linux on the desktop, this isn’t something done all that often. It’s mostly useful for things like the above-mentioned troubleshooting and repair. When there’s a problem that’s exacerbated by the GUI, booting to text mode is a good idea and a great feature.
This is only for systemd users and is sometimes called ‘console mode’. This article also assumes that you’re using GRUB as your bootloader. If either of those is not true, you can safely ignore this article.
If you’re asked at a forum to repair your system by booting into text mode, this is the article for you. It’s not something you’ll need often, but it’s something worth knowing, or at least knowing that it can be done. It’s not even all that complicated.
Also, if you noticed an outage yesterday, there was a giant dumpster fire that needed to be put out. It wasn’t a literal dumpster fire, just a bunch of crap that all managed to land at the same time.
The symptoms made me think the site was hacked, but that’s not what happened. There were some changes made at the server level and things did not trickle down. The server migration went well for many people, but I have a complicated setup. I also use a CDN, which further compounded the issues.
Things were fixed upstream. There was no hack, but there were some traffic spikes recently. Nobody’s personal information was leaked. No software was compromised. It was just a ****storm that required more effort than expected.
The server is still being worked on as I write this article. Data was seemingly corrupted in multiple tables, which shows the value of backups. Nothing of any value has been lost in the process – except some traffic. I hope that those people were able to find the information they were looking for, and I formally apologize for the downtime.
Boot To Text Mode:
You need some pretty good timing for this and it may take some people a few tries to get it right. I’ve done this many times and I still don’t always get it right on the first try.
When you boot your computer, it performs the “POST” (which is the Power On Self Test). It goes by quickly these days. In many cases, it doesn’t even tell you that it’s performing the POST. In those cases, it may show you a logo for the computer. It happens on your computer, even if you don’t see it.
Now, between the end of the POST and before Linux starts loading, you need to press a key to stop Linux from loading. You want to access GRUB.
The key you press is going to vary, but it’s just one of two keys.
If you’re using legacy (BIOS) then you need the SHIFT key.
If you’re using UEFI, then you need the ESC key.
After POST ends and before GRUB loads Linux, you need to press the appropriate key. You need to know which you’re using, BIOS or UEFI. You could just keep trying until you find out which one works for you. With the reduced friction between Linux and UEFI, you might not know which system you’re using. I suppose that’s a good thing.
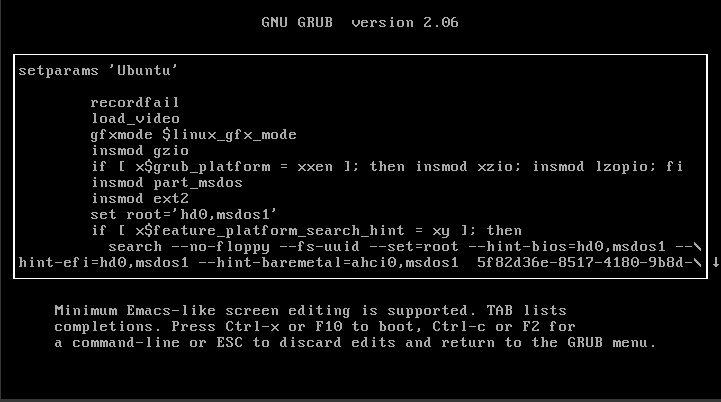
Anyhow, you should end up with a screen that looks like this:
The helpful arrow is your next step in this process of booting to text mode.
As you can see, you next want to press the E on your keyboard.
You’ll next see a screen that looks like this:
These are the boot parameters in use by GRUB. We’ll edit this.
Use your arrow keys to navigate to the line that begins with linux.
Make sure the line also includes vmlinuz.
The line you want to edit will start with the first word and contain the second word, but it will exist.
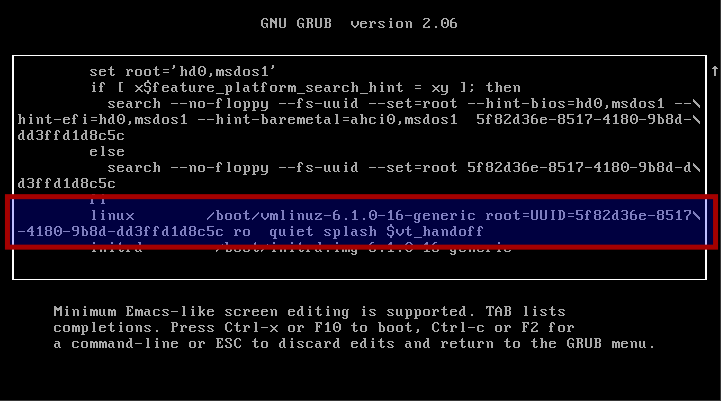
You want to go to the end of that line. Depending on your GRUB resolution, the line may span multiple lines. In other words, you’ll be editing where there’s a hard new line and not paying attention to the actual formatting.
That may look something like this:
That’s the line you want to edit. Note that it spans two lines.
At the very end of that line, you simply need to hit the space bar and add the number three. Like, literally, you’re just adding:
1
3
In the example image above, that 3 would be added just after the word ‘handoff’. The 3 is telling the system to boot to the multi-user.target and doesn’t load a graphical environment.
There are directions at the bottom, but just press F10 to continue booting to text mode. The next screen you see should look a whole lot like this one:
Tada! That’d be a success. If you see that, you’ve booted into text mode! Congratulations!
This isn’t a permanent change. When you use this method to boot to text mode, you’re only going to boot into text mode that one time. There are ways to set the computer to always boot to text mode, but that’s not within the scope of this article.
You may have to try this a few times. The process is simple after you get to the GRUB menu, but accessing that GRUB menu may be problematic. You may need good timing (unless you’re set to display this screen on every boot) to access the menu in the first place.
Again, you’ll need to know if you’re using BIOS or UEFI. That’ll help you avoid frustration. I linked to it above, but it wasn’t all that well highlighted. I’ve written an article that teaches you how to tell if you’re using BIOS or UEFI.
Knowing which key will bring up the GRUB menu might just save you a bunch of frustration, as I know this has frustrated people in the past. This bugged one user enough for them to insist their OS didn’t have the option, that it was impossible to do. (They were using one of the official Ubuntu flavors, with a default install. So, they were just upset that they couldn’t get it working.)
Closure:
If you remember the intro well, you’ll know that this article has some drama behind it. You’ll know that the site was down yesterday and that there were continued issues today. I was awake at 04:30 to see if the site was up and running. Things looked pretty good.
I then wrote one article and the system went crazy, crashing when I tried to schedule it for publication. The upstream hosting company then tried some more magic potions and they wanted me to try again.
Alas, that ate the article I wrote…
Fortunately, WordPress is awesome and they stored a cached copy in my browser’s cache. They found this and propagated almost all of the fields. This was great!
That was when I noticed that I’d already covered that subject in the past – twice in fact. In my defense, I write a lot of articles and this was a fine subject to write about.
At this point, I just wrote another article. That’s this article, for those who weren’t keeping track. We’re still not 100% certain that all the bugs are ironed out, but we’ll see. I’ll schedule it for publication at the usual time and try to observe this as much as I can. This presumes that I’m able to save it and schedule it without any problems. We shall see… (The save draft button does appear to work.)
Thanks for reading! If you want to help, or if the site has helped you, you can donate, register to help, write an article, or buy inexpensive hosting to start your site. If you scroll down, you can sign up for the newsletter, vote for the article, and comment.
Today’s article will be another short-form article, where we quickly learn how to tell if you’re using UEFI or BIOS with your Linux computer. Making a few short-form articles seems like a fun idea, so why not? There’s room for all sorts of stuff and now that I’ve done this for a couple of years.
In short, when you boot your computer there’s a bunch of stuff you don’t see, but the hardware needs to interact with the software. We used BIOS for many years, but the new and improved method is UEFI (which stands for Unified Extensible Firmware Interface).
UEFI is meant to improve on some BIOS limitations and to help increase your security. If you have a modern computer, it’s capable of UEFI but might have BIOS available. If BIOS is available, it may be referred to as ‘Legacy’ if you want to go mucking about to change it.
Linux supports both UEFI and BIOS booting. If you installed Linux yourself, you may already know if you’re using UEFI or legacy booting. However, if your Linux installer notices that it is in either mode, it will default to installing in that mode. So, I suppose it’s possible for some folks to not actually know if they’re using UEFI or BIOS.
This leads me to today’s article…
Are You Using UEFI or BIOS:
This article requires an open terminal, like many other articles on this site. If you don’t know how to open the terminal, you can do so with your keyboard – just press CTRL + ALT + T and your default terminal should open.
With your new terminal open, type the following command (or cut and paste the command, if that’s easier):
1
ls /sys/firmware/efi
If it lists an output, you’re using UEFI. You’re using BIOS if you get an output that’s something similar to:
1
ls: cannot access '/sys/firmware/efi': No such file or directory
It really is that simple.
Closure:
Well, this is the shortest article I’ve written. At least I’m pretty sure that it’s the shortest article I’ve ever shared. Brevity is not my strong point, but at least now you know how to tell if you’re using UEFI or BIOS. So, you didn’t come away empty-handed – unless, of course, you already knew that.
Thanks for reading! If you want to help, or if the site has helped you, you can donate, register to help, write an article, or buy inexpensive hosting to start your own site. If you scroll down, you can sign up for the newsletter, vote for the article, and comment.
balenaEtcher is a free software tool used to write .ISO files to USBs so that you can boot from them and install Linux. balenaEtcher is just one of many tools to do this, but it is both simple and effective. That makes it fit for purpose and is why it is getting its own article.
You’re going to need a blank USB drive, like a thumb drive. Well, it needn’t be blank but it should be. It needs to be large enough to meet the requirements of your distro – usually 4 GB is adequate. Larger is fine.
You’re also going to need the correct .ISO from the distro you’re trying to install. I have no way of knowing what that is, so here’s an article about picking the distro that’s right for you. You should verify the integrity of the .iso to eliminate it as a source of problems.
You’re also going to need to know how to boot to USB. That link will take you to an article that covers that, and includes DVD. It covers booting to something other than your default drive.
Finally, you’re going to need balenaEtcher. Head to this page and scroll down. If you scroll down, you’ll see many download options. It’s available for everything from Linux to MacOS.
Download the correct version for the operating system you’re currently using. If you download the AppImage, be sure to make it executable before trying to run it. Either way, you’ll need to download balenaEtcher (maybe install it) and then run it. That’ll vary depending on your OS, but they even have .deb and .rpm files available.
All set?
Let’s Use balenaEtcher:
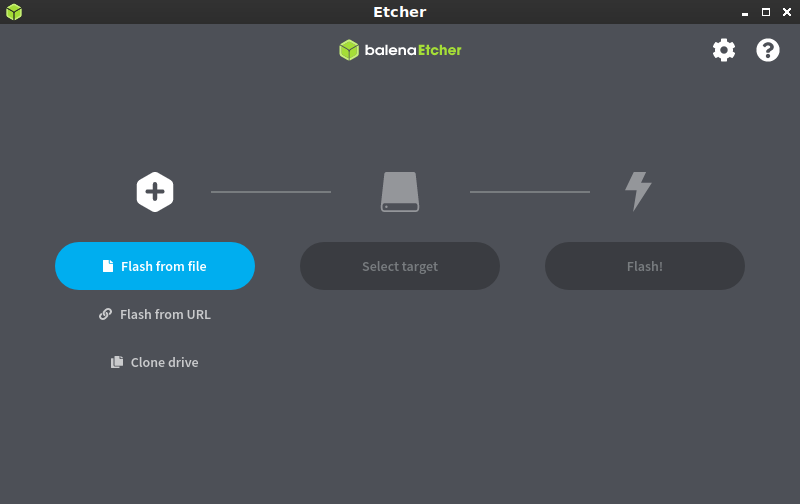
With all those pieces in place, balenaEtcher is fairly self-explanatory. I’m going to assume you got it to work properly. If you can’t get it installed or running from the AppImage, just leave a comment and I’ll talk you through it for your system. You can also ask on Linux.org.
It’ll look something like this when you first open it.
In this case, you’ll pick “Flash from file”.
Then, you’ll click ‘Flash from file’ and doing so will let you navigate to and select the .iso you want to use. Do so, being sure to get it correct.
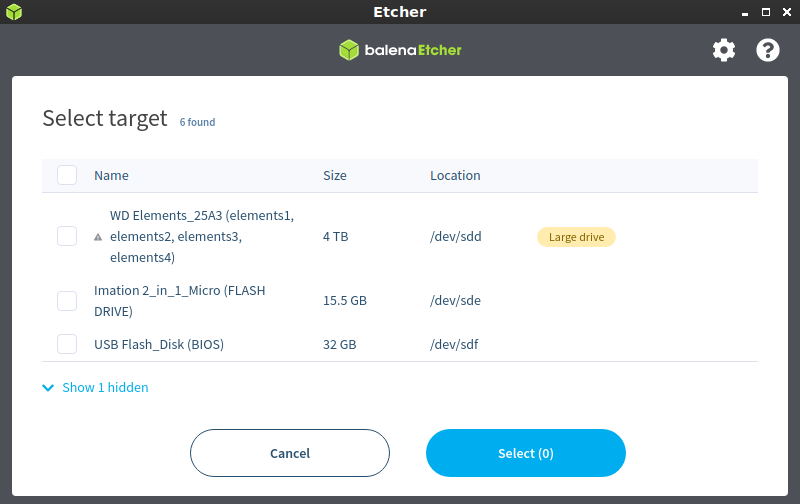
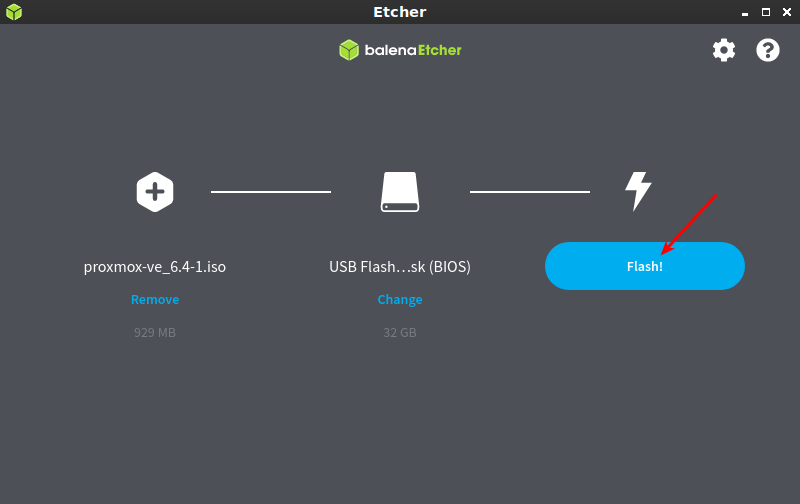
Next, you’ll select the target. The target in this case means the USB drive that you want to write the .iso to. So, that will be the smaller flash drive in most cases and will look something like this:
Select the right flash drive. Be very careful at this stage! This step can go horribly wrong!
There’s just one step remaining! You need to click the Flash button and wait for it to do its job writing the .ISO to the USB drive. It looks like this:
Click the ‘flash’ option and wait patiently while it does its job.
That could take a little while, though not all that long if you’re using USB 3.0. On USB 2.0 it takes a bit, so be prepared to wait – but not terribly long.
When this is all done, just close the program and your new USB device should be ready. You should be able to boot your computer, select the USB drive as the boot device, and then install Linux. Most of the time, it goes just swimmingly. If it doesn’t, ask for help.
Again, don’t forget to verify the integrity of the downloaded .ISO before you do any of this. The process for doing that varies, and the distro will tell you how on their download page. Have fun installing Linux!
I’ll probably eventually take the screenshots of me installing Linux in a virtual machine, but I haven’t done that article yet. It seems like a good future article to write.
Closure:
Well, there’s another article. This is just a nice, quick article. It’s handy for when you need to know how to use balenaEtcher, or when you need to tell someone else how to use it. It’s one of the articles I’d expect to see people linking to on a regular basis. “Hey, this is how you use Etcher!”
Thanks for reading! If you want to help, or if the site has helped you, you can donate, register to help, write an article, or buy inexpensive hosting to start your own site. If you scroll down, you can sign up for the newsletter, vote for the article, and comment.
In order to install Linux, you need to be able to boot to USB (or CD/DVD – with USB being more common these days and many devices not even having CD/DVD drives). The goal of this article is to help you boot to USB or to optical media, so that you can install or repair your Linux system.
To install Linux you pretty much have to boot to USB or to a CD or DVD. It’s true, you can actually install directly from your regular disk drive, but that’s a convoluted method that few people will ever need. I may cover that method at some point, but today is not that day!
You may also need to boot to a live Linux instance for other reasons. Maybe you need to repair your installation? Perhaps you need to grow your partition because you have run out of room? Or, just maybe, you need to recover your data so that you can do a fresh installation – or so that you can start the recovery from your backed up data?
It’d be rather pointless to enumerate the many reasons why you’d want to boot to USB. There are many reasons and it’s a skill you’re going to need. Trust me, you need to know this stuff.
I say USB because that’s the most common today, but you may also need to boot to CD or DVD. Your hardware may actually be so old that it won’t even let you boot to USB. So, for the sake of this article, let’s just assume you’re booting to some form of external media, be it USB, optical media, or even an SD card. No matter what you’re trying to boot as an alternative media, the process is pretty much the same.
Booting to USB
Booting to USB, what’s the purpose? The purpose is to install or repair an already running system. It means booting to something other than your default internal drive (under normal configurations) and using that booted media to effect change on your system.
As I said above, there are many reasons why you’d want to do this. It’s a pretty common thing, especially among Linux users. There are many questions asked about this process and I’ve decided to document the methods here.
However, there’s no way I can possibly make this article truly definitive. In fact, I’d appreciate it if you’d help. In the comments section, fill in the blanks for me. You have hardware that I may not have access to, so you can tell us what works for your hardware and the article will be a more complete source of information. It’s your time to shine!
How to Boot to USB
In order to boot to USB, you have to have fairly good timing – or a willingness to sit there and pound on the same key over and over again. In a traditional sense, you’re aiming for a boot selection menu that you can access after POST (Power On Self-Test) and that split-second before the OS starts its boot sequence.
You’re not trying to access the BIOS, you’re trying to access the boot selection menu and there’s a narrow window to get it right. The good news is that the key to access the BIOS is different than the key to access the alternative boot menu. So, a good working strategy is to press the right key on your keyboard over and over again during boot while hoping for the best.
The question is, which is the right key? You don’t want the BIOS menu, unless you plan on changing it permanently. You only want the temporary boot menu, which another animal entirely.
So, I have a bunch of hardware. I also have a search engine. I’ve made an attempt to find the temporary boot menu keys and to document them all in one place.
The list of keys!
Acer:ESC, F2, or F12 Apple/Mac:OPTION Asus:F8 or ESC Compaq:ESC or F9 Dell:F12 HP:ESC or F9 Lenovo:F8, F10, or F12 MSI:F11 NEC:F5 Packard Bell:F8 Samsung:ESC, F2, or F12 Sony:F1, F2, or F3 Toshiba:F12
NOTE: This list isn’t exhaustive nor is it completely accurate. In some cases, you may need to actually enable this in your BIOS. Samsung, for example, will not show the temporary boot selection menu unless you’ve first disabled “Fast Boot”. Other OEMs may require similar changes.
The above keys should get you into the temporary boot menu, where you can choose to boot to USB, CD/DVD, an external drive, a microSD card, or whatever. It’s an essential step in both booting and repairing your Linux computer. It’s a good idea to memorize it once you know which one works for you.
As I mentioned above, you can help. If you have a device that’s not listed, please let me know in the comments. Some manufacturers have more than one way to access the screen, so be sure to let me know if your device is different. The more data we get, the more people we can help.
Thanks for reading! As always, feedback is fantastic, you can sign up for the newsletter, and you can donate. You don’t have to donate. The site will remain online regardless, but you can help cover the costs. If I keep this schedule up, we should have a new article in two more days – so stay tuned!