How To: Check For Bad Sectors On Your Disks

Today, we’re going to examine one way to check for bad sectors on your disks. Once again, it won’t be a particularly taxing article, but it’s something everyone should know how to do. This being Linux, I’m sure there are alternative tools.

Hard drives, from spinning platter to solid-state, are divided into sectors. Sometimes, these sectors go bad. The disk’s software manages this to some extent, and actually has more space available than listed so that it can make up for bad sectors as time passes.

But, you still get bad sectors. It’s just the nature of the game, and no disk drive is immune to this. All you can do is accept them and, in some cases, repair them.

See, there are two types of bad sectors. The first is a hard bad sector, which is hardware related and can’t be fixed. The second is a soft bad sector, which is a software issue and it can be fixed. I’ll someday write an article about how to fix soft bad sectors, but I won’t bother getting into that today.

With all that in mind, the tool we’ll be using is appropriately named ‘badblocks’, which describes itself thus:

badblocks – search a device for bad blocks

Badblocks has a variety of uses, so you can always get a head start on this article by reading the man page. 

So, with that already covered, let’s just jump into the article.

Check For Bad Sectors:

This article requires an open terminal, like many other articles on this site. If you don’t know how to open the terminal, you can do so with your keyboard – just press CTRL + ALT + T and your default terminal should open.

With your terminal now open, you should probably identify your drives with the following command:

The output of this may look a bit like this:

output of fdisk -l
You can see your drive’s identification with the output of fdisk -l.

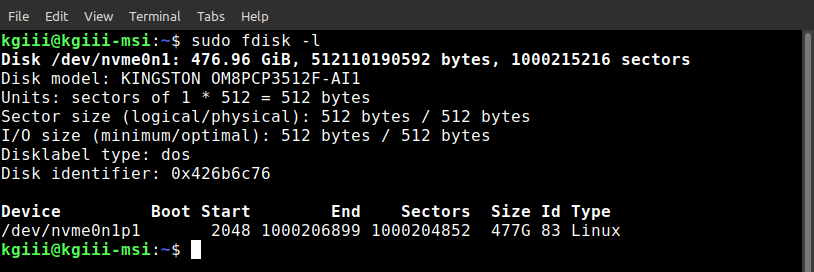
As you can see,  it’s listed as /dev/<device_ID>  and that’s the information you want to hold onto.

Sometimes, it’s a lot more complicated, and will look something like this:

output of fdisk -l
This is a bit more complicated than the first one – plus the drives are all ‘sd*’ in nature.

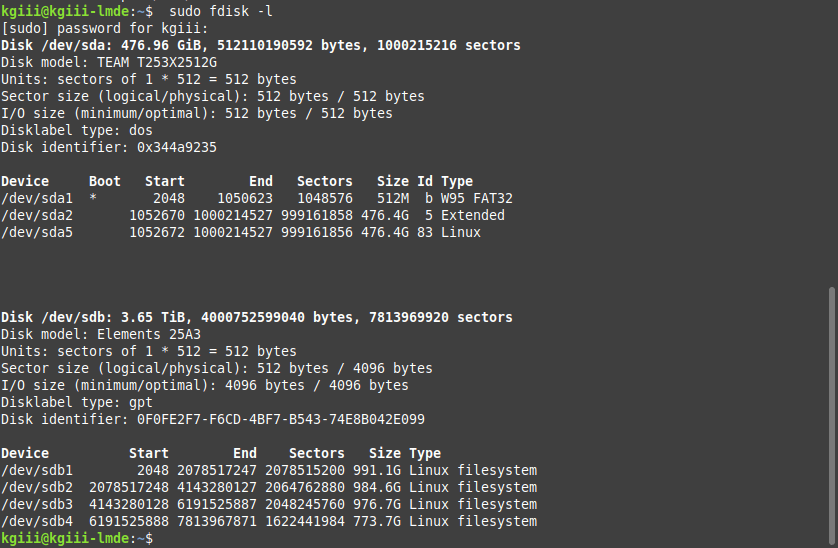
As you can see, they’re all start with ‘dev/sd*‘ and end up as /dev/<device_ID>. The system I ran badblocks on is quite a bit more complicated than the output from the laptop I used in the first instance.

Now, you want to scan your individual device to check the for bad sectors. That’s actually just a simple command. You can use:

The -v ensures the output is verbose and sent to the screen. You can also write that data to a text file for reference. To do that, you just use a command similar to this:

Then, you’ll have a badblock.txt file you can refer to, showing you information about any bad blocks. I wanted to show you the output from a disk with bad blocks, but I don’t appear to have any to show you. I tried quite a few, but it was a no-go. Ah well… You’ll figure it out easily enough. It’s not even a little hard to check for bad sectors!

Closure:

Yup… You have another article. This time you learned how to check for bad sectors, a pretty handy tool – especially if you’re finding corrupt files on your disks. If you are facing corrupt files, this would be the first step I’d suggest taking.

Anyhow, the show does go on and you got a new article. I am more or less feeling just fine now, just some lethargy and not a whole lot of energy. Sweet!

Thanks for reading! If you want to help, or if the site has helped you, you can donate, register to help, write an article, or buy inexpensive hosting to start your own site. If you scroll down, you can sign up for the newsletter, vote for the article, and comment.

How To: Check A Disk For Errors

In today’s article, we’re going to learn how to check a disk for errors. We’ll be using a multi-pronged process to thoroughly check a disk for errors in the Linux terminal. By itself, none of these are particularly complicated. As such, I expect this to be a relatively easy article to follow.

If you’ve been seeing errors when transferring data to a disk, it’s probably a good sign that it’s time to check that disk for errors. You may also want to check a disk for errors if you’ve not used it before – like if it is used or if you have just purchased it.

To perform these tests, the disk must not be mounted! If need be, you’ll have to do these tests from a live environment. That’s easy enough. Remember how you installed Linux? Well, that same installation media is (usually) the same media you’ll need to enter a live environment. You will, of course, need to boot to the media when you start your system – be it USB, or CD, or DVD. It’s much the same as though you were going to install Linux – except you don’t opt to do the installation – you just work in the live environment.

Anyhow, we’ll be using a few tools for this. All of these tools will almost certainly be available by default. If they’re not, ummm… Well, if they’re not, pick a different distro’s live environment to use, or install them yourself! These tools are all on the installation media for distros in the Ubuntu family, for example. So, yeah, find a distro where they are available – which should be pretty much all of them.

Check A Disk For Errors:

So, you’re booted to a live instance of your favorite distro (or the disk you’re going to check is unmounted) and you’re ready to start testing. Well, you need an open terminal. If you don’t know how to open the terminal, you can do so with your keyboard – just press CTRL + ALT + T and your default terminal should open.

Once you have your terminal open, use lsblk to identify the disk you wish to check for errors. For the purposes of this exercise, we’re going to assume the disk you’re checking for errors is known as ‘sda’. Be sure to change that to suit your particular needs.

First, let’s check for S.M.A.R.T. errors (which we’ve previously covered in-depth). You can do so with this command:

Next, let’s check for bad blocks. Bad blocks are physical points on your device that no longer work properly. Some bad blocks isn’t, necessarily, indicative of immediate disk failure. Some bad blocks may be normal. Still, let’s check it.

If you’re really into this, you’ll want to check it for bad blocks – and then check it again soon after. That will let you know if the number of bad blocks is increasing. If the number is rapidly increasing, disk failure will likely soon follow. Otherwise, you’re probably okay for the time being.

Finally, let’s check for file-system consistency. This is typically done with the ‘fsck’ command, a command you should have some understanding of. There are many ways to run the command, but you can just use the following command to see what’s going on:

Now, you’ve run three tests. Between them all, you should have a pretty good understanding of your disk’s health and you’ll know how to check a disk for errors. Again, you’ll want to check a disk for errors when the situation dictates – especially if you’re getting disk errors while in the operating system. 

When you get disk errors, it’s time to consider retiring the drive. Depending on the severity of the errors, you might wish to stop using the drive immediately, creating an image of the drive, and retiring the drive from your system. Disk failures happen and recovering data from a failed drive can be a major hassle. So, use these warnings as a reason to consider replacing your drives if drive failure is in the cards.

Closure:

And there you have it! You now know how to check a disk for errors! It’s a handy skill to have. After all, disks fail. Knowing when they are going to fail is a good thing. Being prepared for disk failure is a bonus and a good idea! It’s also worth checking new disks. I’ve tested new disks and had unsatisfactory results that meant I returned the disk to the retailer, so it’s a concern and worth taking the time to test.

Thanks for reading! If you want to help, or if the site has helped you, you can donate, register to help, write an article, or buy inexpensive hosting to start your own site. If you scroll down, you can sign up for the newsletter, vote for the article, and comment.

Subscribe To Our Newsletter
Get notified when new articles are published! It's free and I won't send you any spam.
Linux Tips
Creative Commons License
This work is licensed under a Creative Commons Attribution 4.0 International License.