Today we will cover a subject we’ve covered before, as we discuss yet another way to find files by extension. This is Linux! We have options! There are so many ways to find files by extension – and this is one of the more interesting of those ways. So, if you want to find files by extension, this might be the article for you.
You might be interested in previous articles that covered this topic:
Another Way To Locate Files By Extension
Yet Another Way To Find Files By Extension
You can search to find more. This is a task that has all sorts of ways to accomplish it. Some ways are easier than others. I’d say that the method we use to find files by extension in this article will be fairly easy. There’s not a whole lot to it.
We will be installing software. We’ll be installing mlocate but the man page will refer to it as plocate while the command we’ll be using will just be locate. Sound confusing? Well, it is. Don’t worry, the directions are still simple.
mlocate:
We’ll be installing mlocate as our tool to find files by extension. We’ll do this in the terminal, a fairly universal way to do things. Pretty much every distro is going to have at least one terminal available. You can usually open your default terminal by pressing
When you do get mlocate installed, you can check the man page with ( man locate). There, you’ll see that locate is described like so:
plocate – find files by name, quickly
Yes, it has now been called mlocate, plocate, and locate. No, I do not know why. I do not think I’ll try to find out why. This is just one of those things you sort of accept and move on. Please feel free to research this and leave a comment. I’m not terribly curious, but other people might be.
With your terminal open, we can get mlocate installed with one of the following commands:
Debian/Ubuntu:
1 | sudo apt install mlocate |
Arch/Manjaro/etc:
1 | sudo pacman -S mlocate |
RHEL/CentOS/etc:
1 | sudo yum install mlocate |
OpenSUSE/GeckoLinux/etc:
1 | sudo zypper install mlocate |
There are other package managers. If your package manager isn’t covered, just go ahead and search for “mlocate” and you’ll likely find that it’s available by default.
Configure mlocate:
Now that you have mlocate installed on your system, you need to update the database. The locate command requires a database. On slow systems with many files, this can take a few seconds. It should not take long on a modern system.
The only command you need to run at this stage is this:
1 | sudo updatedb |
Let that finish. It should not take very long. If it’s taking a long time, something might be amiss.
That’s all you have to do. The database will happily keep itself updated, though may take a short while to do so. If you add a new file, it might not be in the database immediately. In theory, this lag could mean you miss something – but the odds of that are rather low unless you’re constantly generating additional files.
I guess that means we should talk about using the locate command.
Find Files By Extension With The ‘locate’ Command:
As the title indicates, our goal is to find files by extension. We’ll be using the newly installed and updated locate database. The syntax is really simple. You’d just run a command like this:
1 | locate ".<file_extension>" |
For example, you can find .iso files this way. That command would look like this:
1 | locate ".iso" |
That command will find everything with .iso in the name. If you have a foo.bar.isotext file that’s not really an .iso file, you’ll have to ignore that result because the locate command is going to find it.
But wait, there’s more!
You can limit the search to just a single directory. The command may not look conventional, but the syntax is as follows:
1 | locate ".<file_extension>" /path/to/directory/ |
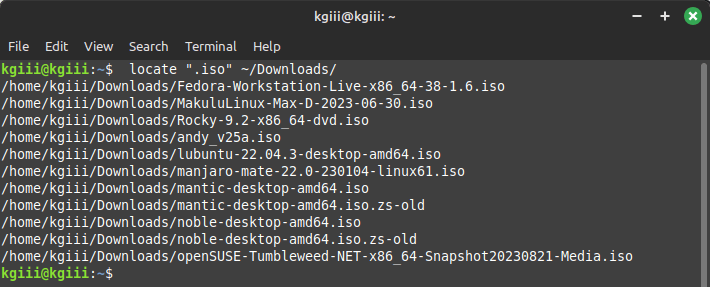
Let’s say that I want to find all the files ending with .iso in my ~/Downloads/ directory. That command would be simple. It’d look like this:
1 | locate ".iso" ~/Downloads/ |
An example output might be something like this:

See? It’s not too hard to use the locate command. You can do more with the locate command, but this is just using it to find files by extension. Read the man page to learn more about it.
EDIT: Closed parentheses thanks to @Osprey.
Closure:
Well, this is a fairly short article. This time around, we just used a different method to find files by extension. There are lots of tools at your disposal and we use the locate command for this one. Just remember to update your database before you use it. Other than that, it’s pretty simple. It’s easy enough for new folks to use it!
Thanks for reading! If you want to help, or if the site has helped you, you can donate, register to help, write an article, or buy inexpensive hosting to start your site. If you scroll down, you can sign up for the newsletter, vote for the article, and comment.