Today’s article will be a bit of a weird one, as I share with you one way to find local network devices using the Linux terminal. I suppose network device discovery is typically seen as a dark art, something a malicious hacker might do, but it’s completely harmless (in and of itself). So, if you want to find local network devices, this article just might be for you!
What we’ll actually be doing is scanning a block of IP addresses to see what responds to our prodding. This is sometimes called IP Scanning or IP Sweeping. It’s also sometimes called Port Scanning, but we won’t be doing any real port scanning. I assure you, I am not secretly trying to turn you into a big bad hacker – but this is a pretty neat ‘hack’ (in the traditional sense of the word).
We will be learning just a single command (with a bit of explanation) with a single flag. It’s a very complicated tool and trying to cover it all would take a giant article or many smaller articles. You can guess which one we’re going to do!
The tool we’re going to use for this is called ‘nmap’. This is available in every major distro. It might be installed by default. It’s just the tool for the task at hand, so you need to install it before you can use it as this article will suggest. (I trust you to know how to do so at this point.)
Did you install nmap? If so, please continue. If not, read the last paragraph.
With nmap installed, you can check the man page to see that it’s described as:
nmap – Network exploration tool and security / port scanner
Now you’re ready…
Find Local Network Devices:
Picture this…
So, for some reason, one of my laptops has stopped answering on the .local domain when I want to connect to it with SSH. I have choices at this point. I could fire up Team Viewer and then connect to the laptop to find the IP address belonging to the said laptop. Another choice would be to get off my lazy butt and walk to the device, but that defeats the point of remotely controlling the device.
I suppose the best choice would be to just figure out why it’s stopped responding on the .local domain. Wouldn’t that be novel?
But, I have another tool! I have a tool that’s reasonably fast, very easy, and likely effective! That tool is, as suggested earlier, nmap.
The first thing I do is crack open a terminal to find my local IP address. That’s easy enough and the link will show you how to find your private (or local) IP address. Though it needn’t be private. Security by obscurity is not security – and it’s trivial to learn. But, that’s an article for another day.
I was able to quickly learn that my local IP address is 192.168.215.88. From this, I realize that the most common configuration will be for everyone to be on the same subnet and so my laptop likely falls within the 192.168.215.1 to 192.168.215.255 range.
We can use the asterisk to represent any of those numbers, as it’s a wildcard. This means the next command is obvious and will be simply:
1 | nmap -sn 192.168.215.* |
The -sn flag would mean ‘do not do a port scan’, so it’s checking only for devices that return a ping. Make sense? (It’s a pretty speedy command when not also scanning ports.)
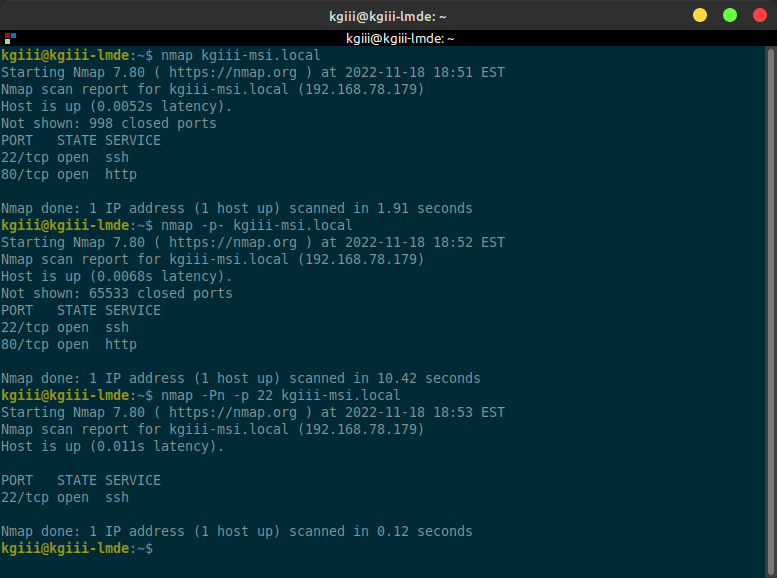
A Picture Of nmap:
I think that this is one of those instances where my text isn’t quite clear enough. So, what I’m going to do is show you a picture.
The nmap command I ran showed me a list of local network devices. As I already know the IP address of the device I’m using, I can exclude that from the list. The device I’m looking for (my laptop) is then a different IP address.
The process looks something like this (trimmed down to just have one device for simplicity’s sake):

As you can see, I first tried to connect with the .local domain and found that it did not work. So, I ran the nmap command and used a wildcard to scan the entire IP address range (1 to 255).
Sure enough, the IP sweep with nmap found another device and showed the IP address. It showed the gateway, which I could also exclude. The process of elimination meant there was one IP address to try (it could have contained more devices). I tried to use SSH with that IP address and, sure enough, that’s my laptop!
See? I saved a trip across the room! I saved opening up a bulky application and waiting for it to do its thing before I could even try using it to connect to the laptop. In fact, I suppose I also saved the effort I could have spent just randomly guessing IP addresses and hoping I got the right one for my laptop eventually!
Closure:
I figure there’s a lesson in nmap in there somewhere. You never know when you’re going to need to find local network devices! Now, when you do need to do so you will know how.
I figured I’d try writing this one in a way that showed you how I benefit from knowing how to do this. I figured that it’d be interesting to show you how the command solves a real problem. There have been a few articles similar to this and they’re fun articles to write. They are articles that come from the real me, the me that is actively using and appreciating Linux (often in the terminal) in my day-to-day life.
Thanks for reading! If you want to help, or if the site has helped you, you can donate, register to help, write an article, or buy inexpensive hosting to start your site. If you scroll down, you can sign up for the newsletter, vote for the article, and comment.