Count The Number Of Running Processes Per User

This won’t be as complicated as it seems because we’re just going to cover how to count the number of running processes per user. This is a fairly basic task that requires fairly basic tools. If you want to count the number of running processes per user, read on! It’s quite simple…

Your Linux system requires many running processes. A running process is an application, though some applications can have multiple running processes. The Linux kernel manages processes and a full desktop system will require hundreds of processes to be complete.

Processes are on a per-user basis. As explained before, Linux is a true multi-user operating system. Each user will have their processes and all processes will be owned by a user. It’s a pretty basic concept once you get your head around it.

You won’t need to install anything for this article. We will use some basic tools to show you how to count the number of running processes per user. This isn’t an advanced operation and you’ll almost certainly have the correct tools installed.

What tools will you need for this article?

ps:

The first tool you’re going to use is the ‘ps’ application. Don’t worry, the application is installed by default. You can confirm this with this command:

Additionally, you can check the man page with this command:

If you do that, you’ll see that this is the correct tool for listing the running processes in your Linux system. It’s described like so:

ps – report a snapshot of the current processes.

See? That’d be the correct tool for listing the currently running processes.

We’ll also use…

wc:

This too will not require any additional software. It’s a near-certainty that the wc command is included in your Linux operating system by default. You can confirm that wc exists with this command:

When it comes to counting things, the wc command is the go-to command. You can tell this by checking the man page with this command:

As you’ll see, the wc command is described like so:

wc – print newline, word, and byte counts for each file

So, wc is the correct tool. We’ll use the -l flag (count lines) to go along with the wc command, meaning this should be something you can figure out already without me needing to write the rest of the article! Linux isn’t all that difficult to work with and the terminal doesn’t have to be a complicated affair.

Count The Number Of Running Processes Per User:

Both the ps and wc commands are terminal-based commands. That means you’ll need an open terminal to count the number of running processes per user. You can usually open a terminal by pressing CTRL + ALT + T. If that doesn’t work, open one from the application menu.

With your terminal open, you can show the number of running processes with the following command:

That’s the first part of this exercise. 

Next, we’ll use a pipe. We’ll pipe the output from that command to the wc command and tell the wc command to count the lines. That’s done like this:

That will give you a count of all the running processes which is nice but not the goal of this article. This article is meant to show you how to count the number of running processes per user.

So then, let’s show you how to show the processes owned by a user…

For example, I’d find processes owned by me with this command:

Now, to count the number of running processes per user you just go ahead and pipe it to the wc command used above, like so:

Again, an example:

That command should show you all the running processes that are owned by root. It’s a pretty easy set of commands to figure out and I’m sure you can figure it out from here…

Closure:

Well, we set out to learn how to count the number of running processes per user. I’d like to think we accomplished that goal. You never know when you’ll want to see the processes owned by a user, but it could be useful when debugging things – like finding out what’s eating up your resources.

This is one of those commands that are pretty obvious once you know about it. They’re two simple commands that combine to create a pretty good result. Linux is like that. You don’t always need to know some esoteric commands. You can often combine some basic commands to get the output you’re after. You can achieve much with just a few basic commands and it’s good to get more comfortable doing so.

Thanks for reading! If you want to help, or if the site has helped you, you can donate, register to help, write an article, or buy inexpensive hosting to start your site. If you scroll down, you can sign up for the newsletter, vote for the article, and comment.
Show Running Processes

Your Linux system will have a lot of things running and these things have their own process, so let’s learn how to show running processes in the Linux terminal. This is something that’s a bit more advanced than most regular desktop users will need, but it’s still worth knowing.

You may not realize it, but you have a whole lot of processes running. These processes are what makes your system work. Without them, you’d have no activity. There’s a lot you could learn about processes, such as how they’re not all owned by your user account and how they all have their own process identification number (known as a PID).

None of those things are important for today’s article.

Today, we’re just going to show running processes in the terminal. It’s not a very complicated thing – and I’ll show you a couple of things you can do with this exercise.

You won’t need to install anything. We’ll be using the ps command that is almost certainly installed by default.

The ps Command:

The ps command is exactly the tool we want to use. It’s used to show running processes, the goal of this very article. You can verify that ps is available (and it is, it has been around since the UNIX days as I recall) with this command:

If you check the man page, you’ll confirm that this is the right tool for the job:

ps – report a snapshot of the current processes.

This is pretty self-explanatory. We’ll be using that very command to show running processes on your Linux box. Well, I suppose this would also be valid for the other *NIX OSes, like BSD and probably MacOS. I don’t use those OSes, so I can’t confirm the availability of the ps command – but it’s pretty likely to be there and perform the same task.

Show Running Processes:

As I mentioned above, you’ll need an open terminal for this exercise. You can open your terminal from your application menu. You can usually just press CTRL + ALT + T and your terminal will open.

The ps command reads the files in the /proc directory and doesn’t need elevated permissions to run. Some of the processes will not be owned by you, so acting on this information may require elevated permissions.

With your terminal open, simply run the ps command in the terminal:

As you can see, that’s not a lot of running processes. It doesn’t show them all.

If you want to see all the running processes:

Or, if you want to really use the ps command to get a lot of information:

Now, you don’t always want that much information at once, so try this:

There are times when you’ll want to use the ps command for a purpose, such as finding the PID of an application that’s frozen. To do that, you can pipe it to grep and limit the output. For example:

There’s a lot more to the ps command, so check man ps for more information. This is just scratching the surface.

Closure:

Well, this ended up shorter than I expected. I don’t want to dive in too deep. The goal is just a quick overview, but I expected it to take longer to describe this stuff. Fortunately, it’s a fairly easy subject – on the surface. Dig into the man page and you’ll see there’s quite a bit more that you can do.

Thanks for reading! If you want to help, or if the site has helped you, you can donate, register to help, write an article, or buy inexpensive hosting to start your site. If you scroll down, you can sign up for the newsletter, vote for the article, and comment.

How To: Stop, Pause, and Resume Processes Running in Your Terminal

As you learn Linux, you’ll possibly find yourself using the terminal more often. You’ll run processes in the terminal because you need to or because you prefer to. This is how you stop, pause, and resume those processes running in your terminal.

There are any number of reasons why you’d need to do this. I’ll give you an example in the main part of the article, but there are all sorts of reasons to know and use this information. There are a few generic reasons to do so, of course.

First, you’d want to stop processes because you don’t just want them to keep running forever. That’s the easy one, though they’re all easy. Speaking of which, this article should be pretty short and easy.

Second, you’d possibly want to not stop but rather pause a running process because you expect to return to it. This is different than stopping the process. It’s very much like pausing a movie.

Third, obviously, will be resuming the above mentioned process. If you’ve paused a running process then it only makes sense to know how to resume said process. If you don’t intend to resume it, it doesn’t make much sense to pause it.

This article will explain how to do all three of these operations!

Stop, Pause & Resume Terminal Processes:

So, we’re going to need both a practice exercise and an open terminal. Let’s start by getting the terminal open by using your keyboard and pressing CTRL + ALT + T.

That should open your default terminal. Assuming it does open your terminal, I want you to run the following command:

Once started that command will keep running over and over again. I assume you don’t need to keep pinging forever, so you can stop it with CTRL + C. That’s it. Once you issue that command, the process will stop.

What if you don’t want to stop it – you just want to pause it for a little while? Well, run the ping command again and this time use CTRL + Z. When you issue that key combination, the running process will pause and be pushed into the background.

If you want to resume running that process in the terminal, in that same terminal, you just use the following command:

Unlike the first two, it’s text that you enter into the terminal before you press enter. There’s no CTRL + anything that you use. You just literally type ‘fg’ (think foreground) and press enter. That brings the paused process back into the foreground and resumes running it.

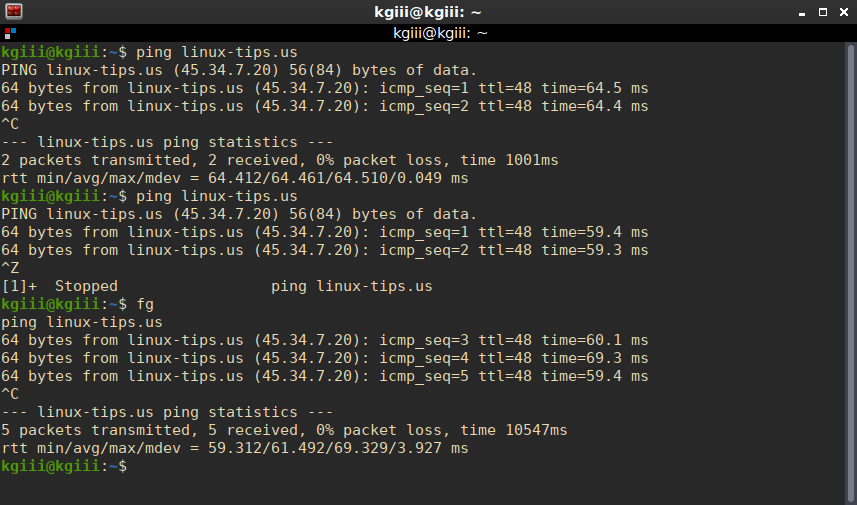
The above commands, when run in succession, should look a little something like this:

terminal
It should look a little something like that. Those are the commands from above.

You can do this with all sorts of applications that run in the terminal. You can stop, pause, or resume, as needed by moving the running process into the background and then bringing it back into the foreground.

If you look carefully at the above image, you’ll see that it counted five packets as being transferred. This indicates that the process doesn’t keep running in the background. It’s truly paused. Typing ‘fg’ and pressing return brought the process back to the foreground, where it continued pinging this site.

Closure:

There you have it. It’s another article in the books! This one tells you how to start, pause, and resume processes running in a terminal. Hopefully, you can find some use for it. If you have any ideas for articles, feel free to leave a comment. My publication schedule seems to be working, so you can expect another article every other day.

Thanks for reading! Your readership and feedback helps keep me motivated! If you want to help, or if the site has helped you, you can donate, register to help, write an article, or buy inexpensive hosting to start your own site. If you scroll down, you can sign up for the newsletter, vote for the article, and comment.

Subscribe To Our Newsletter
Get notified when new articles are published! It's free and I won't send you any spam.
Linux Tips
Creative Commons License
This work is licensed under a Creative Commons Attribution 4.0 International License.