Today, we’re going to learn to clear the terminal screen. This is generally done for privacy’s sake. You don’t want people to be able to scroll up and see what you’ve been reading in the terminal. This probably isn’t as important if you’re the only user and you’re in your house, but you may still like to keep things clean and tidy.
We’ll go ahead and cover two ways to clear the terminal in this article. They’re both rather easy commands and you’ll find this article is definitely not all that complicated, or even very long. This is pretty much one of the first things folks should have learned when they started using the terminal. We might as well cover it here.
Rather than make this long-winded, we’ll just make this into a short and easy article to read. Let’s all learn how to…
Clear The Terminal:
To be clear, this just erases the text in the terminal. It clears the scrollback content so that folks can’t scroll up and see the previous terminal contents. Again, it’s a good idea to do if you’re in a multi-user environment where people may have access to your screen and you don’t want them to know what has been written to the terminal.
Obviously, you need a terminal for this article. Just press CTRL + ALT + T and your default terminal should open.
I suppose we’ll need some content, so let’s try using this command:
1
ls -la
That should fill your terminal up.
Now, to clear it you can use either of the two following commands:
1
clear
Or you can also use:
1
reset
(Though reset may leave a little text at the top, it still removes the terminal’s scrollback history.)
Both of those will do the job, with ‘clear’ being the obvious winner = but it’s nice to have options. They’ll clear the scrollback in the terminal, preventing folks from scrolling up to read what has previously been written there. Of course, they could potentially still press the arrow up button and see what commands you’ve written, so you can try to prevent that as well.
Closure:
See? I told you that it’d be a quick and easy article. It’s not all that taxing to learn how to clear your terminal and that’s all that this article is meant to cover. Both of the two commands have a man page, but they’re not very useful commands for anything else but clearing the terminal. Have an easy day, a day where you can (maybe) say you learned something and not have to read a long article. After all, it was a quick and easy day for me!
Thanks for reading! If you want to help, or if the site has helped you, you can donate, register to help, write an article, or buy inexpensive hosting to start your own site. If you scroll down, you can sign up for the newsletter, vote for the article, and comment.
In today’s article, we’re going to explore a couple of other ways to generate strong passwords in Linux. It’s going to be a pretty easy task and one most everyone can learn from. It shouldn’t even be a very long article.
Weak passwords are easy to crack. You don’t want that, for obvious reasons. If you want to see how approximately how long it’ll take to brute force passwords, you can check sites like this one. Remember that the time given by that is more or less the maximum time it could take, and your password could be brute-forced (by repeated guessing) much sooner than that.
I’ve previously written an article about generating a sufficiently complex password. That’d be one way to generate strong passwords, but this article will cover a couple of other easy ways to generate strong passwords in the Linux terminal.
Generate Strong Passwords:
This article requires an open terminal, like many other articles on this site. If you don’t know how to open the terminal, you can do so with your keyboard – just press CTRL + ALT + T and your default terminal should open.
With your password open, we’re first going to use GPG to create a strong password. Everyone should already have GPG installed, so there’s no reason to cover that in this article. So, to do so, you’d use a command something like this:
1
gpg --gen-random --armor 1 16
It’ll have an output similar to this one:
Obviously, you don’t want to use that password specifically! Use your own!
You can change the 16 to any length you want. It’s obviously the number of characters.
You can also use OpenSSL, which you likely have installed, to generate a complex password. It’s actually pretty easy and the command is:
1
openssl rand -base64 24
Again, you can change the 24 to anything you darned well please. Sometimes sites will have a maximum password length, which might seem kinda silly – as I think I recall there being a hard limit of 256 characters that the kernel will accept. Either way, the output would be similar to this one:
That one is 24 characters long. Yay!
Feel free to mess around with changing the length. OpenSSL is likely installed by default and you don’t have to install pwgen. Both of the tools in this article will likely be installed by default.
Closure:
And there you have it! Another article said and done. This one is about teaching folks how to generate strong passwords in Linux. It’s an easy enough task and this article shouldn’t be too complicated for even the most n00b of the n00bs!
Thanks for reading! If you want to help, or if the site has helped you, you can donate, register to help, write an article, or buy inexpensive hosting to start your own site. If you scroll down, you can sign up for the newsletter, vote for the article, and comment.
This article is a bit of a review of some software called ‘uMatrix’. If you’ve never heard of it, it’s an impressive piece of software – especially considering it’s a browser extension.
I was nosing around some old projects in my GitHub when I decided to look upstream. Lo and behold, Ray Hill (gorhill of uBlock Origin fame) has picked up developing uMatrix again. (Install through your browser’s extension manager. Links below.)
Well, do you remember old school firewalls where you could not just block things by application, you could be even more refined – like narrowing it down to which port, ingress or egress, and even which domains that application could connect with?
Imagine something similar to that, except it’s for your browser. For each page, you can elect to block images, CSS, cookies, scripts. Then, you can decide which scripts and which CSS to allow through. You can elect which third party assets load, from cookies to images – and you can do so on a domain name basis.
There’s a learning curve. It’s a pretty big learning curve for a browser extension. Plan on a couple of hours to really get used to it – and to get your favorite sites configured. You need only configure them once and then you can backup the settings so that you can use it on multiple devices or put it aside for safekeeping.
It WILL break sites. You WILL get frustrated.
More About uMatrix:
If I took privacy serious and were more security focused, I would not use the internet without uMatrix. As it stands, I have an older version (now updated) configured in one browser for when I want to visit stuff I absolutely don’t trust. If you take privacy serious (and cross-domain scripting, third party cookies are a huge no-no, but so shouldn’t images and CSS files) then you really, really should take a look at this extension.
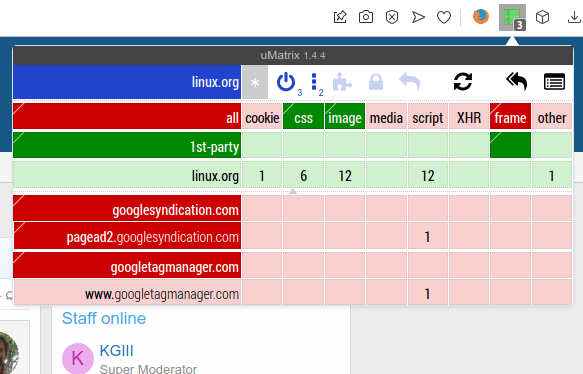
Take a look at this:
Look a little daunting? You can figure it out. I have faith in you!
In each of those columns, you can click to block it everywhere or to allow it on this one specific domain. As you can see, there’s everything from cookies to CSS, from media to scripts. The refinement you can achieve is amazing. It will take some work and time for you to ‘get good’ with uMatrix.
Now, you basically want it to operate in the default configuration you have it in right after installing, only allowing CSS and images from the domain you’re visiting.
When a site refuses to work properly, you can start by allowing scripts on an individual basis – on the per-site basis you see from the domains listed on the left. You can click on two areas in each column to give fine-grained permissions. After a while, you can get pretty quick at deducing why it doesn’t work. It’s usually a script from another site that needs to be enabled.
You’ll also learn how much cruft the web has, browsing much faster and having fewer scripts chew up your CPU and RAM. If you have a low-end computer, this is also a must-have.
At one point, Hill had stopped working on the project and shuttered it. I’m not sure when he started working on it again. I’m glad they did because it’s the best privacy and security browser extension I’ve ever seen in my life. Now that he’s working on it again, I feel comfortable recommending it.
uMatrix Review:
Really, I wrote this to share my joy. If I had to review it, and I guess I have to, I’d give it a solid 9.5 out of 10. I’ve deducted a half point because there’s no effort to make it all that intuitive to new people and this makes the learning curve harder. It’s hard to explain, but once you see what it does you will understand it better.
Not even I can make it all that intuitive until you actually test it out and start browsing the web with it. If you get frustrated, settle down and relax. You can make it work. It will take some time to get used to the new paradigm. You can browse much faster (more so than from just blocking ads) when you’re not loading a bunch of 3rd party cruft.
You might as well know where to get it. It’s available for the two major browsers, plus in Opera’s own little extension store. These extensions work fine on same-family browsers, like Pale Moon or Google Chromium.
Give it a shot. Commit to browsing with it for a full day and see for yourself what the web is like when you’re not loading tracking cookies, scripts, ad images loaded from other domain names, and so much more.
By the way…
I worried more about these things years ago, back when I was a Windows user and for the times when broadband wasn’t a realistic option. I was more concerned with my security and letting scripts load in the browser, so I’d use uMatrix. It had the added benefit of doing a great deal to protect my privacy by making it extremely difficult to track my movements across the web. These days, browsers are much more secure and run in their own containers and I care less about privacy.
Even just blocking remote scripts, media, and images will speed up your browsing noticeably. By the time you have it configured for the sites you visit, you’ll have a pretty secure and private browsing experience. You should also consider making it work in incognito mode if you make regular use of private browsing.
Closure:
There you have it, another article. This one is a review of uMatrix, one of my favorite browser extensions even though I don’t actually bother with it for most of my browsing. I used to browse with it exclusively, but I’ve given up caring. If you care, and many of my readers do, then I highly recommend trying it for a full day. Commit to a full day and then leave a comment telling us of your experiences.
Thanks for reading! If you want to help, or if the site has helped you, you can donate, register to help, write an article, or buy inexpensive hosting to start your own site. If you scroll down, you can sign up for the newsletter, vote for the article, and comment.
One company likes to send me a password-protected PDF every month, and it can be a pain typing in the password every time. Fortunately, we don’t have to! To completely remove the password from password-protected PDFs, keep reading!
Now, there are times when removing the password from a password-protected PDF is against corporate policy or may be a violation of regulations. I suppose a good rule might be, “Don’t tamper with the password protection unless the PDF belongs to you.”
That said, it’s actually pretty easy to remove the passwords from password-protected PDFs. It’s easy and I’ll show you how! This won’t even have to be a very long article!
Remove Password From A Password-Protected PDF:
Like oh so many of my articles, this one starts with the terminal open. If you don’t know how to do that, it’s easy. Just use your keyboard and press CTRL + ALT + T and your default terminal emulator will open.
The tool we’ll be using is called ‘qpdf‘ and it describes itself as:
PDF transformation software
Once you have that open, one of the following should help you install qpfd:
Debian/Ubuntu:
1
sudo apt install qpdf
Arch/Manjaro:
1
sudo pacman -S qpdf
RHEL/Fedora:
1
sudo dnf install qpdf
Any of those should get you to the point where qpdf is installed, and there shouldn’t be (m)any dependencies. Using it is just as easy as installing it.
Obviously, you change “PASSWORD” to the password that’s used in the password-protected PDF to the actual password. You also use the name (and path) of the PDF and a new name for the new PDF that has no password. That will, of course, remove the password and you can delete the original after verifying that it worked.
BONUS:
You can actually use qpdf to make a password-protected PDF. It’s also easy and the command would look like this:
In this case, the PASSWORD is your new password and it must be typed twice. The 256 is the key-length used to encrypt the PDF. To get more information like that, just run:
1
qpdf --help
In there, you’ll see that qpdf is really quite a potent application. It can do so much more than just stripping the password from a password-protected PDF. So, give that help file a scan and see what other features it has!
CLOSURE:
See? I told you that this article wouldn’t take all that long. Best part? It’s another in what’s a growing list of articles and it’s something you can actually use when you get a password-protected PDF. Again, if you’re gainfully employed or in a regulated occupation you may not want to remove the password protection.
Thanks for reading! If you want to help, or if the site has helped you, you can donate, register to help, write an article, or buy inexpensive hosting to start your own site. If you scroll down, you can sign up for the newsletter, vote for the article, and comment.
It is possible to use sudo without a password. Doing so is probably a pretty bad idea for most people, but it can be done. Password-less sudo is an option that you have, but it’s one heck of a security risk.
I have pretty good physical security and the risks of someone physically accessing my devices are pretty minimal. There’s no neighbors that can access my WiFi, or anything like that. Because of this, I can, and sometimes do, set up my computers so that I don’t need to use a password when I use sudo.
I feel like I need to make this clear:
If you set it up to use sudo without a password, you’re removing a key security element. If you can use sudo without a password, so can’t someone who’d be doing so with malice aforethought. It’d be even more risky if you did this on a laptop that might get misplaced or stolen.
In short: DO NOT DO THIS (without considering the security implications).
By the way, if you don’t know what sudo is, it stands for “superuser do”. It’s what you use to temporarily elevate your permissions, to read, write, or execute administrative (or otherwise restricted) files. Basically, it turns you into an omnipotent administrator.
Again, be careful before doing this. If it makes you an omnipotent user, it makes anyone that can access the device an omnipotent user. You have been warned. If you’re comfortable with your physical security, this is an option. It’s an option you should consider only with care and diligence.
Like so many things, this too starts in the terminal. As always, you can open your terminal with your keyboard, just press CTRL + ALT + T and your default terminal should open. Once it is open, enter the following to open the file with nano:
1
sudo nano /etc/sudoers
Arrow button yourself down to the bottom and add the following line:
1
<your_username> ALL=(ALL) NOPASSWD:ALL
Where it says “<your_username>” you change it to your username – without the brackets. So, if your username were the same as mine, you’d make a line that looks like:
1
kgiii ALL=(ALL) NOPASSWD:ALL
The ‘kgiii’ is lowercase, and your username will be lowercase. If, for some reason, you don’t actually know your username, you can find it with:
1
whoami
Anyhow, after you’ve added that line, you can save the file. As we’re using nano, you save it by pressing CTRL + X, then Y, and then ENTER.
That should get you sorted and you should now be able to use sudo without a password. If you are aware of the security implications, this may just be something you want to do. On the other hand, it’s not exactly taxing to type your password.
Closure:
And, once again, you have another article! I’ve reached the point where I have a small buffer. I could be offline for a few days and articles will still publish themselves. I’m hoping to get even further ahead, so we shall see how it goes.
Thanks for reading! If you want to help, or if the site has helped you, you can donate, register to help, write an article, or buy inexpensive hosting to start your own site. If you scroll down, you can sign up for the newsletter, vote for the article, and comment.