How To: Enable The Root Account in Ubuntu

This will be a quick and easy article, where I explain how to enable the root account in Ubuntu. It’s easy to enable the root account, but you may not want to. The choice is up to you.

This article really starts here, with a pet peeve. See, Ubuntu doesn’t ship with root enabled by default and it does that for security reasons. If there’s no root account, the root account can’t be compromised. Instead, it relies on sudo for elevating permissions. If you ask at some sites, they’ll give you a lecture instead of telling you how to enable root.

Me? I disagree with that. If you want to know how to enable root, I’ll tell you how to enable root. It’ll likely come with a blurb that tells you why you may want to avoid doing so – but I’ll give you the answer to your question.

About the only time I won’t give you a direct answer is when it’s obvious that you’re asking me to do your homework. I may also not tell people how to do their job. After all, I don’t want incompetence entering the workforce and I don’t want incompetent people staying staying in the field.

I view Linux as not just an OS but also as a bit of a philosophy, a philosophy of constant learning, continued improvement, and a never-ending quest for greater understanding. If someone wants to know how to enable root, I’m damned well going to tell them how to enable root.

Yes, it may lessen their security, and I’ll make sure to tell them that as well. I’ll be sure to tell them why Ubuntu made the choice and what it means if they undo it. It’s their system. If they want to enable root, I will help them do that.

Enable Root in Ubuntu:

Having said all of that above, it’s actually really trivial to enable root in Ubuntu. The first thing you’re going to do is open the terminal. Like always, you can use your keyboard, just press CTRL + ALT + T and your default terminal will open up.

Next, you’ll want to enter the following command:

Now, first it’ll ask for your current user’s password. Enter that. When you enter that, it’ll ask you to set a password for ‘root’. You’ll need to enter that password twice. Once you’re done with that, you’re done with it. That’s literally all it takes.

If you want to test this, you can login as root in TTY. Press CTRL + ALT + F3 and login as root, using the password you just assigned. To get back to your desktop, just press CTRL + ALT + F1 and it should bring you right back. If not, or if you’re not using Ubuntu, you can press and hold the left ALT button and then press the until you’re back at your desktop.

NOTE: This won’t enable GUI login as root. I’ll explain how to do that in a future article. This only enables the root account and nothing more.

If you do enable root, be aware that that means the root account can be compromised and used. Root has all the permissions. All of ’em… So, if the root account is compromised whoever has done so has complete control of the system. You should be aware of this before you make this change. Only make this change if you know what you’re doing and if you’re prepared for the consequences.

Closure:

And there you have it. You have another article in the books, this one explaining how to enable the root account. Think twice before doing so, but it’s your device and you get to make that decision. Just be aware of the consequences of doing so and you should be all set.

Thanks for reading! If you want to help, or if the site has helped you, you can donate, register to help, write an article, or buy inexpensive hosting to start your own site. If you scroll down, you can sign up for the newsletter, vote for the article, and comment.
How Long is my Ubuntu Support Going to Last?

Ubuntu versions, and official flavors, have different lengths of time that they’re supported. Today, we’ll learn how to tell how much longer you have Ubuntu support and what you can do about it.

Every two years, Ubuntu releases a LTS version. That means “Long Term Support” and the support length for that is usually 3 years, and then it enters ESM, which means Extended Security Maintenance. Except when they don’t, and you get 5 years of support and 10 years of ESM.

Ubuntu’s official flavors have LTS versions that also come out every two years. Those are supported for three years and then you have no access to the flavor-specific updates unless you update to the newest LTS version of said official flavor.

Every six months, Ubuntu releases an ‘interim’ release. These releases are supported for nine months, which means you have a three month window to upgrade to the next version before the upgrade window closes. These releases also explore new versions of software that will make it into the LTS releases.

LTS releases are always YY.04 releases, but not all YY.04 releases are in fact LTS releases. They’re only LTS releases if the year of release was an even year. So, 18.04 and 20.04 are all LTS releases and there won’t be another LTS release until 22.04 –  which, according to Ubuntu’s versioning format will be in April of 2022.

Confused yet?

I can’t blame you if you are! After all, unless you spend all your time learning about this sort of stuff then you’re not going to remember that. At best, you have the “proper” configuration and you upgrade when your OS tells you to upgrade. If you’re using an interim release and miss that upgrade notice then it can be quite an ordeal to upgrade to a new version.

Let’s figure this out.

How To: Check Ubuntu Support Status

Fortunately, you can check your support status pretty easily. The results may be confusing, but you’ll figure it out.

Like so many articles, let’s crack open the terminal. Just use your keyboard and press CTRL + ALT + T to open your default terminal emulator.

If you’re using 18.04 or older, then you use the following command:

If you’re using 18.10 or newer, then you’d use this:

Your output will look something like this:

Which, as you can see, says I have support until 2025. If I had ESM enabled, that’s software from the Ubuntu Advantage program, then I’d have security updates even longer. As you may recall, that requires Snap apps, and I’ve chosen to disable Snap Applications. So, obviously I won’t be doing that whole ESM thing. 

Not that it matters with the ESM, because I’m using Lubuntu. Where it says 2025, I have to assume “official support” to only last until 2023 – three years of support. Now, you can keep using an official flavor beyond those three years, it’s just that the official flavor parts won’t be getting any additional updates. That’s generally considered a Bad Idea®. But, you can do so, and that’s why the date for ending Ubuntu support is later than it really is.

Anyhow, that should make it more clear. You should find the end date of your OS’s support and keep that in mind. You should make plans to upgrade in a timely manner, because security updates are important to you and the rest of the ‘net.

NOTE: When your computer isn’t upgraded you’re a threat not just to yourself. You risk becoming compromised and becoming part of a botnet, spamming relay node, or worse. So, keep things upgraded. Thanks!

Like always, thanks for reading. You can participate by contributing articles, donating, or sharing the links with others. You can also sign up for the newsletter. I promise, I won’t send you any spam!

Quickly Reset Ubuntu’s Default Repositories

Is your software not updating? Are you getting repository errors when you try to upgrade? There’s a quick and easy way to reset the Ubuntu repositories to the defaults.

Ubuntu, like all Linux distros, uses repositories for distributing software. This provides a central location for curated, standardized software that’s almost certain to work on your system. These repositories are not just where you install software from, they’re also where you get your software updates.

If you want to see them in action manually, open your terminal and enter the following:

That will show you the system checking the repositories, updating your internal database of software and software versions. There aren’t a whole lot of defaults, so it’s usually a pretty quick process. If you’ve been adding PPAs or other repositories, it could take a while to get through the list.

Of course, if you see errors with that command then this might actually be the article you’re looking for! There are a variety of reasons why one might want to set the system back to the defaults, and it’s actually pretty easy once you know how.

Reset Ubuntu’s Repos

Like many articles and exercises, this one is gonna start with you cracking open your terminal. You should already know how to do that, but you can just use your keyboard and press CTRL + ALT + T.

Once you have that open, just go ahead and run this horribly destructive (I kid, I kid) command.

NOTE: That command could have a horrible outcome if you mess it up. Be sure to double-check it, or use copy/paste. If you screw this up, you can delete files that you really don’t want to delete. You have been warned!

That command will erase all the entries in your ‘sources.list’ file, technically deleting the file itself, which is not necessarily a good thing. Fortunately, it’s a necessary step and only the first step. The next step is also easy – and more or less mandatory.

Just run the following command:

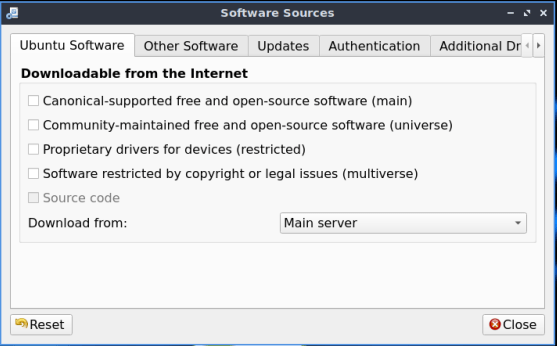
Up should pop a window that looks a whole lot like this:

software properties
Note the lack of any selected repositories. The next step should be obvious.

There you go. You have a blank slate. Select from those four (or five, if you want the source code and have selected at least one other repository) and then click close. When you close it, the system will ask you if you want to update the database and you should agree, of course. You can also change the server from which you download, and most people pick a server that’s geographically close.

That’s it. That’s all it takes to reset your Ubuntu repositories to the defaults. There’s no wizardry involved. You’re simply removing one file and recreating it with the defaults. You could do it all with a file manager if you opened it as root, but the terminal is faster and easier.

Thanks for reading. Feedback is always appreciated. You can sign up for the newsletter and get a notification when new articles are published. A couple of people asked, so I’ve set it up so that you can donate to help fund the site. I’m not going to try to guilt you into donating. The site will remain online and continue to grow even without donations. Still, I had some interest and figured I’d add it as an option. 

Linux Tips
Creative Commons License
This work is licensed under a Creative Commons Attribution 4.0 International License.