This is a guest article by @captain-sensible, about Linux installation – specifically creating USB media using Windows. I trust him on this, and don’t feel qualified to do much in the way of editing as I know next to nothing about Windows. So, without further ado:
Preamble:
If you already have Linux as your OS, then an article about how to get a Linux .iso onto a USB stick is probably redundant. The other thing I can deduce is that if you want to have a go at trying to install Linux, that would mean you probably don’t have Linux OS nor access to programs that run on Linux.
You might think an article involving Windows is not a good fit for Linux tips? Well I disagree the tip to put it succinctly is this – “Linux and how to get it” I.e. you want Linux but you don’t have it, and so the article is about getting it using the only tool you probably have at your disposal, which is Windows. (That’s assuming you don’t have any avisée friends using Linux)
Therefore, I am going to go through how to use Windows and software tools to get a Linux OS iso file onto a USB from which you can boot. Maybe in part 2 I could mention use of ventoy on a Linux box and persistence for a live Linux OS on a usb .
Now there are a couple of tools you can try including:
https://www.balena.io/etcher/
https://rufus.ie/
But here we will have a look at Ventoy. Ventoy has a couple of useful features – you can put several Linux ISOs onto the same stick and boot from any of them via the Ventoy boot splash menu. Also via one of the Ventoy tools called CreatePersistentImg a file is created, inside the same directory that the script is run and can be configured to be used on the formatted stick with the ISOs so that the live OS can install software.
Our Agenda will be:
- Download a Linux .iso file
- Download Ventoy
- use Ventoy to format a USB stick we have
- Drag .iso file onto ventoy formated stick
- Boot from USB stick
Create USB Media Using Windows:
Normally I use Linux with ventoy; for this exercise using Windows10, I downloaded linuxmint-20.2-cinnamon-64bit.iso from University of Kent Mirror.
See Linix Mint Cinnamon Mirrors
Now with a download you need to check the integrity of the download. You can get the sha256 sum from:
https://ftp.heanet.ie/mirrors/linuxmint.com/stable/20.2/sha256sum.txt
And the gpg from:
https://ftp.heanet.ie/mirrors/linuxmint.com/stable/20.2/sha256sum.txt.gpg
Instructions for verifying your download can be found at:
https://linuxmint-installation-guide.readthedocs.io/en/latest/verify.html
Next we need to download Ventoy:
Go to this URL:
https://sourceforge.net/projects/ventoy.mirror/files/v1.0.52/
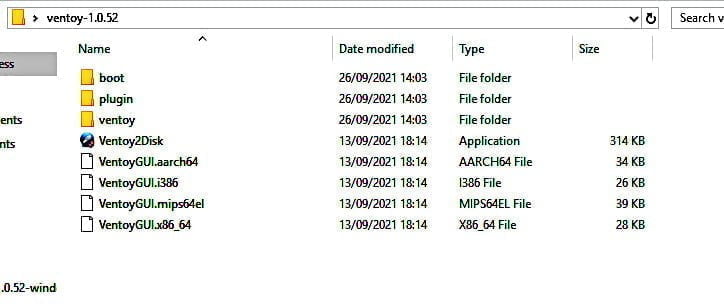
Shimmy down to ventoy-1.0.52-windows.zip and mouse left click to download it to your PC. Right click and choose “extract”. You will probably get something like select a destination – go for Desktop if you can; at least you can find it easily.
Anyway that will unzip the zip file. I found once unzipped that the directory I wanted was inside another directory called ventoy-1.0.52-windows, the directory and its contents you want is the one labelled ventoy-1.0.52.
See image below:

That’s the one that contains the tools you need including Ventoy2Disk, an executable Windows file. Drag that directory from inside the outer directory to your desktop.
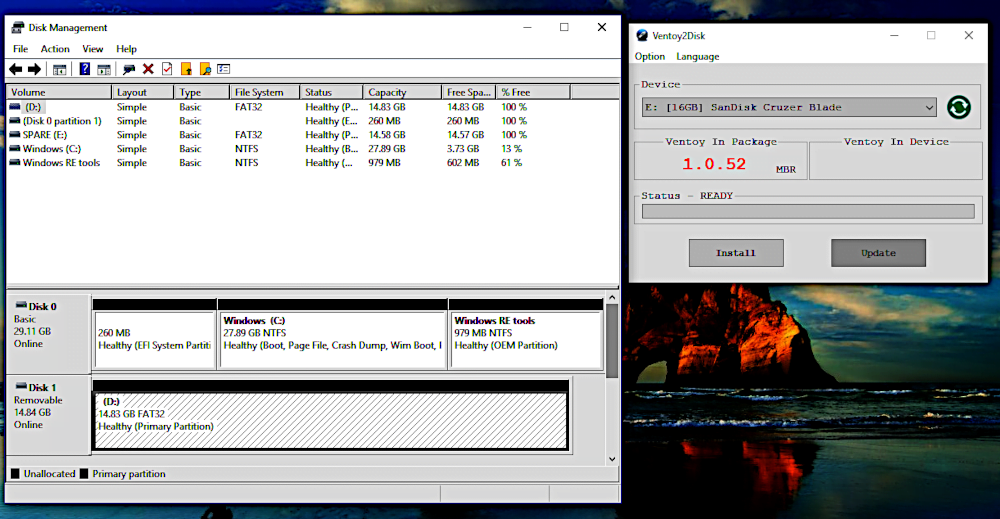
To fire up Ventoy, go inside the ventoy-1.0.52 directory and mouse left click twice on Ventoy2Disk. You should then see a dialogue box (see image below). Now from the image it tells you that it thinks Device E: SanDisk is the USB stick to be formatted. The main point being you need to insert a preferably virgin USB stick, a USB thumbdrive with nothing on it, into your PC before Ventoy2Disk can work on anything.
Now its always best to double check things. One way of doing that is to fire up a disk utility and see what’s listed. You will use common sense as well – A 16GB storage device is unlikely to be your PC internal hard drive. Lets have a look anyway.
One way of confirming is to use Disk management. To fire that up hit the key with Windows Icon on it and R, that should bring a dialogue box up with a text box . Into the text box type Diskmgmt.msc; you should then see Disk Management and entries – see image left.

I think I can conclude with Ventoy that Spare E is the USB I want to use. One reason is that I formatted it and labelled it using GParted. So next with USB attached to PC, left click on the install button of the Ventoy dialogue box. Now when its finished, pull the USB out and re-insert it , that’s to make sure the PC is correctly recognizing, the USB which will now have a label – ventoy.

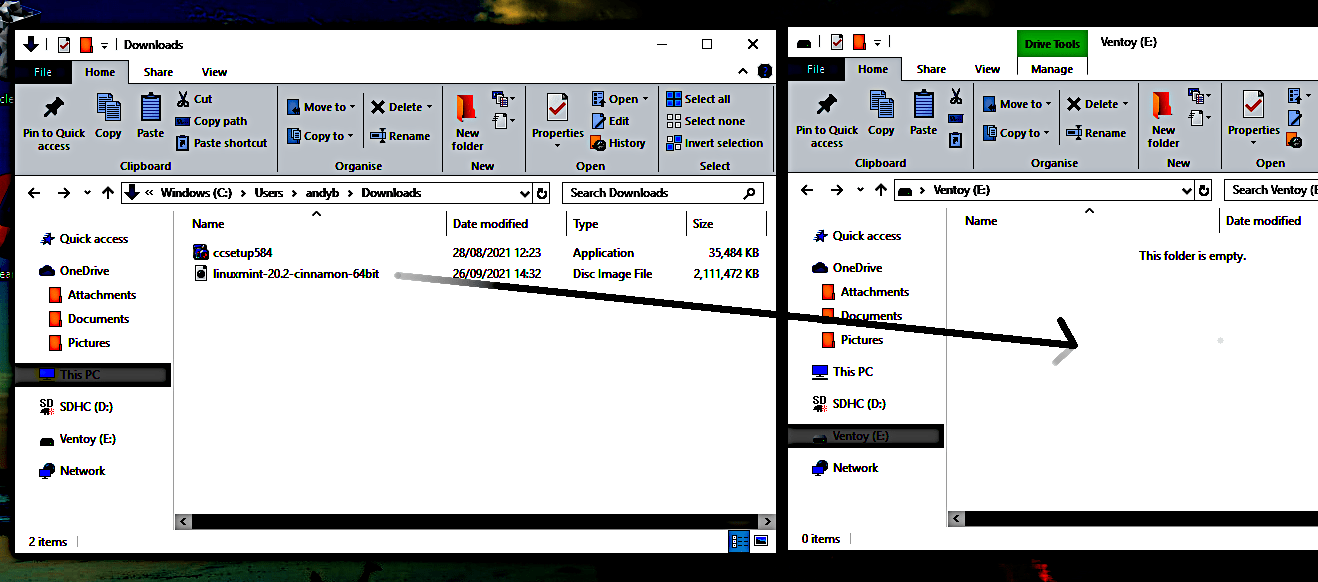
If you look at the above image, a window is open with location of the ISO file and the other Window on the right is the newly labelled USB stick called ventoy opened. All you have to do is use your mouse and literally drag holding down left, on the mouse from the left window onto the right window. You might have to fiddle with Windows, I know I did with Windows 10 on the laptop I was using.
Once that’s been done its a case of now shutting down Windows and from a cold boot hit the key which will give you boot options. The laptop I was doing the operation was a H.P stream so for that laptop F9 is the boot option key and F10 is the bios. You have to hit the keys almost immediately after powering up.
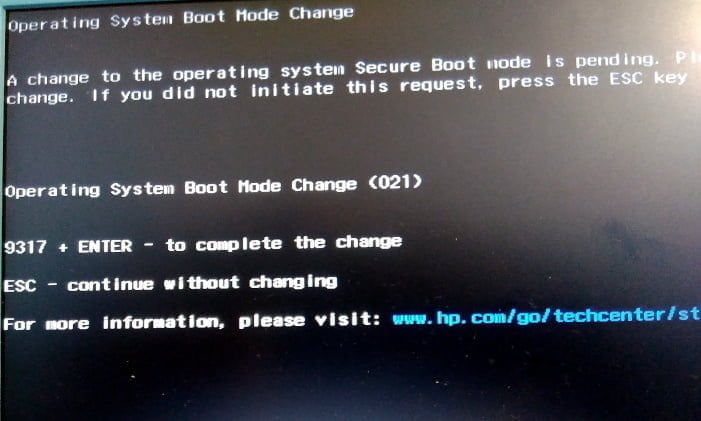
I had a couple of glitches on powering up, getting the boot option and booting from the USB I got “image not authenticated “now what came to mind was checking the integrity of the download. No that wasn’t it.

One issue was expected in disabling secure boot and enabling legacy boot; the other one wasn’t. What is was is that although I had edited the BIOS, there was a “Operating System Boot Mode Change” notification.
I did as requested entered the number quoted, hit Enter (return key) and after that I was Ok. I then got Mint booted live! Finally – Windows doesn’t like to let go easily.
Moving On:
Now when you get to the stage of getting a Linux OS up live from a USB here are a view bits of advice:
On the Desktop of your live Linux OS you will see an icon saying install Linux, don’t rush in and do that. Play around for a week with the live OS, get to know it and try of launching a shell (terminal window). Learn to use, at least launch and have a look at tools such as GParted and screenshot. You can use apt-get or apt from a terminal to search for that.
Those sort of tools and your ability to use them will come in extremely handy if you have any issues and need help from a Linux forum. Users will want to see your partitions (use gParted) and see what some things look like (use screenshot) they will probably also want to see some output of commands on the shell (your ability to use basic commands needed).
The live Linux OS you have doesn’t have persistence, you can play with installing software and it should install but only in RAM. You can achieve persistence with the Ventoy approach, but thats perhaps for another time.
Closure:
There you have it, an article about creating Linux installation USB media using Windows. This one was written by a guest, now a registered user and author. So, kudos to them for stepping up and contributing!
Thanks for reading! If you want to help, or if the site has helped you, you can donate, register to help, write an article, or buy inexpensive hosting to start your own site. If you scroll down, you can sign up for the newsletter, vote for the article, and comment.