Find A Command’s Binary

Today’s article should actually be fairly short and simple, as we learn how to find a command’s binary. For those of you who are new, I’ll do what I can to make this more clear. At the end of the day, all should become clear and it really shouldn’t take all that long.

So, when you run a command in the terminal, you’re calling the binary file that is that program. This is also true when you’re starting a command in a GUI environment. You’re loading a binary file. Well, no… You could be loading some sort of script – but most of the time you’re going to be loading a binary.

Well, what we’re going to do is show you where to find these binaries by using the ‘which’ command in the terminal.

HINT: They’re generally tucked away in /usr/bin/!

The command we’ll be using is the ‘which’ command. It’s a very simple command to use when you just want to find a command’s binary. If you run the ‘man which‘ command (not the sandwich made from burger) you’ll find it is described accurately, and as thus:

which – locate a command

And, that’s really all the command we need for this exercise. It’s dirt simple, but still worthy of its own article. Ready?

How To: Find A Command’s Binary:

Yup. You guessed it. We’ll be using the terminal for this article. We do that a lot at this site. So, open up your default terminal emulator. If you don’t know how to open the terminal, you can do so with your keyboard – just press CTRL + ALT + T and your default terminal should open.

With your terminal now open, try any one of the following:

Or:

Perhaps:

That’s right, the entire usage is just:

It even works for proprietary things, like:

If you want to be more curious, you can even find the binary for the very ‘which’ we’re using in this article:

See? This is so dirt simple that an absolute n00b can be up and using the ‘which’ command pretty much instantly! Using the terminal doesn’t have to be complicated. You can get comfortable using the terminal in just a few days and you’ll be better for it.

Closure:

So, yeah, that’s all the article you really need when your goal is to find a command’s binary file. It’s not even a wee bit difficult – and is a great way to explore the terminal when you’re new to it. Have fun!

Thanks for reading! If you want to help, or if the site has helped you, you can donate, register to help, write an article, or buy inexpensive hosting to start your own site. If you scroll down, you can sign up for the newsletter, vote for the article, and comment.
Monitor Bandwidth With nload

Today’s article should be fairly quick and simple, as we learn to monitor bandwidth with nload. It’s a handy tool that’s generally available across the many distros and is something you might find useful in your daily Linux journey.

You may also recall this article:

‘vnStat’ A Tool For Monitoring Your Bandwidth Usage

Well, today we’ll be learning how to monitor bandwidth with nload. You’ll find that nload has some visual similarities with vnStat – but nload doesn’t do logging. It’s a way to monitor your bandwidth in real time and, of course, in the terminal!

We do lots of fun stuff in the terminal! I didn’t actually expect so many articles to be terminal-based when I first started the site. Maybe I just hate taking screenshots?!?

Anyhow, this article will be published on a Sunday. It’s a weekend article, so it’s we can have a little fun with it. I’ll even keep it relatively short. You’re welcome!

So then, let’s just jump into the article…

Monitor Bandwidth With nload:

This article requires an open terminal, like many other articles on this site. If you don’t know how to open the terminal, you can do so with your keyboard – just press CTRL + ALT + T and your default terminal should open.

With your terminal now open, let’s go ahead and install nload. It should be in your default repositories, so it’d be installed with something like:

Fedora:

Debian/Ubuntu:

Etc… Fill in the above for your distro. You’ll find that nload defines itself as:

nload – displays the current network usage

With nload installed, you can simply start it with:

That will load all of your network adapters and you use your arrow keys to navigate between the network adapters. It should automatically find all your network adapters, so you don’t need to configure it to do so.

If you want to see the nload options available, press F2 where you’ll find you have some options available, including how long it takes for the application to find the averages.

If you want to monitor the bandwidth of just a single adapter, that command is actually really simple – it’s just:

For example, and using an an oft used Linux adapter name:

That’s about it, other than learning how to close the application. That may not be obvious to everyone, you can use Q or you can press CTRL + C to close out nload.

Closure:

And that is it, really. The article doesn’t really need more details to show you how to monitor bandwidth with nload. It’s quite a simple program and the output is entirely intuitive for even a rank Linux beginner. Enjoy your weekend!

Thanks for reading! If you want to help, or if the site has helped you, you can donate, register to help, write an article, or buy inexpensive hosting to start your own site. If you scroll down, you can sign up for the newsletter, vote for the article, and comment.

How To: Show Your Hard Drive Specifications In The Terminal

In today’s article, we’re going to explore one way that you can show your hard drive hard drive specifications in the terminal. There’s nothing too challenging in this article, so even new people can follow along.

To be clear, I’m using the phrase ‘hard drive’. In this instance, I’m speaking both of mechanical hard drives (HDD) and solid state drives (SSD). I could probably come up with something better, but we’ll just stick with ‘hard drive’.

You may want to know your hard drive specifications to ensure you got what you paid for. You might also want to know what features it supports – and how long at least one of those features is expected to take. For instance, there’s a secure erase feature on many drives and this takes time. The command we’ll be using may tell you how much time it will take to securely erase the disk.

We’ll be showing the hard drive specifications in the terminal and the biggest tool we’ll be using is ‘hdparm’. It does what it says on the tin and describes itself like:

hdparm – get/set SATA/IDE device parameters

You should find hdparm installed and shouldn’t need to install anything. If you want confirmation that hdparm is installed, run:

You’ll find that there’s a lot to learn about hdparm, but don’t worry about that. You can check the manual if you want:

See also:

Check Disk Speed In The Terminal

So then, let’s just jump into the article…

Show Your Hard Drive Specifications:

As the title suggests, we’ll be using the terminal for this exercise. Open you terminal now. If you don’t know how to open the terminal, you can do so with your keyboard – just press CTRL + ALT + T and your default terminal should open.

With your terminal now open, let’s find your disk drives with the following command.

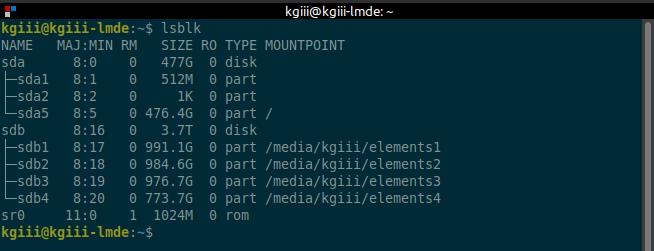
Your drive should look something like this:

lsblk output
You’re looking on the left, at the base directory – such as ‘sda’ or ‘sdb’.

At this point, you want to note the base – the parent disk drive. In the above image, you see two of them. You see both ‘sda’ and ‘sdb’. Your results can be wildly different, but that’s the information you need.

Now it’s time to show the hard drive specifications. To do that, you’ll want to use a command that looks a lot like this:

An example of that command would look like:

The output is pretty verbose and you can learn a great deal about your hard drive specifications by using the hdparm command. As suggested above, don’t be afraid to run man hdparm to learn more because hdparm is a rather robust application..

Closure:

There you have it, you have another article! This time, you’ll have learned a bit about one way to show your hard drive specifications in the Linux terminal. Pretty sweet! So far we’ve been able to maintain that ‘every other day’ schedule.

Anyhow, please don’t frivolously click ads on the site. Google’s just taking the clicks away and is probably taking away some legitimate clicks while doing so. That’s not helpful! I appreciate it, I appreciate that you’ve whitelisted the site, but Google’s convinced I have invalid traffic and there’s not much I can do about it.

Thanks for reading! If you want to help, or if the site has helped you, you can donate, register to help, write an article, or buy inexpensive hosting to start your own site. If you scroll down, you can sign up for the newsletter, vote for the article, and comment.

How To: Test Your Drive Speed In The Linux Terminal

Today’s article is going to just be a nice and easy article, one that shows you how to test your drive speed in the Linux terminal. It’s easier than you might think and even easy enough that a new Linux user can figure this one out.

Why would you want to do this? Why would you want to test your drive speed in the Linux terminal?

Well, while there are surely GUI ways to accomplish this, you might want to verify that you’re getting the disk speed you paid for. You might also just want to know your drive’s speeds or perhaps you want to post your drive speed on a forum for bragging rights? These terminal commands will also be pretty much universal, across all distros.

It doesn’t matter why you want to test your drive speed, it just matters that you can test it – and that you’ll now know how. And, you know what they say? Knowledge is power!

So, what will we be doing?

Well, we’ll be using the Linux terminal to check how fast we can read and write data to your drives, no matter if they’re spinning platter hard disk drives or solid state drives. The commands will be the same for all drive types and are fairly easy to learn.

So, with all that said and done, let’s get into the article…

Test Your Drive Speed In The Linux Terminal:

Of course, this article will require an open terminal. On Linux-Tips we do a lot in the terminal. It’s fun and fairly universal. If you don’t know how to open the terminal, you can do so with your keyboard – just press CTRL + ALT + T and your default terminal should open.

With your terminal open, you’ll want to run the following command to identify the drive you want want to test. That’s nice and easy, just run:

You’re looking for something like /dev/sda1 or something like /dev/nvme0n1p1 and the lsblk command might help you narrow down which drive it is you want to test.

Once you have identified the drive you want to speed test, you can begin testing. You can first try testing the write speed, that is how fast you can write data to the drive. To do that, you’re command would look like:

For example, if you had ‘sda1‘, your command would look like:

That will tell you how quickly you can write data to your drive, a pretty handy number to know. However, that’s only half of the equation…

You might also want to know how fast you can read data to the drive, the other half of the equation. The command to find the read speed is pretty similar to the command to read the write speed – and that command would look a little something like this:

Or, again, if you want an example of how to test the speed at which you can read data from your drive, an example command would look a little like this:

Note the difference between the commands. In the latter command, we’re writing data from the disk (reading it) and sending it to the bit bucket. With the write command, we’re going the opposite direction. In one case you’re writing from /dev/null and in another case you’re writing to /dev/null. Pretty easy, huh?

Closure:

There it is! This is actually the 301st article written for Linux-Tips.US! This time around we learned how to test your drive speed in the Linux terminal. I told you that it wasn’t too complicated and I stand by it. If you just follow the directions, you’ll learn how to test your drive speed and have another tool in your toolbox.

Thanks for reading! If you want to help, or if the site has helped you, you can donate, register to help, write an article, or buy inexpensive hosting to start your own site. If you scroll down, you can sign up for the newsletter, vote for the article, and comment.

Let’s Learn A Little About The ‘dir’ Command

In today’s article, we’re going to learn about the ‘dir’ command. The ‘dir’ and ‘ls’ command are quite similar, but ‘ls’ seems to get all the press. So, today we’ll be looking at the ‘dir’ command. It will be a relatively short article (I suppose) and easy enough for new people to follow.

You’re possibly already familiar with the ‘ls’ command. I’ve written a variety of articles about ‘ls’. We’ve used ‘ls’ in numerous articles along the way. Here are a couple of ‘ls’ articles:

Some Fun With Sorting The Output Of ‘ls’
Let’s Use ‘ls’ To Sort Files By Time

Those are just a couple. WordPress, the backbone of this site, isn’t very good at searching for just two characters like ‘ls’. That’s for good reason and I’m not sure if that behavior can be changed.

Ah well… Root around and I’m sure you’ll find more. I’ve written about 300 articles and can’t possibly remember them all!

Anyhow, we’ll be using the ‘dir’ command in this article. It describes itself pretty well in the man pages, and is similar to the ‘ls’ command. It describes itself as:

dir – list directory contents

So, if you’re familiar with the ‘ls’ command, you’ll find ‘dir’ to be quite similar. I’m sure there’s a reason that both exist – I’m just not sure what that reason is, nor am I sure why both are included by default. Feel free to let me know your thoughts or theories!

Edit: See this link to see why Linux contains both.

Well then, let’s get on with it…

The ‘dir’ Command:

Well, you shouldn’t need to install anything for this article, but you will need to have an open terminal. By now, you know how to open the terminal if you’re a regular reader, but others need only press CTRL + ALT + T and their default terminal should open.

With your terminal now open, let’s just start with the basics. If you just enter the ‘dir’ command it will output a list of all the visible files in that directory. It looks like:

You can also specify a directory, like:

If you want to show hidden files, you can try this:

If you want to list things in a single column, in a list format, you can just add the -l flag. This also shows the file’s permissions and modification time. So, you could try:

If you want to list files with the ‘dir’ command and to do so recursively (digging into the folders within folders), you can do that too. All you need is the -R flag. So, for example:

That’s just scratching the surface of the ‘dir’ command. There’s a whole lot more that you can do, so just try the man page for more nifty tricks  you can do with ‘dir’.

If you have any questions or nifty ‘dir’ information, please feel free to leave a comment. It’s a pretty handy command to have on hand, much like ‘ls’.

Closure:

And there you have it. You have yet another new article, this one about the ‘dir’ command. It’s not terribly complicated and it’s another tool to toss into your toolbox. You never know when you might want to use it instead of the ‘ls’ command, though they’re awfully similar.

Thanks for reading! If you want to help, or if the site has helped you, you can donate, register to help, write an article, or buy inexpensive hosting to start your own site. If you scroll down, you can sign up for the newsletter, vote for the article, and comment.

Linux Tips
Creative Commons License
This work is licensed under a Creative Commons Attribution 4.0 International License.