Make A Website Screenshot With CutyCapt

In today’s article, we’re going to use the terminal and make a website screenshot with CutyCapt. It’ll be a short and easily followed article, but one for everyone to follow. Even a rank beginner will easily be able to make a website screenshot with CutyCapt! (That’s the link to the project homepage, or where you need to go to learn more about CutyCapt.)

There are pretty much a zillion screenshot tools. There are even a metric-ton of browser extensions that specialize in taking a website screenshot. You can use any of those, or you can just install CutyCapt and use that from the terminal. There are even multiple choices when it comes to taking website screenshots from within the terminal, but  we’ll just be using this CutyCapt in this article.

If you’re curious, CutyCapt defines itself on SourceForge as:

CutyCapt is a small cross-platform command-line utility to capture WebKit’s rendering of a web page into a variety of vector and bitmap formats, including SVG, PDF, PS, PNG, JPEG, TIFF, GIF, and BMP.

That appears to be a pretty solid definition. The CutyCapt tool does what it says on the tin and that’s it. You can’t really expect anything more – which is not a bad thing. You have one job and you need one tool. If the goal is to take a screenshot of a website via the terminal, the tool is CutyCat.

Make A Website Screenshot With CutyCapt:

Like oh so many, this article also requires an open terminal. If you don’t know how to open the terminal, you can do so with your keyboard – just press CTRL + ALT + T and your default terminal should open.

With your terminal open, you’re going to need to install said CutyCapt. This may not be available for in all default repositories, but it’s in Debian/Ubuntu/Mint’s default repositories. So, using those as my example, you can install CutyCapt with:

Just know that your distro may not have this packaged, so follow the link in the preamble and find a way to install it in your distro of choice. You can compile it easily enough, should you need to go that far.

Once you have CutyCapt installed, it’s actually pretty easy. If you want use CutyCapt to take a screenshot of linux-tips.us, your command might look a little like this:

Or, in other words, it’s pretty basic:

It might look complicated, but CutyCapt is not all that complicated when you break it down. If the output size isn’t quite what you’re after (and it might not be), you can just keep playing with it until you get it exactly how you want it. The output format and expected screenshot size is all you need to worry about getting right.

Either way, as mentioned in the preamble, you can change the output. In our example, we specified .png. You need only change that and the output will change to what you specified. If you need any further assistance, you can use the classic man cutycapt to learn more about the application.

Closure:

See? You have yet another article. This one teaches you how to make a website screenshot with CutyCapt. It’s a pretty handy application to have on-hand if you’re into taking screenshots of websites. CutyCapt is only used for making screenshots and not a whole lot more than that, so it’s a one-trick-pony and intentionally so.

Thanks for reading! If you want to help, or if the site has helped you, you can donate, register to help, write an article, or buy inexpensive hosting to start your own site. If you scroll down, you can sign up for the newsletter, vote for the article, and comment.
How To: Hide The Output From wget

In today’s article you’re going to learn that you actually can hide the output from wget. I am not one of folks want to do this, but some do. Or at least the option is there, so I assume they do. Either way, read on and you’ll know how to hide the output from wget! 

Goodwood Revival is this weekend, but you’ll still get an article. I am thinking about going in person next year, so I’ll have to write articles ahead of time. I probably should have done that even though I’m just streaming it.

Anyhow, there’s an option that will let you hide the output from wget and it’s in my notes. I might as well turn it into an article because I’m sure someone wants to do this. 

What this does, to be clear, is shows no wget output in the terminal once you enter the command. You’re not running blind, however. I’ll show you how to at least ensure the command gets completed. So, it does have uses – when  you just don’t need to see the clutter.

Lots of people do loads of useful work in the terminal and don’t really need to see clutter, so this is one way to avoid that terminal clutter. I actually prefer to see what’s going on, but I’m weird like that. If you do not prefer to see what’s going on with wget, this article is for you!

Hide The Output From wget:

This article requires an open terminal, like many other articles on this site. If you don’t know how to open the terminal, you can do so with your keyboard – just press CTRL + ALT + T and your default terminal should open.

It next requires that you use wget to get something. So, pick something and download it with wget. I don’t care what. You do you and download anything you want. To hide the output from wget, the command is:

That’s really it. However, you then have no idea if it it completed. Fortunately, you can make sure wget completes its task (within reason) with the -c flag. So then the command would look like:

See? Pretty simple. That command will not only hide the output from wget, it will ensure the download is completed. You’ll avoid cluttering up your terminal, or something…

Closure:

There you have it! You now know you can, and how you can, hide the output from wget. You can even be reasonably sure it completes behind the scenes. It’s not a very difficult article to follow today, so consider it an easy day. Now, back to my racing…

This article requires an open terminal, like many other articles on this site. If you don’t know how to open the terminal, you can do so with your keyboard – just press CTRL + ALT + T and your default terminal should open.

Change Your Home Directory

In today’s article you’re going to learn that it’s possible to change your home directory. Why? Because Ol’ David is in a bit of a rush to get this out on time. I can’t miss my publication deadline! So far, there has been an article every other day. Gotta keep up the schedule.

Yesterday was an extremely frustrating day. People managed to waste my entire afternoon. The only consolation I got was that I drove home really quickly, in a very spirited manner. That was not enough consolation. So, I just drank a couple of delicious beers (Sierra Nevada Pale Ale) and went to sleep.

I expected to get up early and write the article. I did wake up early, but I fell back to sleep. My body wanted to catch up on some missed sleep and it did. Which means I’ve got like an hour to write this article.

(I don’t think there has ever been a more ‘bloggy’ post than this one! It’s horrible and I’ll hopefully never do it again.)

When I first planned this article, I planned on showing you how to change your home directory with a new user. It was going to be fairly long and needlessly complicated. So, instead, I’m just going to tell you how to do it. You can learn how to create a new user.

So then, let’s get onto the meat of this…

Change Your Home Directory:

There are all sorts of reasons why you might want to change your home directory. Maybe you don’t want people being able to easily spot it by traversing your directory tree? You might want to move it to a different partition that has more space? Who knows?

But, this isn’t something you want to do willy-nilly. See, a whole lot of things depend on your home directory and your home directory probably contains a lot of stuff. So, after you’ve changed your home directory you’re probably going to need to move a lot of stuff around. That’s why it’s best to do this with a new user. If you want to practice this, I’d say do it to a new user. There’s a link in the preamble to learn how to create a new user.

The command is remarkably simple. Just open up your terminal and run:

So, if I wanted to move my home to /foo/bar, the command would look like:

You don’t have to specify /home/kgiii – even though that’s the full directory path. The -d command knows that we’re generally talking about the home directory. If you’ve already moved your home directory, and it is outside of the /home directory, you’re probably gonna have to specify that. I don’t actually know, I’ve never tried that.

This isn’t something I’d undertake lightly. I’d really only recommend this on a new user OR if there are some very specific circumstances. You might do this if you’ve filled up your disk space, added a new disk, and want to move your home directory to the new disk so that you don’t have to muck about with changing partitions or anything. Even then, it’s a bad solution – but probably one of the best solutions you have available.

Closure:

Consider this an article that’s for a very special set of circumstances. It’s for when someone on a forum has run out of disk space and wants a way out without any changes to partitioning and doesn’t want to reinstall. This isn’t something you probably need to go playing around with, but you can. I ain’t stopping you. The potential to make a mess of this is pretty strong.

Thanks for reading! If you want to help, or if the site has helped you, you can donate, register to help, write an article, or buy inexpensive hosting to start your own site. If you scroll down, you can sign up for the newsletter, vote for the article, and comment.

Let’s Make A Symbolic Link

In this article, we’re going to learn how to make a symbolic link. This will be a very easy article, and one you may get some use from. It’s not terribly hard to make a symbolic link, though I suppose the syntax may seem quirky as compared to many other commands. It’s not hard, trust me on this… Or not… You can pretend it’s hard and impress your friends and family!

Ah well…

So, what’s a symbolic link? Well, it’s a link to another file. A symbolic link is a file that contains nothing more than a link to another file. There’s a hard link as well, and that points to an inode. A symbolic link is a bit more versatile. You can make a symbolic link (again, a file) and move it around the system and it’ll still point at the original file. It’s useful if you want to do things like put shortcuts on your desktop.

This being Linux, everything is a file. A symbolic link is a file. It is a file that contains information about where another file is located. Some folks think this sort of stuff is complicated, perhaps too complicated for a new Linux user, but I think it’s easy – so long as it’s properly explained. Darned if I know how to explain it! I hope that worked for you. That’s really all it is. That’s it. It’s just a file that contains information about where another file is located. Everything is a file.

Like I said, this is going to be a short article. It really shouldn’t be all that difficult to show you how to …

Make A Symbolic Link:

This article requires an open terminal, like many other articles on this site. If you don’t know how to open the terminal, you can do so with your keyboard – just press CTRL + ALT + T and your default terminal should open.

Now, pick a file… One that most users will have will be your Bash history, located at ~/.bash_history unless you’ve really done some heavy modifications. Let’s use that file to make a symbolic link.

The format to do this is:

Obviously, the -s means ‘symbolic’ (feel free to check ‘man ln‘ for more information) and you name the existing file first and then the file you want to create. So, to do this with .bash_history, it’d look like:

Now, you can see it in action:

Tada! It will show the contents of your .bash_history if you did everything correct. Want to see something even more handy?

Now, look at  your desktop and open the file named ‘test’ – or just navigate there in your terminal and check it again with the cat command:

Congratulations! You’ve learned how to make a symbolic link! I told you that it wasn’t all that hard. As a concept, it’s even easier to understand. The syntax to do so isn’t even all that difficult. You’ve got this! I have faith!

Closure:

Yes, yes I did say this would be quick and easy. I think it was. It’s not terribly hard to make a symbolic link and it was a fun article to write. It’s fun to cover some of the basics. As the tagline says, “Getting you up to speed!” Search around or just browse, you might be amazed at the subjects covered!

Thanks for reading! If you want to help, or if the site has helped you, you can donate, register to help, write an article, or buy inexpensive hosting to start your own site. If you scroll down, you can sign up for the newsletter, vote for the article, and comment.

Search For Command History By Date

Today’s article is going to show you how to search for the command history by date. This isn’t hard, but might seem a little advanced for some of the newer users. We’ll be doing this through the terminal, of course. That seems like a good idea to me!

Unless you’ve made some fairly drastic changes, Linux terminals keep a log of previously entered commands. This is on a per-user basis and considered relatively secure, or at least as secure as your user account is. It’s helpful to be able to look at your command history, especially if you’ve forgotten what you did and you really need to undo it!

Previous history articles include:

Delete An Entry In Your bash_history

Dealing With Duplicates In Your Bash History

So, I haven’t really covered the .bash_history (proper name, I suppose) all that much. There really isn’t all that much to cover, but today we’ll learn how to search your command history by date. It’s most useful when you remember when you made changes but you can’t remember the precise commands used when you made those changes.

Find Command History By Date:

Like oh so many articles, this one too requires an open terminal. You can open one easily enough. Just press CTRL + ALT + T and your default terminal should open.

With  your terminal open, we first have to tell Bash to store and show dates along with the history. That’s an easy command that you need only run once:

When you next type ‘history‘, it’ll look like a hot mess until you figure out what the command has done.

Now, to find command history by date. To do that, you just enter:

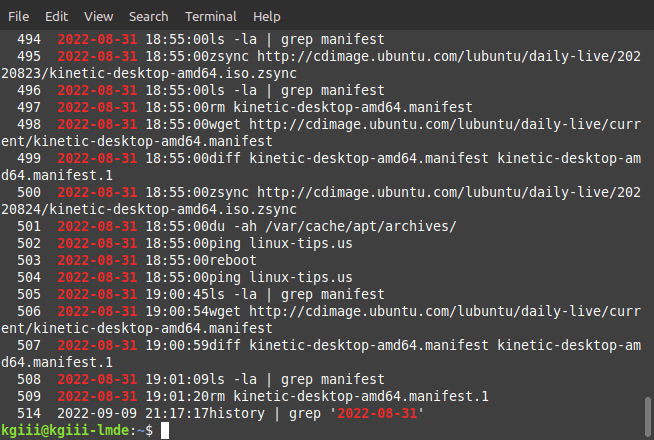
The format for me is YYYY-MM-DD, though I suppose it could be different for others who have an alternative date format set up. I don’t really know, but it’s easy to figure out by just running the history command and deducing the format from those results. If you’ve done it properly, it might look a little something like this:

searching command history by date
See? It works! It does show the command used to show these results, of course.

So, if you want to see what commands were run on a certain date, you can do that. You can also find what you entered when you remember the day but not the commands you entered. It can be pretty handy so search the command history by date. Keep it as a handy tool, as you never know when you’re going to need it.

Closure:

And there you have it. You have another article in a very long list of articles. This one is  handy if you need to know your command history by  date. I know I’ve been known to use this myself, largely because I sometimes need to narrow down my history quite a bit, as I do a great deal in the terminal and my history is a hot mess.

Thanks for reading! If you want to help, or if the site has helped you, you can donate, register to help, write an article, or buy inexpensive hosting to start your own site. If you scroll down, you can sign up for the newsletter, vote for the article, and comment.

Linux Tips
Creative Commons License
This work is licensed under a Creative Commons Attribution 4.0 International License.