Unzip A .zip File In the Linux Terminal

Today’s article is going to tell you how to unzip a .zip file in the Linux terminal. It shouldn’t be too complex, nor will it take a great deal of time to learn how to unzip a file.

In the Linux world, we don’t really see the .zip files all that often. We have other ways to compress files, but .zip is still there and you’ll sometimes come across them in your travels.

If you’re unaware, the .zip form of data-compression is actually a ratified standard. The format has been around since the late 80s and is one of the compression methods that supports loss-less compression. There are all sorts of compression formats and methods, but .zip has been around since forever and will probably exist long into the future.

If you want to unzip a .zip in a GUI, I’d say that you need look no further than PeaZip. It’s easy enough to compile from source, or you can find pre-built PeaZip packages for most distros. This article, on the other hand, is how to unzip a zip in the Linux terminal.

It’s not all that daunting and should be a pretty easy article for even a beginner to follow. Though, I suppose, any well-written article should be easy enough for a beginner to follow. Were I something other than a basic keyboard smasher, I’d probably be able to do that!

Read: Decompress a .tar.gz in the terminal

Unzip A .zip:

The headline clearly mentions doing this in the terminal, so you’re going to need an open terminal to continue. That’s relatively simple. Just press CTRL + ALT + T and your default terminal should open.

With your now-open terminal, let’s first make sure you have the ability to unzip a .zip file. To do that, let’s use:

That should return something akin to:

If you do not get a result, you’ll need to install unzip from your system’s repositories. Trust me, it’s in there – unless you’re using a really, really basic distro.

Assuming you get results indicating that you have unzip, it’s actually easy to unzip a .zip in the Linux terminal. You just navigate to the correct directory and run:

Which, I suppose, is mostly all you’re going to need. I should also mention that when you’re attempting to run this command, you can generally type the first few letters of the file name, and then press TAB to auto-complete the file name, saving you some typing time and just generally making the whole thing easier.

Obviously, there’s more to the unzip command. You can check the man unzip page, but the more useful flags will get covered here. Seriously, check the man page. The command is absurdly complex, with tons of options for obscure uses.

For example, to unzip a .zip to a different directory, you just use the -d flag, like so:

If you need to enter the password, you can just use:

When you want to list the files without decompressing them, you just use the -l flag, like this:

If you want to test the ,zip file to see if it’s corrupted, you can use the -t flag.

Normally, it’ll extract the files and overwrite the existing files (if any). You can avoid that with -n flag:

When you unzip a .zip, you will find out that it happily creates new directories. You can avoid that with the -j flag, like this:

Do read the man page! There’s a zillion options.

Closure:

Seriously, read the man page. Learn how to unzip a .zip file – and then all the many, many options included. Of all the man pages out there, this one is one of the most complex ’cause this one little application has a ton of options. Even if you don’t intend to learn it all, read the man page!

Thanks for reading! If you want to help, or if the site has helped you, you can donate, register to help, write an article, or buy inexpensive hosting to start your own site. If you scroll down, you can sign up for the newsletter, vote for the article, and comment.
Kill Frozen Applications The Easy Way

Linux is an operating system and, like every operating system, you sometimes need to kill frozen applications. Computers are not now, nor will they ever be, perfect devices with perfect software. Sometimes, crap happens and you find yourself in a situation where you need to kill a frozen application or two. (Even if it were perfect, your RAM is bombarded with EMR and will eventually knock a bit loose, even with ECC RAM.)

There are all sorts of ways to deal with frozen applications. You can do everything from sigterm to pkill. Worst case scenario, you always have RIESUB to fall back on – for a completely frozen system. All of those are great and have their place, as does this method.

As this is meant to be quick and simple, so we’re just going to jump into it – and have a relatively brief article today.,,

Kill Frozen Applications:

Let’s say you’ve somehow managed to make your browser freeze. It is unresponsive, though the rest of the system seems to work just fine. You could open a terminal and try the pkill and sigterm types of resolutions or you can use xkill. It’s literally point and click!

So, open your terminal and enter the following (read the rest before doing this):

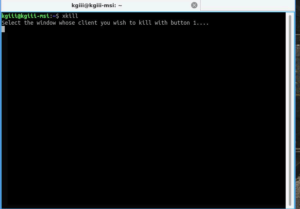
When you do, your terminal will look a little like this:

xkill in action
The icon will change as well, but I can’t seem to capture that.

Your cursor might also change. In one test my cursor is an X and on another test, with a different OS, it’s a red skull and crossbones. I couldn’t caputer either in a screenshot, so you get what you get.

NOTE: If you change your mind and don’t want to click-to-close, you can still type in the terminal. You can use sudo pkill <terminal-name> to get back to normal.

Anyhow, take that cursor and click on the application you want to close. This sends a shutdown command to the frozen process and things should go back to normal after the frozen application closes. Of course, sending the shutdown command to a process in no way indicates a certainty of it listening, it may still fail and stay frozen – perhaps depending on how exactly frozen the application is.

NOTE: It has come to my attention that I should warn you. If you click on it after typing xkill, it WILL close it. It’s pretty indiscriminate. It doesn’t care if you’ve saved. It will kill it. I’m also told that CTRL + ALT + ESC is a shortcut in Mint for this, but I can’t seem to make it work. 

Closure:

See? I told you that it’d be a quick and easy article. This one is about you you can kill frozen applications – but there are all sorts of ways to do that. You can expect future articles to cover this very subject, but with different methods. I just figured this would be quick and easy for everyone.

Thanks for reading! If you want to help, or if the site has helped you, you can donate, register to help, write an article, or buy inexpensive hosting to start your own site. If you scroll down, you can sign up for the newsletter, vote for the article, and comment.
So, What Is ‘sudo’ Anyhow?

If you’re a new user, you’ll see commands with sudo in them and you’ve gleaned the meaning of what is sudo. The sudo command is a bit more robust than you may know and this article is going to tell you what sudo is. As I’m not actually sure how to format such an article, I’m going to try to smash it to fit my usual style article. This may make for  a fairly short article.

The sudo command stands for ‘superuser do’ and that’s probably how most folks will know it. That is, after all, correct. You use sudo when you want to execute something that requires different privileges than your account has. Most of the time, that means you want to run the command as an administrator with root privileges. 

But, that’s not all that sudo can do. You can also use it to run software as though you were another user on the same machine. Some folks (erroneously, but not without merit) have taken to referring to sudo as ‘substitute user do’. It suits, but it’s not correct.

To be fair, sudo didn’t have those extra features when it was new (~1980). When it was new, it just let you run commands as a superuser – root – and that was it. Perhaps if it had been named today, with the current feature set, those folks would be correct by calling it ‘substitute user do’. As it stands, those people are technically incorrect.

I’ve also written a couple of other sudo-related articles that may interest the reader.

Create A New User With SUDO Privileges In Ubuntu
How To: Use sudo Without A Password

What Is sudo:

The sudo command typically starts a command, such as an installation command. For example, a command like this:

If you try that command without a privileged account, it’ll fail and you won’t be able to install the software. For security sake, your regular user account should operate under the ‘least privilege principle’, meaning your regular account can’t be used to maliciously operate the system.

The sudo command is that safety gap. To use sudo, you must be a member of the sudoers group/have rights to the command and you must know the password. If you have sudo access, you can cause all the harm you want to a system! So, protect those passwords because they are legitimately the keys to the kingdom.

As we learn what is sudo, we might as well learn a few flags that you can use with it. The most important one, as sudo is plenty powerful by itself, is the -u flag. You use that not when you want to operate as root but when you want to use the privileges of another user on the same system. It looks like this:

When you’ve authenticated as sudo, you will not need to enter your password again for some period of time. The most common period of time is 5 minutes. After five minutes of non-use (idle time with no sudo commands) have passed, you will need to authenticate all over again.

If you want to exit early, you just use the -k flag. That resets everything and you’ll need to authenticate the next time you wish to use sudo. Conversely, if you use the -v flag, it will grant you another five minutes of authenticated time, allowing you to extend your sudo session.

There are a few other flags, but those aren’t really used often. Though, if you’re going to enter a lot of commands, you can use sudo -s and open a new shell where you have sudo privileges. That’s useful if you’re going to use a number of commands and don’t want them in your terminal scroll-back.

Closure:

There you have it, you can now answer the question: what is sudo? It’s a handy tool to have and there are uses most people probably never bothered learning. It’s there if you need it and you might as well be familiar with it.

Thanks for reading! If you want to help, or if the site has helped you, you can donate, register to help, write an article, or buy inexpensive hosting to start your own site. If you scroll down, you can sign up for the newsletter, vote for the article, and comment.

Check Memory Usage With ‘free’ In Linux

In today’s article, we’ll chec memory usage with the free command. We’ve touched on the ‘free’ command before, but this is a whole article about the free command. This should be a pretty quick and easy article, as it’s not a complex command.

There have been a few other articles about RAM.

How To: Find The RAM Total In The Terminal
Check Your Memory In The Terminal: Part II
Let’s Determine The Number of RAM Slots Without Opening The Case

And, in the discussions of those articles, we often refer to free -m as our go-to tool for quickly checking memory usage. It’s a handy tool used by most, and it’s a good tool to have in your toolbox. On top of that, it does a bit more than just check memory usage.

The free command has been around forever and describes itself like this:

Display amount of free and used memory in the system

Which is exactly what it does. It’s a pretty useful command if you want to see how much RAM you’re using, how much is free, how much is reserved for buffers, and even more if you’re interested in your swap stats.

So, folks are generally already familiar with the free command, but there are indeed more options and it’s worth an article to explain a few of those choices. Like always, you can also run man free to get a bunch of information that may not be included in this fairly brief article.

Check Memory Usage:

Yeah, this is yet another article that insists on the terminal. That’s not a bad thing, if you check the byline. The goal here at Linux-Tips is to get you more comfortable with Linux – and that includes getting comfortable in the terminal. So, open one up by pressing CTRL + ALT + T on your keyboard, and your default terminal should pop right up.

With that done, let’s go ahead and try the command that everyone uses:

The output from that will look a little something like this:

output from free -m
Those columns should be reasonably easy to understand. You can figure it out, I’m sure of it!

You can see by the column titles what the columns mean. Like I said, it’s relatively easy to understand – which is why it makes a pretty great tool. There’s actually a pretty good description of those terms, if you don’t already know them, in the man page.

But, you can use it in other ways. See, the -m stands for megabytes (obviously). Well, you can use other flags, like -b, -k, and -g. That’s bytes, kilobytes, and gigabytes – where the -m is megabytes as previously mentioned.

If you want a nice human-readable format, you can try this:

The output of that may vary the units but it will also show you which units are in use. It’s a pretty handy way to use the free command to check memory usage in Linux.

Sure, there’s a wide format and you can even use units as large as pebibytes. I don’t actually have anything where that’d make sense, but it’s an option if you happen to have such a system. (If you have access to a system with pebibytes of RAM, call me!)

But, did you know that you can run the command over and over again with just a single command? To do that, you use the -s flag followed by the number of seconds you want it to wait before refreshing. So, if you want it to run every 10 seconds, the command would look like this:

You can combine that with a count – like how many times you want it to run. So, something like this:

That will run the free command (you could add other modifiers) every five seconds and will do so three times in a row.

There are other options, but those are the most common. You can have it output the low and high numbers (when run over a period of time), display column totals, and even opt for a wider display. Personally, I don’t really find those options all that interesting and don’t bother with them, but they’re a man page away from being a part of your toolbox.

Closure:

And there you have it, an article teaching you how to check memory usage with the free command. The free tool is a pretty handy tool and one everyone should be familiar with. If your system is slowing down, it’s nice to know things like how much RAM is being used. If you work in application development, it’s nice to know how much more RAM your application adds to the system. There are any number of reasons why you’d want this information.

Thanks for reading! If you want to help, or if the site has helped you, you can donate, register to help, write an article, or buy inexpensive hosting to start your own site. If you scroll down, you can sign up for the newsletter, vote for the article, and comment.

Check Your Memory In The Terminal: Part II

Today’s article is all about how you can check your memory in the terminal. If it looks familiar, it’s because I’ve already written “How To: Find The RAM Total In The Terminal“, which covered a couple of ways to check your RAM – all of which were in the terminal. I left the article open for others to share how they check their memory, but nobody left any comments.

In the previous article, I invited people to comment and share other ways to check RAM, RAM total, RAM usage, etc… Seeing as nobody commented, I figured I might as well return to the previous article and throw in a couple more ways to do check your memory in the terminal.

The previous article includes some handy tools, such as the easiest way:

While also mentioning a much more extensive and informative tool:

Both of which are lovely ways to check your memory in the terminal.

This being Linux, there’s also other ways.

Me being me, I figure I might as well share them with you.

After all, it’s yet another article that I can write! So, as unoriginal as this article may sound, there’s also a couple of tools I really want to introduce you to. 

There’s always room for more tools, especially if they’ll help you…

Check Your Memory (in the terminal):

As the line above indicates, you’re going to need an open terminal to do the work in this article. You can open it from your start menu, or you can just press CTRL + ALT + T and your default terminal should open right up.

The first tool we’re going to use is ‘top‘. I think you’ll find top installed on pretty much everything, though some distros are including variants like htop. The venerable top application is a terminal-based task manager and has been with us since 1984.

Anyhow, the command is nice and simple. Just run ‘top’ in the terminal:

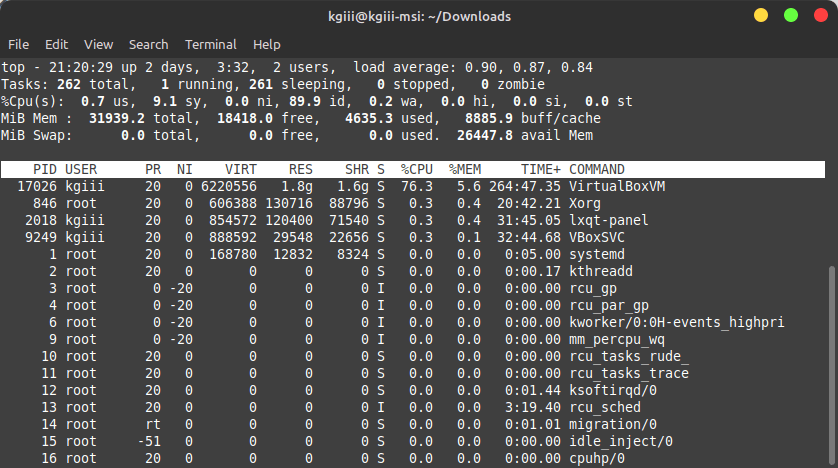
The output will look something like this:

using top tto find your memory information
Look up near the top, above the fold, you’ll see the memory information. Pretty easy, isn’t it?

The last two lines of data, above the list of tasks, tell you all you need to know (unless you need a ton of details, I suppose) about your RAM, your RAM usage, what’s buffered, etc… It also tells you about swap, another facet of memory. 

Next we have a lovely command called ‘vmstat‘ a tool for showing virtual memory statistics. This lovely tool has been around since 1985 and has a ton of options. It’s an excellent tool and you’re highly encouraged to use the man vmstat command.

We actually don’t need all those lovely options for this. We don’t have to dig down very far to get the information you need. In fact, once again, you’re going to run the command without a single flag, like so:

The outcome of which is also self-explanatory. It looks like:

vmstat showing information, including ram information.
Look under the line clearly marked memory. See? There it is! There’s the memory info!

Just look under where it’s clearly marked ‘memory’ and you’ll see that you can use this to check your memory. It’s a bit more cryptic as it doesn’t directly show the total – but it does show you the information that’s actually important.

The total doesn’t matter. What really matters is how much RAM you’re using and how much RAM you have free. But, vmstat being vmstat, it will of course give you that information if you want it. If you do want that additional information, just use the --stats flag – like this:

Where you can see an output similar to this;

use the --stats flag to get a ton of memory information about your memory.
It contains not just that, but all sorts of information about your memory!

Pretty sweet, huh?

Closure:

There you have it, a follow-up article that tells you how to check your memory. After all, nobody wanted to add them as comments! Either way, you got to play with a couple of new tools, or at least tools not really mentioned here on this site.

Speaking of the site, the end of my year long project is in less than 2 months. That’s right, I’ve kept this up for this entire time, with a few guest articles in between. I’ll do a meta article, but I have to say that this has been a pretty fun (and educational) project. Maybe we’ll keep it rolling? It seems likely that I will. I quite like writing these things.

Thanks for reading! If you want to help, or if the site has helped you, you can donate, register to help, write an article, or buy inexpensive hosting to start your own site. If you scroll down, you can sign up for the newsletter, vote for the article, and comment.

Linux Tips
Creative Commons License
This work is licensed under a Creative Commons Attribution 4.0 International License.