Today’s article is just going to be a quick and easy article, where we learn how to clear swap. I figured I’d do this article while swap was still fresh in my memory so that I’d not forget to write it down the road. If you use swap and want to learn how to clear swap, read on!
Again, this article is only useful for those that use a swap. There are different opinions about using swap and this article is for those who do. I just wrote an article about how to monitor swap, so we might as well learn to clear it.
What do I mean by clearing swap? I mean emptying it. I mean removing all the data held in swap, allowing for data to be written to swap again. It’s not something I worry about, but I know folks have asked about it in the past. I might just as well cover it, though it really won’t take much time.
Clear Swap:
This article requires an open terminal, like many other articles on this site. If you don’t know how to open the terminal, you can do so with your keyboard – just press CTRL + ALT + T and your default terminal should open.
With your terminal now open, you can clear swap with the following command, by turning swap off:
1
sudo swapoff -a
You then turn swap back on with:
1
sudo swapon -a
Tada! You’re all done. If you want, you can do it all with just a one-liner:
1
sudo swapoff -a && sudo swapon -a
That’s really all there is to it. It’s not terribly complicated and it’s something you might as well know if you’re going to use swap and are concerned with monitoring and clearing it.
Closure:
There you have it. I told you that it’d be short and easy. You now know how to clear swap, should you actually want to do so. You might as well know how. It’s bound to come in handy for someone.
Thanks for reading! If you want to help, or if the site has helped you, you can donate, register to help, write an article, or buy inexpensive hosting to start your own site. If you scroll down, you can sign up for the newsletter, vote for the article, and comment.
Today’s article is going to be an interesting one, an article where you learn how to show RAM information with Ramfetch. For many of you, I expect Ramfetch will be a completely new application, which is nice. However, this article should be simple enough for even a new user. Read on and learn more about your RAM!
By now, you’ve seen some of the following articles:
Well, this time around, we’re going to be using a similar application – but one meant specifically for RAM. The name of this application is ‘Ramfetch‘. Let’s just say the idea will be familiar, as you’re already aware of similar applications. At the end, you end up with a handy screen to screenshot to show your friend and family – or to learn from. Bragging rights is always a good reason!
So, then why would you want to do this? Well, Ramfetch gives you some good information about your RAM. It’ll do the basics, like show you what’s free, what’s available, and the total amount of RAM. But, it shows you quite a bit more than that, and it’s data worth looking at for those who want to know more about their RAM.
What we’ll be doing is cloning a git repository, moving a file, and changing the permissions to ensure it can be executed so that you can run the command from anywhere within the terminal.
You’ll need ‘git’ installed, and that should be installed by default in pretty much every major distro. If it’s not, check your package manager – or simply follow the URL in the article and perform the operations manually.
With all that said, let’s just jump into the article!
Show RAM Information With Ramfetch:
Of course, you’re going to need an open terminal. Ramfetch is a terminal-based tool. So, open your default terminal emulator. If you don’t know how to open the terminal, you can do so with your keyboard – just press CTRL + ALT + T and your default terminal should open.
UPDATE: Without letting me know, they changed things up. Follow these new instructions.
Now, let’s move it to a directory where you can always use it from the terminal, regardless of which directory you’re in:
1
sudo cp ramfetch/ramfetch /usr/local/bin/
The next step is to make Ramfetch executable:
1
sudo chmod +x /usr/local/bin/ramfetch
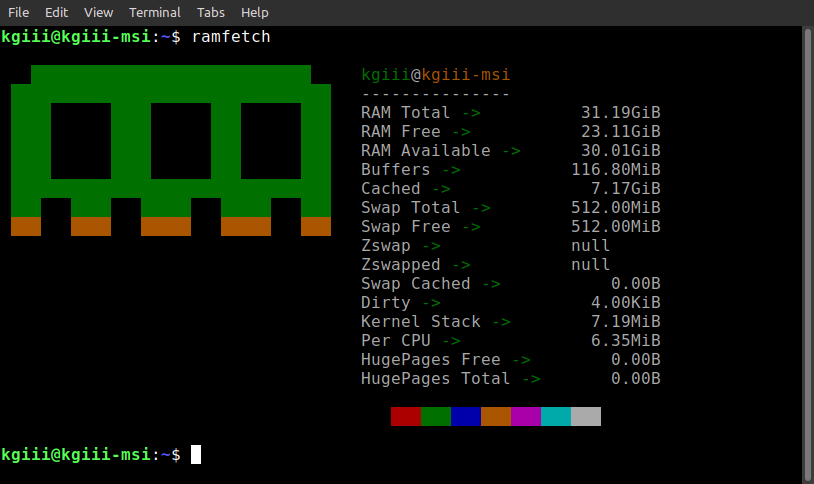
With that said and done, just execute the ‘ramfetch’ command to show RAM information with Ramfetch. It’s simply:
1
ramfetch
Your output might look a little something like this:
See? It gives you quite a bit of information about your RAM. Handy, huh?
There you have it. You can now show RAM information with Ramfetch! Pretty simple, huh? There’s no man page and the ramfetch --help command doesn’t really show you any other ways to run Ramfetch.
Here’s a better image, as supplied by the author of Ramfetch (o69mar):
It does indeed look better, so there’s that!
Closure:
There’s another article said and done. Welcome to the new year and I hope you had a safe New Year’s Eve this year. We start the new year off with a simple enough command, learning how to show RAM information with Ramfetch.
I’ve not missed a publication schedule yet, so we’ll see how much longer this can go on. (I’m sure I’ll miss a publication deadline at some point, but today is not that day. In fact, I wrote this days ahead of time!) So far, so good! I never thought it’d reach this level, by the way.
Thanks for reading! If you want to help, or if the site has helped you, you can donate, register to help, write an article, or buy inexpensive hosting to start your own site. If you scroll down, you can sign up for the newsletter, vote for the article, and comment.
If the title wasn’t enough, today’s article has us taking a look at the free command. Once again, this will be a nice and easy article. I wanted to write a witty title, but Google doesn’t like witty titles for stuff like this and Google has been mad at me for a couple of months! Either way, it’s a good time for an easy article.
If you’ve somehow never used the free command, you’re in luck! That’s what this article is going to be about! It should be relatively short, as there’s really only a few ways you’ll want to use the command.
What is the free command? Well, it’s an application that you run in the terminal (like oh so many of my articles) and it gives you some needed information about memory usage. It’s not fine-grained information, it’s about total usage.
You can get this information all sorts of ways. Both top and htop will happily spit this information out. There are any number of GUI ways to get this information, such as your task and process manager may have a tab to tell you about memory usage.
Us? No, we’ll be using the free command. The man page happily describes the free command as:
free – Display amount of free and used memory in the system
See? It’s another one of those terminal applications that does exactly what it says it’s going to do! Imagine that!
The Free Command:
This article requires an open terminal, like many other articles on this site. If you don’t know how to open the terminal, you can do so with your keyboard – just press CTRL + ALT + T and your default terminal should open.
You can just run the command with nothing else:
1
free
That’s the same as you’d get if you ran free -w, by the way.
You can pick the display units as flags. Just look into man free to learn how to do that, but the easiest output for most people to read will be to display the units in megabytes or in ‘human readable’ form. You do those with:
1
free -m
Or the human-readable format:
1
free -h
Or if you prefer base ten:
1
free --human --si
Next, as you can see there’s a swap and regular memory section. If you have swap enabled, you can get some small benefit from seeing the total memory used. To do that, try this:
1
free -t
Finally, you can run the command periodically and get a running output so that you can monitor memory usage over time. That one’s pretty simple. The -s means seconds, so the following will refresh every ten seconds:
1
free -s 10
There’s more that can be done with the free command, so be sure to run man free in the terminal. However, those are the most common ways I use the command, so it’s likely to be fairly similar usage needs for you.
Closure:
There you have it, we have an article about the free command. It’s a good way to monitor memory usage, unless you need something more fine grained. If you want, there are are tools for that – including top and htop. But, those are fine article ideas for another time.
Thanks for reading! If you want to help, or if the site has helped you, you can donate, register to help, write an article, or buy inexpensive hosting to start your own site. If you scroll down, you can sign up for the newsletter, vote for the article, and comment.
In today’s article, we’ll chec memory usage with the free command. We’ve touched on the ‘free’ command before, but this is a whole article about the free command. This should be a pretty quick and easy article, as it’s not a complex command.
And, in the discussions of those articles, we often refer to free -m as our go-to tool for quickly checking memory usage. It’s a handy tool used by most, and it’s a good tool to have in your toolbox. On top of that, it does a bit more than just check memory usage.
The free command has been around forever and describes itself like this:
Display amount of free and used memory in the system
Which is exactly what it does. It’s a pretty useful command if you want to see how much RAM you’re using, how much is free, how much is reserved for buffers, and even more if you’re interested in your swap stats.
So, folks are generally already familiar with the free command, but there are indeed more options and it’s worth an article to explain a few of those choices. Like always, you can also run man free to get a bunch of information that may not be included in this fairly brief article.
Check Memory Usage:
Yeah, this is yet another article that insists on the terminal. That’s not a bad thing, if you check the byline. The goal here at Linux-Tips is to get you more comfortable with Linux – and that includes getting comfortable in the terminal. So, open one up by pressing CTRL + ALT + T on your keyboard, and your default terminal should pop right up.
With that done, let’s go ahead and try the command that everyone uses:
1
free -m
The output from that will look a little something like this:
Those columns should be reasonably easy to understand. You can figure it out, I’m sure of it!
You can see by the column titles what the columns mean. Like I said, it’s relatively easy to understand – which is why it makes a pretty great tool. There’s actually a pretty good description of those terms, if you don’t already know them, in the man page.
But, you can use it in other ways. See, the -m stands for megabytes (obviously). Well, you can use other flags, like -b, -k, and -g. That’s bytes, kilobytes, and gigabytes – where the -m is megabytes as previously mentioned.
If you want a nice human-readable format, you can try this:
1
free -h
The output of that may vary the units but it will also show you which units are in use. It’s a pretty handy way to use the free command to check memory usage in Linux.
Sure, there’s a wide format and you can even use units as large as pebibytes. I don’t actually have anything where that’d make sense, but it’s an option if you happen to have such a system. (If you have access to a system with pebibytes of RAM, call me!)
But, did you know that you can run the command over and over again with just a single command? To do that, you use the -s flag followed by the number of seconds you want it to wait before refreshing. So, if you want it to run every 10 seconds, the command would look like this:
1
free -s 10
You can combine that with a count – like how many times you want it to run. So, something like this:
1
free -s 5 -c 3
That will run the free command (you could add other modifiers) every five seconds and will do so three times in a row.
There are other options, but those are the most common. You can have it output the low and high numbers (when run over a period of time), display column totals, and even opt for a wider display. Personally, I don’t really find those options all that interesting and don’t bother with them, but they’re a man page away from being a part of your toolbox.
Closure:
And there you have it, an article teaching you how to check memory usage with the free command. The free tool is a pretty handy tool and one everyone should be familiar with. If your system is slowing down, it’s nice to know things like how much RAM is being used. If you work in application development, it’s nice to know how much more RAM your application adds to the system. There are any number of reasons why you’d want this information.
Thanks for reading! If you want to help, or if the site has helped you, you can donate, register to help, write an article, or buy inexpensive hosting to start your own site. If you scroll down, you can sign up for the newsletter, vote for the article, and comment.