A Couple Of Ways To Monitor Swap Usage

Today’s article will be nice and easy, as we cover just a couple of ways to monitor swap usage. There are several ways to monitor swap usage, so we’ll just cover a couple of them. One of ’em is bound to work.

So, this only applies to those people who use swap. If you use the search feature, you’ll see that I’ve addressed this before and that I tend to use swap – because it’s more than just a place the kernel sticks stuff when you’ve run out of RAM.

swap is still used with plenty of RAM
See? The system happily uses swap with plenty of free rams.

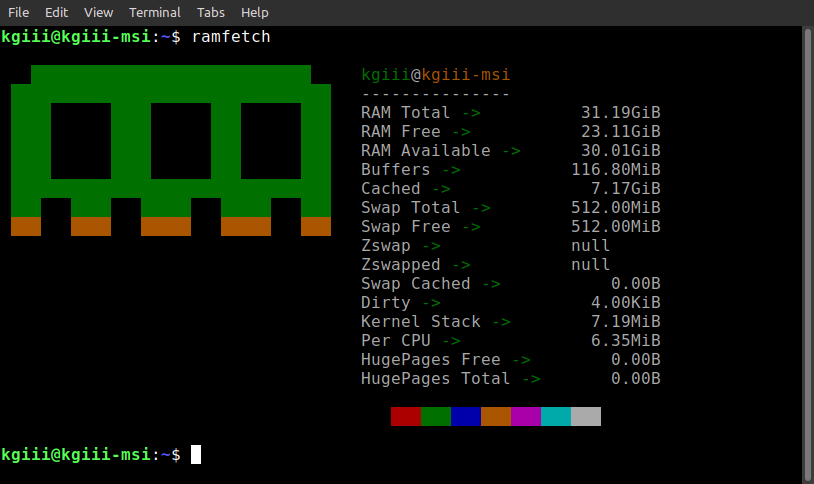
As you can see, on a system with plenty of RAM – and plenty of free RAM – the system still uses swap. I figure that the kernel is smarter than I am. You do you, but I will continue using swap.

But, enough about that. If you don’t use swap, just accept that this article isn’t meant for you and move along. Tomorrow’s article might just have something useful for you. You never know!

So then, I will assume readers know enough about what swap is and will have made their own choices. This article is for those who want to monitor swap usage.

Let’s Monitor Swap Usage:

You guessed it. You’re going to need an open terminal. So, open your favorite terminal emulator. If you don’t know how to open the terminal, you can do so with your keyboard – just press CTRL + ALT + T and your default terminal should open.

With your terminal now open, you can try the following command:
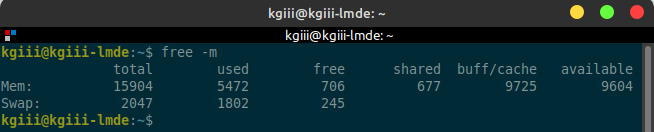
(You can just use ‘free‘ but the -m flag makes it easier to read. You can also use ‘free -h‘ if you prefer that output.)

That command should be fairly universal. You can also use the following command if you’d prefer. It’s just:

That command is pretty handy and pretty much is the same as you’d get if you just run’cat /proc/swaps‘ which is, I suppose, yet another way for you to monitor swap usage. Think of it as a bonus way to check swap usage. After all, you can’t have too many ways and one of ’em is bound to stick with you if you use it often enough.

Closure:

And there you have it. You have another article. This time, we’ve discussed how to monitor swap usage (in the terminal, of course). It’s a handy tool for those who do use swap (be it partition or swapfile). If you don’t use swap, you probably won’t get much use from this article. Maybe tomorrow will be more interesting for you?

Thanks for reading! If you want to help, or if the site has helped you, you can donate, register to help, write an article, or buy inexpensive hosting to start your site. If you scroll down, you can sign up for the newsletter, vote for the article, and comment.

Show RAM Information With Ramfetch

Today’s article is going to be an interesting one, an article where you learn how to show RAM information with Ramfetch. For many of you, I expect Ramfetch will be a completely new application, which is nice. However, this article should be simple enough for even a new user. Read on and learn more about your RAM!

By now, you’ve seen some of the following articles:

Neofetch
Screenfetch
CPUfetch

Well, this time around, we’re going to be using a similar application – but one meant specifically for RAM. The name of this application is ‘Ramfetch‘. Let’s just say the idea will be familiar, as you’re already aware of similar applications. At the end, you end up with a handy screen to screenshot to show your friend and family – or to learn from. Bragging rights is always a good reason!

So, then why would you want to do this? Well, Ramfetch gives you some good information about your RAM. It’ll do the basics, like show you what’s free, what’s available, and the total amount of RAM. But, it shows you quite a bit more than that, and it’s data worth looking at for those who want to know more about their RAM.

What we’ll be doing is cloning a git repository, moving a file, and changing the permissions to ensure it can be executed so that you can run the command from anywhere within the terminal.

You’ll need ‘git’ installed, and that should be installed by default in pretty much every major distro. If it’s not, check your package manager – or simply follow the URL in the article and perform the operations manually.

With all that said, let’s just jump into the article!

Show RAM Information With Ramfetch:

Of course, you’re going to need an open terminal. Ramfetch is a terminal-based tool. So, open your default terminal emulator. If you don’t know how to open the terminal, you can do so with your keyboard – just press CTRL + ALT + T and your default terminal should open.

UPDATE: Without letting me know, they changed things up. Follow these new instructions.

With your terminal open, let’s clone the project:

Now, let’s move it to a directory where you can always use it from the terminal, regardless of which directory you’re in:

The next step is to make Ramfetch executable:

With that said and done, just execute the ‘ramfetch’ command to show RAM information with Ramfetch. It’s simply:

Your output might look a little something like this:

ramfetch output
See? It gives you quite a bit of information about your RAM. Handy, huh?

There you have it. You can now show RAM information with Ramfetch! Pretty simple, huh? There’s no man page and the ramfetch --help command doesn’t really show you any other ways to run Ramfetch.

Here’s a better image, as supplied by the author of Ramfetch (o69mar):

Another Ramfetch image.
It does indeed look better, so there’s that!

Closure:

There’s another article said and done. Welcome to the new year and I hope you had a safe New Year’s Eve this year. We start the new year off with a simple enough command, learning how to show RAM information with Ramfetch.

I’ve not missed a publication schedule yet, so we’ll see how much longer this can go on. (I’m sure I’ll miss a publication deadline at some point, but today is not that day. In fact, I wrote this days ahead of time!) So far, so good! I never thought it’d reach this level, by the way.

Thanks for reading! If you want to help, or if the site has helped you, you can donate, register to help, write an article, or buy inexpensive hosting to start your own site. If you scroll down, you can sign up for the newsletter, vote for the article, and comment.

Check Memory Usage With ‘free’ In Linux

In today’s article, we’ll chec memory usage with the free command. We’ve touched on the ‘free’ command before, but this is a whole article about the free command. This should be a pretty quick and easy article, as it’s not a complex command.

There have been a few other articles about RAM.

How To: Find The RAM Total In The Terminal
Check Your Memory In The Terminal: Part II
Let’s Determine The Number of RAM Slots Without Opening The Case

And, in the discussions of those articles, we often refer to free -m as our go-to tool for quickly checking memory usage. It’s a handy tool used by most, and it’s a good tool to have in your toolbox. On top of that, it does a bit more than just check memory usage.

The free command has been around forever and describes itself like this:

Display amount of free and used memory in the system

Which is exactly what it does. It’s a pretty useful command if you want to see how much RAM you’re using, how much is free, how much is reserved for buffers, and even more if you’re interested in your swap stats.

So, folks are generally already familiar with the free command, but there are indeed more options and it’s worth an article to explain a few of those choices. Like always, you can also run man free to get a bunch of information that may not be included in this fairly brief article.

Check Memory Usage:

Yeah, this is yet another article that insists on the terminal. That’s not a bad thing, if you check the byline. The goal here at Linux-Tips is to get you more comfortable with Linux – and that includes getting comfortable in the terminal. So, open one up by pressing CTRL + ALT + T on your keyboard, and your default terminal should pop right up.

With that done, let’s go ahead and try the command that everyone uses:

The output from that will look a little something like this:

output from free -m
Those columns should be reasonably easy to understand. You can figure it out, I’m sure of it!

You can see by the column titles what the columns mean. Like I said, it’s relatively easy to understand – which is why it makes a pretty great tool. There’s actually a pretty good description of those terms, if you don’t already know them, in the man page.

But, you can use it in other ways. See, the -m stands for megabytes (obviously). Well, you can use other flags, like -b, -k, and -g. That’s bytes, kilobytes, and gigabytes – where the -m is megabytes as previously mentioned.

If you want a nice human-readable format, you can try this:

The output of that may vary the units but it will also show you which units are in use. It’s a pretty handy way to use the free command to check memory usage in Linux.

Sure, there’s a wide format and you can even use units as large as pebibytes. I don’t actually have anything where that’d make sense, but it’s an option if you happen to have such a system. (If you have access to a system with pebibytes of RAM, call me!)

But, did you know that you can run the command over and over again with just a single command? To do that, you use the -s flag followed by the number of seconds you want it to wait before refreshing. So, if you want it to run every 10 seconds, the command would look like this:

You can combine that with a count – like how many times you want it to run. So, something like this:

That will run the free command (you could add other modifiers) every five seconds and will do so three times in a row.

There are other options, but those are the most common. You can have it output the low and high numbers (when run over a period of time), display column totals, and even opt for a wider display. Personally, I don’t really find those options all that interesting and don’t bother with them, but they’re a man page away from being a part of your toolbox.

Closure:

And there you have it, an article teaching you how to check memory usage with the free command. The free tool is a pretty handy tool and one everyone should be familiar with. If your system is slowing down, it’s nice to know things like how much RAM is being used. If you work in application development, it’s nice to know how much more RAM your application adds to the system. There are any number of reasons why you’d want this information.

Thanks for reading! If you want to help, or if the site has helped you, you can donate, register to help, write an article, or buy inexpensive hosting to start your own site. If you scroll down, you can sign up for the newsletter, vote for the article, and comment.

Check Your Memory In The Terminal: Part II

Today’s article is all about how you can check your memory in the terminal. If it looks familiar, it’s because I’ve already written “How To: Find The RAM Total In The Terminal“, which covered a couple of ways to check your RAM – all of which were in the terminal. I left the article open for others to share how they check their memory, but nobody left any comments.

In the previous article, I invited people to comment and share other ways to check RAM, RAM total, RAM usage, etc… Seeing as nobody commented, I figured I might as well return to the previous article and throw in a couple more ways to do check your memory in the terminal.

The previous article includes some handy tools, such as the easiest way:

While also mentioning a much more extensive and informative tool:

Both of which are lovely ways to check your memory in the terminal.

This being Linux, there’s also other ways.

Me being me, I figure I might as well share them with you.

After all, it’s yet another article that I can write! So, as unoriginal as this article may sound, there’s also a couple of tools I really want to introduce you to. 

There’s always room for more tools, especially if they’ll help you…

Check Your Memory (in the terminal):

As the line above indicates, you’re going to need an open terminal to do the work in this article. You can open it from your start menu, or you can just press CTRL + ALT + T and your default terminal should open right up.

The first tool we’re going to use is ‘top‘. I think you’ll find top installed on pretty much everything, though some distros are including variants like htop. The venerable top application is a terminal-based task manager and has been with us since 1984.

Anyhow, the command is nice and simple. Just run ‘top’ in the terminal:

The output will look something like this:

using top tto find your memory information
Look up near the top, above the fold, you’ll see the memory information. Pretty easy, isn’t it?

The last two lines of data, above the list of tasks, tell you all you need to know (unless you need a ton of details, I suppose) about your RAM, your RAM usage, what’s buffered, etc… It also tells you about swap, another facet of memory. 

Next we have a lovely command called ‘vmstat‘ a tool for showing virtual memory statistics. This lovely tool has been around since 1985 and has a ton of options. It’s an excellent tool and you’re highly encouraged to use the man vmstat command.

We actually don’t need all those lovely options for this. We don’t have to dig down very far to get the information you need. In fact, once again, you’re going to run the command without a single flag, like so:

The outcome of which is also self-explanatory. It looks like:

vmstat showing information, including ram information.
Look under the line clearly marked memory. See? There it is! There’s the memory info!

Just look under where it’s clearly marked ‘memory’ and you’ll see that you can use this to check your memory. It’s a bit more cryptic as it doesn’t directly show the total – but it does show you the information that’s actually important.

The total doesn’t matter. What really matters is how much RAM you’re using and how much RAM you have free. But, vmstat being vmstat, it will of course give you that information if you want it. If you do want that additional information, just use the --stats flag – like this:

Where you can see an output similar to this;

use the --stats flag to get a ton of memory information about your memory.
It contains not just that, but all sorts of information about your memory!

Pretty sweet, huh?

Closure:

There you have it, a follow-up article that tells you how to check your memory. After all, nobody wanted to add them as comments! Either way, you got to play with a couple of new tools, or at least tools not really mentioned here on this site.

Speaking of the site, the end of my year long project is in less than 2 months. That’s right, I’ve kept this up for this entire time, with a few guest articles in between. I’ll do a meta article, but I have to say that this has been a pretty fun (and educational) project. Maybe we’ll keep it rolling? It seems likely that I will. I quite like writing these things.

Thanks for reading! If you want to help, or if the site has helped you, you can donate, register to help, write an article, or buy inexpensive hosting to start your own site. If you scroll down, you can sign up for the newsletter, vote for the article, and comment.

Let’s Determine The Number of RAM Slots Without Opening The Case

Today’s article is going to show you how to determine the number of RAM slots without actually opening up your case. It’s actually a pretty easy task, consisting of just a single command. 

But, wait! There’s more! You may want to know than how many RAM slots you have, you may want to know a lot more about the RAM you have already installed, how many slots are filled, if your RAM has ECC (error correction), the speed, the quantity of RAM per stick, etc…

Well, you can do all that and you can do it all with just a single command. The command in question is dmidecode. While dmidecode isn’t guaranteed to be 100% accurate, it’s usually pretty close. It pulls its data from tables in the DMI (SMBIOS) and presents them to you. Hardware manufacturers aren’t always as nice to Linux users as they could be, so there’s some risk of bad information – or wrongly interpreted information.

While dmidecode has partially been covered previously, it defines itself as:

dmidecode – DMI table decoder

And dmidecode is a pretty handy tool. In a previous article we used it with some success, and we’ll be using it again today, this time to determine the number of RAM slots available to you. On a scale of 1 to 10, I’d say this is a solid 2 – meaning even a rank beginner can follow along.

Determine The Number of RAM Slots:

This article requires an open terminal. If you don’t know how to open the terminal, you can do so with your keyboard – just press CTRL + ALT + T and your default terminal should open.

With your terminal open, enter the following command:

The line that is important is, “Number of Devices”. On my laptop, the output looks like this:

using dmidecode to determine the number of RAM slots available
The answer is two. Two slots. Ah ah ah ah! Oh how I love to count things!

So, from that, we can determine the number of RAM slots is equal to two. If you want, you can then scroll down and it will show you what RAM is installed. You can see if you have the same number of devices as you have slots. You can even see the size, number of slots, location, vendor. You can use it to learn a great deal about your RAM. 

As I mentioned above, it’s not necessarily going to be 100% accurate. With bleeding edge of hardware, you’ll find it may be less accurate. If your hardware has been around for a bit, you can be pretty sure of the accuracy.

One of the things I notice is the “Maximum Capacity”. That may mean OEM suggested max capacity. I’ve sure seen more RAM than the claimed maximum. On the system, I see a max capacity of 8 GB of RAM. The box has 16 GB of RAM. I’ve seen it claim a maximum of 4 GB of RAM but had 16 GB of RAM in that box. 

Otherwise, it is usually pretty accurate. In the above, I suspect some OEMs are less than honest and would rather you not know that you can add as much RAM as you can. They’d rather you buy a more expensive device, so report the maximum RAM as less than it really supports. However, that’s just a guess and I have zero evidence to support it. It does seem pretty common, however.

Closure:

And there you have it, another article said and done. This one will help you determine the number of RAM slots that you have available. It’s a pretty easy article and a good tool to have in your toolbox. 

As you may have surmised, the antibiotics are kicking in. I’m feeling quite a bit better. Hopefully the articles reflect that. For the past few, I’ve kinda been phoning it in. My goal is to get ahead again. I can probably do that over the coming weekend. 

… Also, anyone reading this out of sequence probably has no idea what half of these closure comments are about. Then again, how many of those folks keep reading after the important bits? Probably not a whole lot. I could write darned near gibberish down here and nobody would be the wiser.

Thanks for reading! If you want to help, or if the site has helped you, you can donate, register to help, write an article, or buy inexpensive hosting to start your own site. If you scroll down, you can sign up for the newsletter, vote for the article, and comment.

Subscribe To Our Newsletter
Get notified when new articles are published! It's free and I won't send you any spam.
Linux Tips
Creative Commons License
This work is licensed under a Creative Commons Attribution 4.0 International License.